
If you have decided to make the installation of interroom door structures in your apartment (or home), then installing loops on the door will be a question relevant. Indeed, for most people, such a stage of work becomes an insurmountable problem in the way of implementing the tasks. How to perform work on installing door canopies you will find out here.
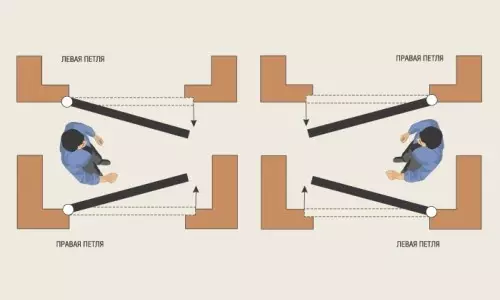
Scheme for determining the choice of loops.
Most often, construction stores are offered to purchase door interior designs without loops. They must be purchased separately, although it should be known which door will presumably be mounted and what is its size.
What are the door loops?
Three types of door loops distinguish:
- left;
- rights;
- Universal.
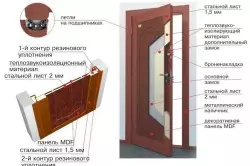
Door device.
In order to determine the necessary disaster loop option, you need to carry out the following manipulations:
- Go to the doorway, where the interroom will be mounted.
- Stand you need from the other side where the door will be opened by the movement. Most people are mistaken, become on the side where the door opens away from themselves. Do not do so. After all, you will get as a result of the wrong loop.
- Mentally open the door to yourself. If this happens on the right side, then the loop is worth buying the right. If in the left, then, respectively, the type of loops left. It's all very simple and elementary. Do not only be confused.
List of necessary tools
- chisel;
- a hammer;
- screwdriver.
Metal door loop diagram.
These are the most important tools, without which it is impossible to do during the process of installing the loop on the door. But, of course, it would be well also to prepare additional tools, namely:
- drill;
- Thin drills;
- screwdriver;
- cutter;
- awl.
The presence of such auxiliary inventory will greatly facilitate your work.
How to perform work on installing loops?
The principal difference, where, first of all, it is better to cut a loop, in the door frame or in the design of the door itself, no. Although the installation process is recommended to start with the door when it is made of a wood array and has small knots.Article on the topic: Loggian glazing technology: Selection of glazing, installation steps
To begin with, it is necessary to determine the place where the loops will be attached. And only then we accept the optimal solution to find a plot on the door where the loops will be located in the box.
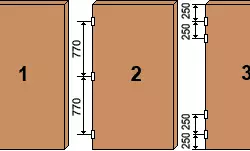
Experts recommend to retreat from the edge of the door design 15-25 cm - it will be the place of the first insert. It costs special attention to how the loops are embedded on the other doors in the house, especially if they are located near, so that there are no big differences. The perfect option is 20 cm from the edge of the door. If it turns out that there is a bitch in this place, then it is better to retreat a little. After all, strict regulations in the process of performing such works are not, and therefore it can be easily changed the distance of the insertion.
To begin with, it is recommended to perform measurements on the upper and lower edges of the door design. At the same time, the chalk or pencil is worth leaving the mark. Carefully trace where the top and bottom of the interior design, which you decide to install yourself, and which side is glass, if it is present on the door.
Each separate loop in the process of marking should be applied in such a way that its hinges come out from the front side of the door.
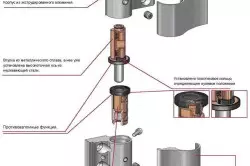
Scheme of the device of the screw loop.
In this case, the person is considered to be the party where the whole design will be opened. Marking the loop is recommended in two ways.
In the first case, you must apply a loop exactly in the selected location, and then put it with an ideally sharpened pencil. In this case, the edges of the loop and the door design are necessarily located exactly and parallel to each other.
In the second case, it is necessary to screw the loop with the help of screws, and then cutter the contour or a conventional pencil to read the marks. At the same time, it is sufficient to spin only two screws. But it is worth understanding that in this case the loop can take a little to the side, so it is necessary to be extremely neat and most accurate that the door then stood as Kosos.
Subtlety of the process
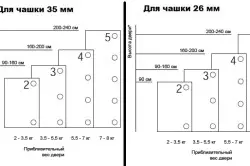
Options for the size of door loops.
Article on the topic: 3d wallpaper for kitchen
Screw the screw is recommended to do exactly in the center. And for this it is better to pre-mark with a pencil and sewn. After all, it is possible to avoid retracting the loops in the tightening process. After the markup is done, it is worth cutting out the contour to the thickness of the loop used. And only then proceed to get a smooth area of the chisel.
If desired, the contour can be pierced with the use of the chisel. To do this, it is recommended to put a tool into the required place and light blows on it hammer to knock out the contour. A special attention should be paid to the fact that for the purchase of the door structure, the outline is most often in the process of incorrect use of the chisin, the plane of the door.
And according to the rules, the chisel should be located so that this outline goes inside. This part will continue to get out to get the most even and beautiful land from the loop.
Right embedded loops on the door must be placed at one level. In the case when you observe a small filling of a separate piece of the loop, you need to deepen the entire surface of the site. It is important not to rearrange, since the deepening should be uniform. And to verify how much it turned out to be independently installing the loop on the door, very simple.
To do this, you will need to take a ruler and attach it to the surface of the loop. If it turns out that the loop is somewhat performing, then you will further form a huge gap between the interior design and the door frame, and on another edge the door may not close. While the deep loop will lead to a huge pressure on the door frame and further pulling the loops.
In order to eliminate the resulting consequences, it is recommended for the first case to reveal the loop and deeper sitting it. And for the second - calculate the necessary height of the gasket for lifting the loop to the desired level. This gasket is most often done from rigid cardboard, but you can perform it from other materials that you have. To lay such a gasket must be directly under the loop. In this case, no fixation is not necessary, twisted on top of the loop will already hold it tightly.
Article on the topic: Why do you need a construction grater. Varieties of material
How can you just choose a place to embed a loop?
Options for installing a different number of loops.
First you need to build the door frame. Then it is worth putting the door to the previously assembled box. Back on top of 2-3 mm and leave a small gap. And only then mark the markup already on the embedded platform of the necessary places on the box. In the case when you initially made the liner in the box, make the marks directly on the surface of the door design.
Now you know how it is well known how to make the insertion of the locked loop. Next, it is recommended to make the applying of your loop to the door surface, its further marking is sewed and driving a thin drill. After that, you need to take screws and screw them with an ordinary screwdriver. If you are constantly changing doubt about the quality of work done, then twist only two screws and see the result.
Butterfly loops - comfortable and easy!
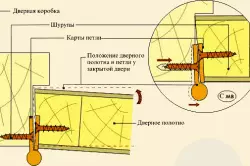
Installation scheme of door loops.
There are special loops without cutting, which are as quickly and simply mounted on the interroom door design. A distinctive feature of such elements is that they are installed without the use of the chisels and grooves.
They just need to be placed and attached directly to the surface of the door and door box. The design of such loops implies the entrance of the elements to each other, and this eliminates unnecessary troubles by preliminary preparation of the door interroom and the door frame to the crossbind of the loops.
After all, not every owner has the necessary skills to work with a tree, as well as special tools.
Door adjustment
It is worth paying particular attention to the fact that the adjustment process is performed in stages.
- Adjusting the door leaf with the opposite for the loop side.
- Then it is worth checking how parallel to the door flaps and boxes are located.
- To begin, adjust the vertical position of the door design from the loop side.
- And only then you can start adjusting the gaps between the design of the door and the box.
- The final is considered to be adjusting the gaps from the key side.
Now you are well known all the recommendations of specialists in installing loops on interroom doors, and the work will be performed on excellent.