
During the construction of private houses, the roof most often makes a batch. There are reasons for it. The first is reliable. Well copes with wind and snow loads. The second is compatible with any roofing coating. The third is relatively inexpensive. The fourth is a simple design that is difficult to spoil. Fifth - it looks attractively. All this, and even the fact that the two-tie roof is built with their own hands without the presence of special knowledge, determines its popularity.
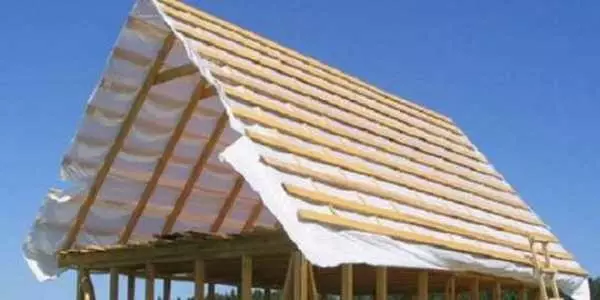
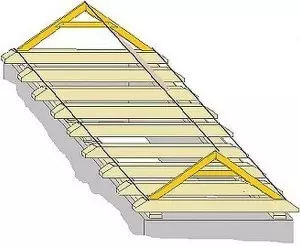
The collected two-sheet roof is ready for the installation of roofing
Step-by-step installation of a two-sheet roof
As you saw above, there are a lot of rafter systems. Accordingly, when assembling each there is its own characteristics, but generally the same order. It must be said about the overall step: pre-drying and wood processing. This stage is required if you bought fresh sawn timber, and not dried.
Use during the construction of the roof of the crude wood of natural humidity will lead to problems: the beams will run, they will move, geometry will change. All this will lead to the occurrence of stress points and with the slightest signs of overload (a lot of snow, strong wind or rain) will begin negative processes. Their elimination is a complex and expensive event. Therefore, or buy dry wood (no more than 20%, ideally for chamber drying 8-12%), or buy material in a couple of months, fold into the ventilated stacks. After you treat the necessary impregnations (from damage to fungi and to reduce flammability) and only then use the mounting system in the installation.

Timber need to dry in ventilated stacks. To do this, they are paved with short cuts of boards. They are put in the meter from the edges and then through the meter. Under the bottom install sure
About the main assembly stages, about how to make a two-tie roof, we will tell you in this section.
Mauerlat.
The assembly of the rapid system of the two-tie roof from the installation of Mauerlat is beginning. It must be set strictly horizontally, because before starting the installation, the horizontal of the wall is carefully checked, to which it is attached, if necessary, it is aligned with cement mortar. You can continue to work after the solution will drop 50% strength.
Depending on the system, it is a sequence of 150 * 150 mm or a board with dimensions of 50 * 150 mm. It is attached to the top row of the wall masonry. If the house is wooden, its role performs the upper crown. If the walls are composed of light construction blocks - Penbeton or aerated concrete and others - their stiffness is not enough to redistribute the load. In this case, on top of the last row of masonry make a reinforced concrete belt, which inserts a fixed fastener - wire or studs. On them then the timber or board is satisfied.
Article on the topic: Fire safety in the house
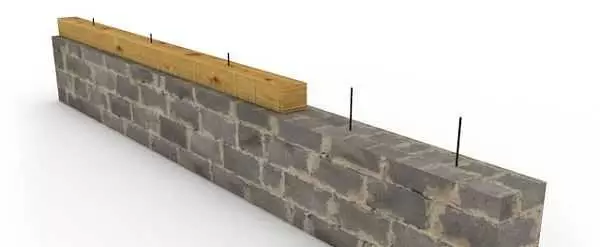
Mounting Mauerlat on Studs
Wall ligament methods and Mauerlata several:
- In the masonry (in reinforced concrete), a smooth rolling wire of a large diameter is fixed (two end stick up). The board is then done in the necessary places of the hole in which the wire is doing. It then twists and bend.
- In the wall, the studs are closed with not less than 12 mm diameter. Under them in Mauerlat, the holes are placed on the board / board) and tighten with nuts with wide washers.
- Aligning the timber or the board along the outer or inner edge of the wall, take the drill with a diameter of 12 mm make holes for anchor bolts. Their (of the same diameter is 12 mm) clog over the hat, then tighten the key.
The distance between the studs (wire) should not be more than 120 cm. On the wall (belt) under Mauerlat, cut-off waterproofing is necessarily placed. This may be in two layers of rolled backrueroid or hydroisol, you can lift with bitumen mastic.
Installing timing
The types of rafting systems of the duct roof are not one dozen. First of all, you need to choose how your it will look. Further, in order to work it was easier, made of thin boards template for all cars, wrinkles and other similar details. To do this, you may need to assemble the first shape on the roof, and then ready to make templates.
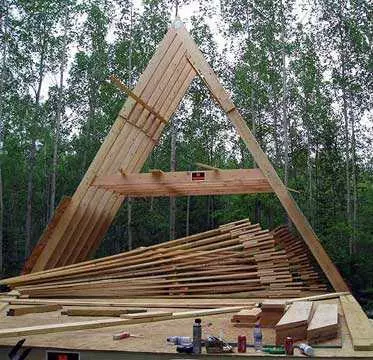
Collect ready-made farms and then raise the roof
The order of assembly depends on the type of the rafter system. If the rainstream changes, they are installed gradually, collecting from the elements right on the roof. In this case, it is convenient if the beams of the ceiling overlapping beams and, if possible, the attic or attic or attic.
In systems with hanging rafters on Earth, a farm is going - a finished triangle of tightening and rafting legs with all the desired pins, racks. The required number of farms is collected immediately. Then they raise them on the roof, they exhibit vertically and attached to Mauerlat.
On the one hand, it is convenient - on Earth it is easier to work, with high assembly speed accuracy high: one farm is not much different from another, which simplifies the procedure. But raising ready-made farms is difficult, especially for large buildings. To make it easier to do, set two inclined boards, which one end rests in the ground, and the second one sticks out a little over the wall. Farms are brings closer to this "lift", one is installed at the bottom, tie the ropes and tighten on the roof boards. In the absence of a winch or crane, this is the most acceptable method.
Article on the topic: How exactly fill the floor with concrete in the house or apartment yourself (video)
The assembly of the rafter requires certain knowledge: as in what order to mount them, how to place and make a shot. Assembly of one of the schemes with a grandmother, see the video.
The procedure for assembling a rafter system
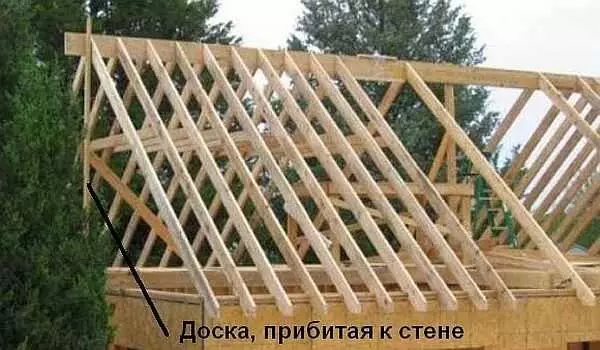
- Exhibited an extreme farm formation. They are aligned and secured by temporary stops. You can also need a temporary fastening, nailed to the wall of the house: nourish a board that sticks out over the walls. You can smooth the first farm on it (unless of course the wall is smooth). Sided on the other side by temporary struts, it is not going anywhere.
How to put a rafter system
- Next, twine is stretched between the installed extreme farms. It takes place at the level of the skate and on both sides below - at the end of the terminal legs. Stretched twine is checked on horizontal - apply a good construction level. If there are deviations, and farms are exhibited strictly vertically, you will have to direct the rafter legs on one of them. Sometimes when deviating at the skate cord is trying to adjust the deviation tilting the farm. But it is impossible to do this: "I swallow" the whole system.
Between the exposed extreme farms, the twine is tensioned to verify the correctness of the geometry
- The exposed extreme farms are fixed to Mauerlat. Molding methods depend on the type of the selected system and can be sliding or not. Types of rafter systems of dual-tone roofs and attachment nodes of the rafter feet to Mauerlat and the skate bruus Scheduled in this article.
- The following farms are put, focusing on stretched twine. It is more convenient to post on the Mauerlate the desired setting step of the rafter, check whether the markup is true and only then begin to the rise and arrangement of farms. So that in the construction process does not knock down the installed rafters, they are attached to one to other temporary beams, put struts and covers. They are filmed after the lamp is stuffed.
- The displayed rafter system is covered with a layer of waterproofing membrane, on top of which the lamp is stuffed. The membrane on insulated roofs according to the latest technologies is obligatory, otherwise the insulation will mock, which will lead to its inefficiency (simply discarded the money). If the roof is cold, you can do without waterproofing.
All, the duct roof is collected and ready for the installation of roofing material.
The installation process of the rafter causes enough questions, but it is impossible to tell a lot of ways. Look one of them in the video. The system is large and climbed onto the roof of parts, and there already gathered in a single design. For large houses it is convenient.
Features of the installation of a rapid system of a wooden house
The difference between wooden houses is that the log house gives a shrinkage, and this leads to a change in the geometry of the rafting system. If the elements fasten hard, the roof can fall apart. Therefore, fasteners make floating. There are special sliding fastenings, which in this case fasten rafters to the upper crown and to run, if there are such (see photo).
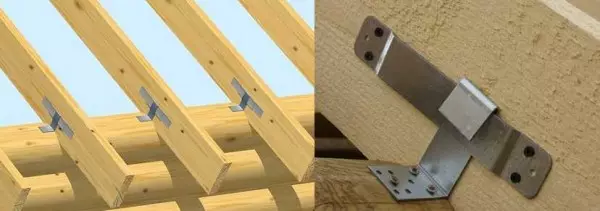
Method for fastening the rafter system of the bang house
To raftered freely moved during shrinkage, its long part is fixed strictly parallel to its edge, it is strictly perpendicular to the head. If necessary, the site is cut into it. Place the mount so that the hook is in the extreme lower position or near it. Fasten on special self-tapping screws that come in the kit (usual are not suitable). If the installation is made on the log so that the rafter foot slip over it, the semicircular opening is cut into the lower part, to which it will rely on.
Such fasteners are sold on any construction market, it is called "Sliding". How to mount a slid to the bruus look in the video.
Video on the assembly and installation of a rafter system of duplex roofs
A two-tight roof is built with her own hands: a lot of subtleties and nuances, there are different methods for fastening, extension. To describe in words, their dealer is ungrateful. This is the case when it is better to see. Below you offer a selection of video that you can be useful.Video report on how the two-tie roof is made
Story of the owner of the house about the stages of construction. There are interesting technical moments that can be useful.
Two types of connecting rafters: hard and sliding
Video about the two most problematic types of connections.How to determine the angle of inclination rafters
Full Video System Assembly Video Report
This film takes a little less than an hour, but the process is demonstrated from the beginning and to the end with many details. The roof is put on the frame house, but when installing on the buildings of another type (except for wooden houses) there is no difference.
Article on the topic: Modern wallpapers: Room design, photo 2019, ideas for the house, interior stylish, how to punish an apartment, views, two colors in the kitchen, video