
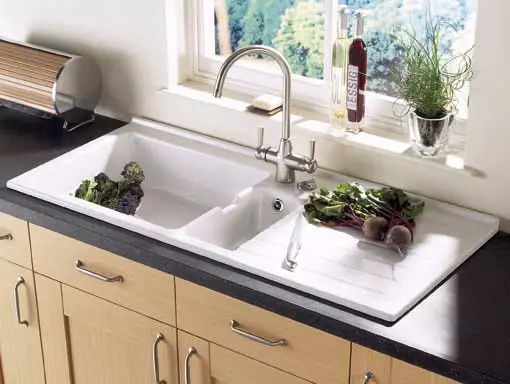
In our life, everything flows, everything changes, a new one comes to replace the old one. May require replacement and old sink in the kitchen or in the bathroom. In any residential room, it is one of the main and indispensable elements of plumbing.
Integrated sinks in the working surface of the table with an attachment that is included in the kit.
Installing a new shell in the kitchen or bathroom can be done with your own hands.
This is not necessary to have special training. How to attach shell to the wall? First you need to decide on the choice of this product.
Selection of the model of the shell
Start recommended with a hike shopping in order to choose this very necessary plumbing equipment. There are a lot of models of this product. All of them are distinguished by the form, sizes and ways of fastening. The sink and washbasin can be mounted on the wall, install on the pedestal or in the worktop. Each methods have its advantages and disadvantages.
Fastening to the wall leaves a lot of free space under the washbasin. It makes it easier to clean, you can install various items below. The product must be attached to the holes in the back of the screws from the fastener kit. In the future, the mixer and siphon are installed on the sink.
The washbasin with a pedestal used to be a tulip sink. This design allows you to hide inside inside the pedestal, tap tubes and hoses. This gives the room a more attractive view.
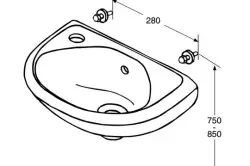
An example of the sink fastening scheme to the wall.
The pedestal makes it possible to install a more massive, beautiful and functional shell. To the wall of the tulip sink is mounted with stiletto dowels. They are equipped with plastic protective washers. Mounted such washbasins can be installed both in the bathroom and in the kitchen.
In the bathroom of the medium size, many prefer to install a washbasin with a tabletop. It may be a mortise, overlaid, embedded sink or monoblock. All of them give special comfort to the bathroom. The main difference of such a device from the tulip is that it often does not have holes for the mixer. Therefore, when conducting pipes of water supply, their conclusions make them so that the mixer can be attached directly to them without using flexible hoses.
Article on the topic: Butterflies for curtains do it yourself: Production options
Tools for work
To install plumbing, depending on its type, you may need:- construction level;
- perforator with drills;
- Dowel;
- self-tapping screw;
- pencil (marker, marker);
- screwdriver or screwdriver;
- wrench or adjustable key;
- sink;
- set of fasteners;
- line (preferably meter);
- a hammer;
- Silicone sealant.
The order of the installation of the shell
Perform work on the installation of the sink with the mounting to the wall in the following order:
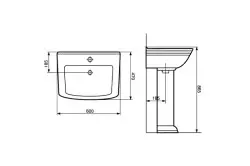
Scheme installation scheme with pedestal.
- Select the installation site of the product. It is recommended to install a washbasin at an altitude of 75-85 cm, counting from the floor. In some cases, the height can be changed in one direction or another to create ease of use for non-standard growth.
- Using the level to spend a horizontal line at the height of the product installation.
- Thread the thickness of the walls of the sink, which it will rely on the mounting brackets. To postpone this size down from the previously conducted line.
- Find the middle of the back wall of the washbasin. Mark this point on the wall.
- Thunderstand the distance from the middle of the rear wall to the brackets.
- Applied brackets to the bottom line at a distance equal to the previous measurement, through the fastening holes with a pencil make labels on the wall.
- Drill the holes in the wall of the labels, set the dowels in them and secure the brackets.
- Install the shell on the brackets. Through the holes in the back of it, make markers.
- Sink remove, drill holes, install dowels.
- To put everything in place and finally fasten with the help of fasteners from the kit.
- Install the siphon and connect the system to sewage.
- Gasons between the sink and the wall to handle the sealant.
Fastening such a product to the wall is made using brackets. Included they are not. When choosing, it is recommended to stop on the bracket-kosynke of the desired length.
Sometimes, together with the sink, it is necessary to install in the bathroom or in the kitchen pedestal or end. In this case, it is not necessary to place the height of the installation of the shell. This size is dictated by the height of the pedestal or the couch.
Drawing of the installation of the shell
The installation of the shell on the pedestal is performed in the following order:
- The shell without fittings is installed on the pedestal and moves to the wall, where it will be;
- marker marked vehicles drilling places;
- Sink and pedestal are cleaned, holes are drilled. The depth and diameter of them must correspond to the length and diameter of the dowels from the fastener set;
- The dowels are installed in the holes, the studs are screwed into them.
Article on the topic: Electricity for curtains: species, characteristics and features
For fastening the mixer to the sink, it is necessary:
- assemble the mixer according to the instructions for it;
- Install it in a special hole on the sink;
- firmly fix the mixer on the body of the product;
- Check the symmetry of the installation of the mixer on the sink relative to its center.
Connecting the mixer to the water supply system:
- Flexible hoses for water supply are fixed on the mixer. They must have a metal braid and rubber cuffs on the tips. When they are installed, it is impossible to apply great efforts.
- Hoses are pulled through the sealing ring and the hole of the sink.
- The mixer is attached to the product using spring washers and nuts.
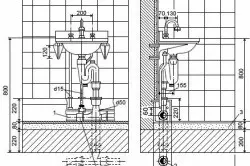
- In the hole for the drain of the water, a release from the siphon kit is installed. It is attached with a screw or nut. It depends on the design. 2 gaskets are installed between the release and sink.
- The siphon itself is attached to release, to which the pipe plastic diameter of 32-40 mm is attached to connect to sewage. It can be replaced by its corrugated hose of the same diameter.
- The sink with a pedestal is shifted to the wall and nuts with protective washers fixed on it.
- Flexible hoses are connected to the water pipe, the tap tube is to sewage.
Siphon scheme.
Connecting sink to sewage:
- Collect siphon according to the instructions.
- Fasten it in the drain hole of the shell, paying particular attention to the correct location of the rubber pads.
- Siphon hose attach to the sewage pipe.
- Test the collected design on the water leakage. To do this, the cranes are open and allowed water with different pressure. If water drops appeared, nuts should be tightened.
A sink was usually installed in the worktop. Installation of the product in the worktop is performed after measuring washing and locker. Most sink-washes are sold with a template for which a hole for installing a washing is placed and cut. If there is no template in the kit, then they come in this way:
- A piece of tight paper is folded on the table or on another flat surface.
- The product is put on paper upside down and pencil or felt-tip pen outline its contour. The line retreats to the distance equal to the size of the side. Cut the template.
Preparation of recess in the tabletop requires great accuracy and high accuracy. From the edges of the countertop you need to leave the distance about 5 cm. The template is applied to the surface and outlines a pencil. The resulting circuit of the drill is drilled by several holes. If the product is rectangular, it is enough to drill holes at the corners of the contour. The blade of the jigsaw is inserted into the hole and do the contour. The edges of the filled removal are cleaned with a skin and treated with waterproofing composition.
Article on the topic: how to make a cutter for plastics from a hacksaw blade
The mounting of the sink washing to the table top is made by applying the silicone sealant. After that, it remains to install a siphon and a mixer, connect water. Some models of miles can additionally be attached to the tabletop with special clamps using wrench and screwdrivers. In the bathroom, such sink sinks usually do not apply.
Fastening to plasterboard
In many apartments, the walls are lined with various materials. Gypsumboard is often used as a facing material. If the plasterboard was mounted when finishing the wall without a frame, then special difficulties in the plumbing will not follow. Most often, plasterboard mounted on the crate. In this case, empty space remains between the wall and facing. Fasten the sink to such a wall is not very simple. The best way out - when installing the crate under plasterboard in the right places, pave wooden bars and a double layer of facing material. You can mount the sink or washbasin to these bars. In the places of fastening of the sink and other plasterboard items, it is better to replace it with an analogue - glass-magny sheet. A random fiberglass leaf, which has the name of Chinese plasterboard, is also suitable.
If the plasterboard is already installed, then there is such a way out:
- Using a magnet suspended on a solid thread, you need to find the location of the metal elements of the crate;
- In these places, screws are screwed for fastening the sink.
But this method is not always applicable.
There are special fasteners for drywall. The most common - SA-U3, the "Butterfly" fastening and a dowel-nail "Snail". If the plasterboard on the wall has a thickness of 12 and more mm, then this fastener will be combined for fastening the sink to the wall.
The question of how to attach the sink to the wall, was not very difficult. Installing the sink of any type with your own hands is quite performed by the task. In some skills in elementary instruments, any man will cope with this work.