
Table of contents: [Hide]
- How to make a canopy yourself?
- For a long forgotten pylon
By the birth of a child, all parents are preparing in advance - make repairs, buy a crib, bedding, etc. Each young mother wants her baby to grow in a beautiful setting. Therefore, the interior of the baby's room is carefully thought out - from the drawing on the fabric for the curtains to the patterns on the walls. The question is how to decorate a cot, interests many moms. As such a decoration can be a canopy or a sorption.

The approximate scheme of sides, calculated on a cot with a sleeping place 120x60cm.
How to make a canopy yourself?
Baldahin over the cradle is not only beautiful. It is also protection against bright light, from flies and mosquitoes. It is absolutely necessary to buy it in the store, you can sew yourself. To do this, you will need fabric, finishing tape, scissors, needles and sewing machine. Still need a canopy holder, hook and cord. The holder can be made of durable wire or use the hoop.
The amount of tissue required depends on the height of the canopy and the fastening site - the ceiling or the back of the cradle.
The fabric is chosen by natural, light, light tones.
A natural chiffon, tulle or thin sitherium suitable for the Balladakhina of a baby cot. With the ceiling mount, it will take 4 m material with a width of 1.5 m. How the finish looks good atlantic tape. It will be required 7 m.
The fabric is cut into two canvases with a size of 1.5 m x 2 m. Clamps together with the front side inside and compassioned in length 2 m, the seam smoothes.
It turned out a rectangle with a length of 3 m and a width of 2 m. The height of the bed of the crib will be 2 m.
Diagram of the cutting of Baldakhina on a crib.
7 cm width ribbon folded along in half and smooth. Take it to the 3rd sides of the rectangle, starting with one of the lateral sides, and paste. The fabric is in the middle of the tape. In the corners of the ribbon, taking turns. The remaining unprocessed top edge of the Baldakhin is separated along the entire length by 0.5 cm and smoothed iron. Once again they are converted by 3-4 cm, smooth and paste along the entire length.
Article on the topic: Gas column in the bathroom
Thick wire bend in the form of a circle with a diameter of 30-35 cm. You can use the hoop from the hoop. The top bending of the baby cots is worn on the wire, after which the wires of the wire are carefully fixed. 3 cords are attached to the ring with a length of 20-25 cm. They must be placed at the same distance from each other.
Over the bed to the ceiling with a dowel, the hook will be attached to which the cords of the canopy will be suspended. Up Baldakhina can be decorated with a bow from the same tape. In this case, the ribbons will need more. You can decorate a children's bed with bright appliques on the floor, ruffles, frills, it all depends on the imagination of the needlewoman.
Back to the category
For a long forgotten pylon
Circuit diagram with assemblies.
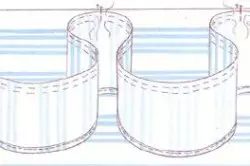
In the vintage times, the beds were decorated with bezers - lace capes descending to the floor. Such a sizes can be done for a baby bed with their own hands. Oracker-sizes not only adorns the crib, but also masks those items that often put under the cradle of the baby, for example, a box with toys, diapers, etc.
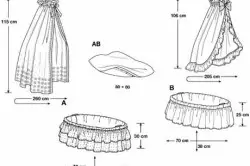
Sew a sorption for a baby bed is easy. It will take fabric, threads, needles, pins, scissors, sewing machine. Potions will not need. It will be necessary to measure the length and width of the bed bottom and the distance from the floor to the mattress. For example, these sizes are equal: the length of the bottom is 140 cm, the width is 70 cm, the height from the floor to the bottom is 45 cm.
The pylon consists of 5 parts - the first base and 4 frill. The base is a rectangle with dimensions of 140 cm x 70 cm. When it is plotting, there are 2.5 cm inserts on the seams. Ruffles are cut in the form of long rectangles. The width of them is taken 45 cm + 5 cm (1 cm - allowance on the seam from above, 4 cm - the liner below). For beauty, frills drape. It must be remembered that the folds increase the flow rate of the fabric by 2 times. Those. It will be necessary to carve 2 rectangles with a size of 50 cm x 280 cm and 2 - 50 cm x 140 cm.
Article on the topic: Build the door frame with your own hands. How to assemble the door frame correctly. Photo
Variants of canopy with podzors.
At all side details, the short sides are treated - first bend 0.5 cm, then it is rehereding to 1 cm, smooth and paste. Next, the bottom of the ruffle is laid - they bring the edge of 1 cm, then 3 cm, smooth and passed along the entire length. Unprocessed top of the products twice paste at a distance of 0.5 cm and 1 cm from the edge. The line makes the biggest step. The fabric is tightened along these striches, collecting folds. The length of 2 finished rolling should be 70 cm, 2 others - 140 cm.
The finished ruffle is applied to the base below its untreated edge by 2.5 cm. On the sides should remain 2.5 cm. The edge of the base is bent toward the side part by 1.25 cm, then once again befened by 1.25 cm and attach. Also come with the remaining three ruffs.
As you can see, transform the appearance of the crib with your own hands, it is worth only to show a fantasy. In addition to the Baldakhin and Podzor, the solid backs of the crib can be decorated with bright stickers with different objects. You can sew flat mattresses in the form of animals, which to tie to the walls on the inside of the cradle. It will not only decorate the crib, but will attract the look of the baby and shines him from bruises about wooden parts.