
Table of contents: [Hide]
- Manufacturing Borge in Baby Cot
- Manufacture of an all-circuit board in the crib
How to sew fires in the crib with their own hands intended to protect the child?

The homemade side is made of fabric and syntheps.
Bursts are used to ensure that the baby does not rest in his head on the hard bar of the bed, to protect against strikes about wooden slats, as well as for the convenience of bed.
They will also protect the child from drafts and create a cozy atmosphere for the baby. You can sew them alone.
Manufacturing Borge in Baby Cot
Materials and tools:
- the cloth;
- Sintepon;
- tapes;
- lace;
- Velcro;
- sewing machine;
- scissors;
- needles;
- Threads.
You need to buy a beautiful cotton fabric of bright coloring with a children's pattern. If the width of the fabric is 150 cm, then you will need about 4 m tissue. It is necessary to wash it before revealing so that the product does not fit during the operation. Borts can be performed by separate, consisting of four parts: two on the sides of the bed, one in the headboard and one in the legs. So they will be easier to disgregate and wash. In some cases it is easier to invest filler. If the baby bed of standard magnitude and the sizes of the mattress are 120x60 cm, then you need to carve the following details:
- Four rectangles with dimensions of 126x38 cm;
- Four rectangles with dimensions of 63x43 cm.
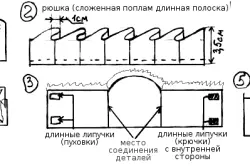
Pattern of sides,
It is necessary to paint the items so that after they are sewn, the drawing on the fabric can coincide. Therefore, the cloth is better to choose with separate small pictures or patterns. Then you need to carve 16 rectangles with dimensions of 7x10 cm, which are designed for fasteners on velcro. After that, there are two strips with a length of 90 cm with a width of 12 cm, intended for rocking on short side of the side. Then cut two strips with a length of 180 cm with a 12 cm width for rocks on the long side of the sides.
Article on the topic: Repair of the washing machine do it yourself
For ties, it is necessary to carve 20 long bands with dimensions of 53x7 cm. After that, it is necessary to double the strips designed for the irregular side of the inside. Then the stripes must be flipped along two long sides and one short, then turn out and stroke the iron. Instead of ties can be used ribbons. After that, on the involving side, the fasteners are stitched, then they are turned and stroked the iron. After that, you need to sew prickly pieces of velcro on the side of the bed in the necessary places. The soft pieces of the velcro are sewn to the fasteners. The fourth side of the fastener needs to be seeded. Then you need to perform assemblies, for this Ryushi and lace to distribute the width of the product. Next, the patterns need to be folded pairwise face inside. At the same time, it is necessary to put Ryushi with lace and strings between them.
Spelling strings and ruffles with lace. Start on the sewing machine all elements from three sides. After that, the parts turn on the front side. Then inside the case should be attached to the filler. After that, it is necessary to shoot the side of the bottom. To wash the filler when washing, it is necessary to make an additional line around the perimeter of the product, retreating 5 cm from the edge.
Back to the category
Manufacture of an all-circuit board in the crib
Materials and tools:
- fabric 2 m;
- syntheps 2 m;
- tape;
- scissors;
- needles;
- threads;
- sewing machine.
You can sew a whole-circuit fish around the ceiling perimeter. For the manufacture of the product, it will take 5 meters of material with a width of 150 cm and 2 meters of synthesis 1 cm thick and 150 cm wide. The fabric is selected from natural materials. Before opening the fabric you need to wash your finished product in the process of operation.
It is necessary to measure the crib and draw the pattern of the bumper on paper. Then you need to carve out the future product out of the material. All parts are stitched from the wrong side. At the same time, one edge is left unenvissed to insert the filler. When crosslinking parts in them, the finishing ruffle is invested, made of the tape. Pre-tape is guarded. Then it is necessary to carve the filler of the sinteration of the desired diameter. The filler should be half astimeter less details from matter. After that, the details of the filler are inserted into the case from matter, and then sew all sowers on the sewing machine. Then the ribbon is sewn to the outside. They need to be sewed in those places where the side will be tied to the crib. Typically, the strings are made in the corners of the bed and in the middle of the side. If a syntheton is selected as a filler, then you need to perform an additional line from the edge of the product. This is necessary so that the syntheton is not frozen when washing. It is possible to use a holofiber instead of a synthet tube, which is more durable and is not frozen when washing.
Article on the topic: Is it worth changing a bath on a shower cabin
Facilities for the baby bed must be erased at least once a week to avoid accumulation of dust on them. The product performed by your own hands will protect your baby from injuries, drafts and will provide him with a relaxing rest and sleep in a cozy comfortable setting.