
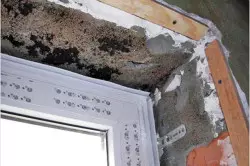
The importance of finishing the window after installing plastic windows is not always aware of customers. Because of this, afterwards, very many complain that they installed the advertised double-glazed windows, and it sneaks from the window. In fact, the problem is that without finishing all the work can not be considered to the end of the completed.
The quality of the plastic window installation depends on the quality of the dissection finishes.
The finish of the plastic window will make it possible to create not only the beautiful appearance of the window, but also to significantly extend the life of its operation.
After plastic windows in the room are installed, the next stage of work occurs - the creation of slopes. Properly performed finishing of the plastic window with your own hands allows you to create an attractive completed view of the Operation.
Properly performed finishing of the plastic window with your own hands allows you to create an attractive completed view of the Operation.
Speaks are considered to be all the surfaces of the walls that are near the windows. The slopes are external (located on the outside of the window) and internal (located on the inside of the window). Most often, all the internal slopes are interested. If the installation is better to entrust professionals, then the finish is more expedient to make it yourself.
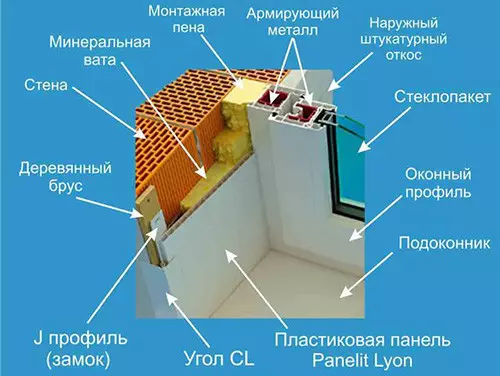
Properly made slopes play not only aesthetic role, they have thermal insulation qualities . Sucks allow you to protect the mounting seams, prevent windows from fogging, prevent the installation of the mounting foam. To create slopes, various types of materials are used.
Interior decorative plaster
Sucks with the help of plaster have more flaws than advantages. Over time, the stucco starts to burst and crack, loses its original color. Installation itself is also not entirely convenient, it takes a lot of time and effort for high-quality execution. The plaster is superimposed by several layers, each layer must be dried and withstand. After that, the surface is ground and in conclusion paint. In terms of time it takes one or two weeks. Plaster slings do not create the necessary heat insulation, and when the windows overcooling will be patted.Normal plasterboard
The only disadvantage in the application is the fear of moisture plasterboard. Therefore, installing GLCs is only in rooms with low humidity.
Slopes made of drywall are rather durable. They have a smooth and attractive look. Plasterboard is insulating, and this gives decent heat-insulating properties to the slopes. The only disadvantage in the application is the fear of moisture plasterboard. Therefore, installing GLCs is only in rooms with low humidity.
Article on the topic: Manufacturing of wooden grids: how to properly assemble the design with your own hands?
The process of installing drywall slopes time-consuming: rope is required, primer and painting. You can make them faster than plaster slings. Although the installation time depends on the qualification of the wizard.
The drywall finish is an intermediate option for price and quality. To create a neat junction along the perimeter of the window, a special plastic or metal corner is used. Such slopes can be coated with a layer of paint, liquid plastic, decorative plaster or transparent furniture film under the tree. Using the last option, it turns out a completely smooth surface that is easily clean and well suited for use in the kitchen.
Gypsum windows are often selected when there is a need to hide the slope with very damaged openings. In this case, use the processing of primer or antibacterial impregnation.
It should be avoided that the airspace remains between the drywall and the wall, in which water can get. Otherwise, spots may appear on the finishing coating and the deformation of the slope will occur.
Plastic installation
Plastic slopes can be quickly mounted, they do not fade, they are easy enough and have an attractive, harmoniously combined with the windows themselves (it is desirable to choose the same shade).
This is the most common and universal way. Plastic slopes can be quickly mounted, they do not fade, they are easy enough and have an attractive, harmoniously combined with the windows themselves (it is desirable to choose the same shade). When installing such slopes, a mineral wool is used, which provides the necessary heat insulation, sound insulation and waterproof. They can be easily made with their own hands. The slopes made of plastic have a fairly decorative appearance, a smooth and smooth surface, a long service life (equal to the service time). They can be done fairly quickly (for about two hours). Install plastic slopes without additional work on putty and color. They have a good degree of vapor of steam, which protects the walls and foam insulation from freezing.
Tools and materials
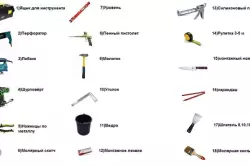
Before starting work, stocking the necessary set of tools.
- Plastic strips with a thickness of 8 mm.
- P-shaped plastic strip (the so-called starting strip).
- F-shaped plastic strip.
- Wooden rack with a thickness of about 12 mm.
- Insulation material (usually use mineral wool).
- Scissors and knife for metal.
- Stapler construction with brackets.
- Building level.
- White silicone.
- Self-tapping screw (4.5 mm and 95 mm).
- Drill or perforator.
Article on the topic: How to plaster foam concrete - Technology of applying plaster on foam concrete walls
If the window is recently installed, it is better not to remove the protective film before the end of work.
Installation steps
Wooden rails are stuffed around the window around the window. To fix them, the screws are 95 mm. Reiki are placed flush to the walls.
- Wooden rails are stuffed around the window around the window. To fix them, the screws are 95 mm. Reiki are placed flush to the walls. To prepare the surface of the wall, the perforator and drill are used in the desired way. To obtain perfectly even slopes, vertical mounting to the wall of the rails aligned in the level.
- At the outer edge of the window, you must fill the P-shaped strip. Self-samples of 4.5 mm are used for fixing. In the gutter of this strip is inserted by a slope band. The joints of the P-shaped strips should provide the ability to install plastic at a given angle. Therefore, when the P-shaped strips intersects, it is necessary to partially cut the angles with a knife, thereby ensuring a smooth and smooth junction from the inside.
- The F-shaped strip is set. Its grooves should be located opposite the P-shaped strip installed before this groove. In the rest, which is located above the opening, the F-groove must be cut off. It is necessary to do this because the upper part of the F-strips should be imposed. Mounting this strip to a wooden rail is needed using a construction stapler. After docking, all unnecessary parts of the F-strips should be cut off with scissors for metal. This method is convenient because it will not be necessary to further liner the wallpaper around the window. F-strip closes all defects.
- Plastic installation in the grooves with the simultaneous layout of the insulation. It is important to measure the size of the plastic as much as possible. If the joints did not work perfectly smooth, then you can be lost them with the help of white silicone.
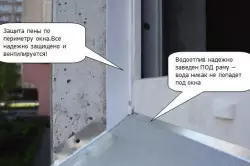
The outer decoration is much more important than the inner, as the mounting foam, remaining without protection against the destructive ultraviolet sun rays, is very quickly spoiled and becomes unsuitable.
It is desirable that work on the installation of all slopes were carried out the next day after installing the window, when the mounting foam is already dry enough. Mounting foam can be used as thermal insulation material. To obtain optimal indicators, the installation of slopes and window sills is best done at the same time.
Many, trying to save money, order installation without an outer and interior window finish. Some believe that internal beauty is more important outdoor and do not finish the window from the street, leaving the mounting seams without protection outside. In fact, the outer decoration is much more important than the inner, since the mounting foam, remaining without protection against the destructive ultraviolet sun rays, is very quickly spoiled and becomes unsuitable. If there is a desire to save money, then it is better to postpone from the interior decoration. Outdoor processing must be carried out as quickly as possible after installation.
Article on the topic: Arbors and Pergolas: What is the difference
Outdoor plaster
Due to low cost this method is the most common. The cement mortar is most often used. A solution is considered to be more durable, which is prepared from glue for ceramic tiles. However, there are no guarantees that all finishes are not cracking over time.Special psyl tape
Some professionals often use a special tape, with the help of the installation of which the suture space expands and fills free space, thereby protecting the mounting foam from moisture and ultraviolet rays. However, producing outdoor windows with their own hands, it is not always possible to have the opportunity to buy such a material.
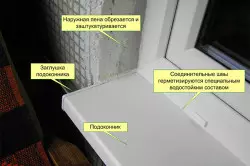
Nachchelniki
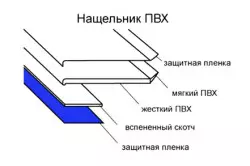
The overall is a plastic corner, which is made specifically for finishing windows outside and protects the mounting foam from all external influences.
The nichelter is a plastic corner, which is made specifically for finishing from the outside and protects the mounting foam from all external influences.
The finish begins with establishing angle to the upper seam of the window. For this, the segment of the nichelnik is cut, which has the length of the same as the distance between the quarters of the window opening. It is fixed to the profile of the window by ordinary self-drawing.
No need to install self-tapping screws very often. If you need, in the corner it is necessary to make slits (if, for example, mosquito nets interfere with installation). After that, you need to mount the tide to the wall with the help of a dowel-nail. It is desirable at the same time in several places separately apply a mounting foam. It will firmly secure the tump and soften the sound when the rain drops on it.
The most difficult finish in this method is the cutting of lateral nicknames. They must be shrinking with the top nickname and the windowsill with maximum accuracy. Sometimes it is better to cut off with a reserve, and then make fit on the desired size. The docking spaces with the upper scaller after installation need to be treated with liquid plastic or silicone.
Competently trimmed plastic windows will serve you and will delight for many years!