
Standard swing doors that are almost always mounted in apartments and private houses can deliver many problems, especially if we are talking about small apartments. For their normal operation, a certain amount of free space is required, which can be used with greater benefits. To enlarge free space in the apartment, instead of standard design, you can install sliding doors. Next will be considered how to make the installation of sliding doors.
Moving along the wall sliding doors are equipped with a design of a modern sliding mechanism that works silently, gently and securely.
Design of sliding doors
Structurally sliding doors consist of a web and a frame, which, depending on the type of mechanism used, can be placed on top or bottom. The canvas moves on the rollers on the guide, it can move along the wall or hide into a special niche.The 2 main types of sliding structures are distinguished:
- Rollers are installed on the top of the door canvase. At the same time, the frame consists only of the upper rail. In this case, you have the ability to use any floor covering and, if necessary, replace it without dismantling sliding doors.
- Rollers are mounted on the bottom of the doors. In this case, the guide bar is placed on the floor, which also plays the role of the threshold.
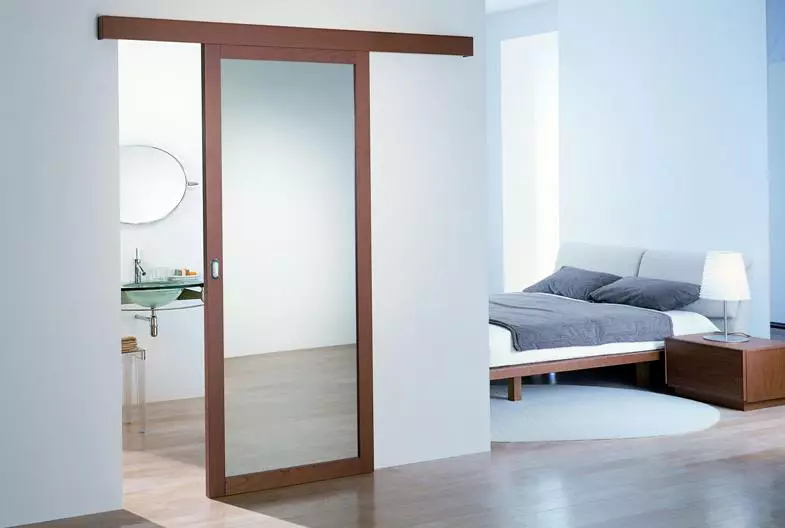
An example of a sliding interior design is shown in Fig. one.
Preparatory work
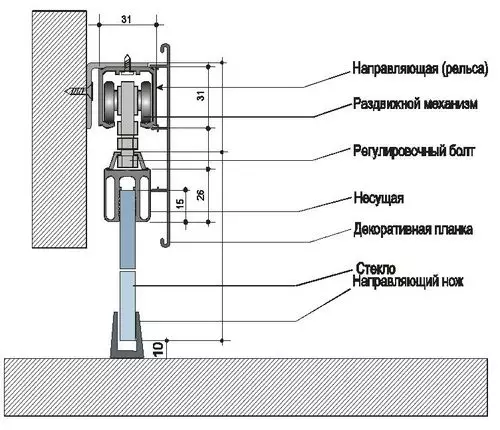
Figure 1. An example of a device of a sliding interroom mechanism.
As an example, the process of installing a single-standing sliding door, which is the simplest and most common design. To perform work with your own hands, you will need such tools and materials:
- screwdriver;
- electric drill;
- building level;
- roulette;
- hacksaw;
- a hammer;
- elements of the sliding mechanism;
- wooden bar;
- pencil.
First of all, markup is made to install the guides. To do this, you can use in two ways:
- With the help of a roulette, measure the height of the floor of the floor, adding to the obtained value of 1.5-2 cm for the gap between the door and the floor, as well as the height of the collected roller device and the guide. Then the labels are set on the wall, along which the horizontal line is drawn.
- The door leaf is substituted to the way, the lining of the required thickness is stacked under it, after which the horizontal line is carried out along the top cut. From this line, the height of the guide and carriage is debugged.
Article on the topic: Gelza GML
In order for sliding doors after installation on their own, it is necessary to control the horizontal line horizontal line using the building level.
Installation of sliding design
Figure 2. Installing the guide sliding doors.
The next step of the installation work is to install the guide. For this, on the marked line to the wall using selflessness, a wooden bar 50x50 mm is mounted, the length of which should be 2 times larger than the width of the doorway (Fig. 2). The bar is needed as close as possible to the wall, for which you need to use the required number of screws. After the timber is fixed, check it out again.
Next, the guide is attached to the lower end of the bar using self-tapping screws. To determine the location of the mounting holes, the thickness of the door canvase should be divided into 2, and to the resulting value to add the desired distance of the doors to the wall (about 4 mm). Before finally fix the rail, make sure that there is enough free space between the door and the wall for its free movement.
Regardless of how much the curve of the wall, the guide mechanism should be fixed strictly in a straight line without the slightest bends.
After mounting the guide rail, collect a roller mechanism, connect the fasteners to it, with the help of which it will be fixed on the doors, and make the resulting design in the guide. At the upper cut of the door, attach the brackets, retreating from each edge of the canvas approximately 5 mm. The number of brackets must correspond to the number of rollers.
After that, you can move to the installation of carriages to the canvas. The mount is carried out in such a way that the notches on the brackets in which the nuts will be tightened were directed to the wall. Next, substitute the door to the guide, align the fastening element of the right carriage with a hole on the right bracket. Fix the brackets on the bolt of roller mechanism. For reliable fixation of the door leaf to the floor, the lower rake joins the floor. After that, it is inserted into the groove, which is placed in the lower door of the door.
Article on the topic: How to choose a cloth for children's curtains
At the last stage of installation work, you must fasten all the door accessories, masking decorative strips and separate the door slopes to your taste.