
Painting of the walls is a completely acceptable alternative to any finish, whether it is a tile, wallpaper, a decorative stone, etc. Most modern facing materials are often made with the possibility of their subsequent painting, which allows you to transform the interior of the house or apartment and give it an individuality. However, before starting to paint the walls, it is necessary to prepare the surface accordingly. First of all, you need to know how to align the walls under painting.
Alignment of walls is a mandatory process before painting.
Preparation for work
Before starting the alignment of the walls, you need to clarify that a variety of surfaces are suitable for painting. As a rule, the following options are distinguished:
- plastered and spacchable surfaces;
- smooth surfaces (plastic and wooden panels, tile, wallpaper);
- texture plaster;
- Relief finishing materials.
In each of these cases, wall alignment has its own distinctive features that you need to know and take into account.
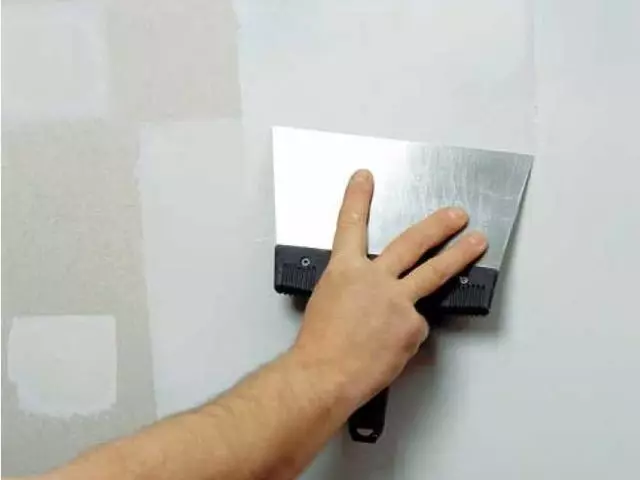
The most efficient and popular is the leveling of walls with a putty.
Wall alignment scheme.
Before aligning the walls, you need to carefully examine all stages of work and figure out which techniques are used in certain conditions.
Before starting work, prepare the following tools:
- Several spatulas of different sizes;
- marker;
- chisel;
- small ax;
- portable lamp;
- a hammer.
Back to the category
Step-by-step instructions for eliminating irregularities
If the usual painting of the walls is planned, the biggest efforts should be directed to the elimination of various kinds of irregularities. Before aligning the walls, you need to consider the available options, namely:- grinding existing coating;
- plastering;
- Aligning surface with plasterboard.
Use the first method will be appropriate if the available concrete base is either the plaster is quite strong and have no serious damage. In this case, it will be necessary to completely remove the old coating, if any, as well as the thin layer of plaster. In this you will help the grinding bar and stacker. Be sure to take into account the fact that old coatings are subject to careful treatment with special antiseptic means with further primer.
Article on the topic: Wooden garage: Construction with your own hands
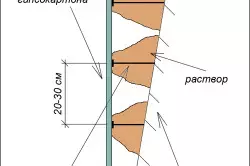
Scheme of putty seams.
Clean the available minor damage in the form of places affected by fungus and dampness, then apply a solution to the surface. It is necessary to use about the same solution that was used for shockting. After such processing, it is necessary to check the surface evenness using the construction level. Permissible deviations are no more than 2 mm.
Only after the entire surface is thoroughly aligned, you can proceed to the next stage of the preparation of walls under painting - putty. If the drops are quite substantial or the existing plaster has been prouded too much, you will have to make it a complete replacement or to strip the walls with plasterboard. A specific way you have to choose yourself, given your personal preferences and an affordable budget. Whatever way you choose, the old coating will still need to be removed. Watch that there are no traces from the previous solution on the walls. After that, you will need to stack the walls or mount the sheets of plasterboard, thus creating a new smooth surface.
Thoroughly drive the aligned walls and leave them to dry at least 5-6 hours. If possible, extend this time to complete drying. Only after that you can proceed to the next stage of work.
Back to the category
Procedure for applying a starting spacion layer
The scheme of applying plaster on the wall.
Apply the paint directly on plasterboard or cement-sand plaster. The fact is that these materials or too much absorb water, or too porridges, which will prevent the uniform distribution of paint on the surface. Ultimately, very noticeable changes in color will occur and irregularities and roughness will be visible, up to the smallest.
To avoid this, the whole surface is opened with putty. Before you begin to work, you need to choose a suitable starting putty. It should contain small sand, due to which it will be possible to apply it a sufficiently thick layer to 3-4 mm and not be afraid that it cracks.
Article on the topic: Dowel for aerated concrete and other fasteners in porous materials
You will need a wide and small spatulas. One will be used to distribute the solution, and with the help of another you can eliminate small irregularities. Before you prepare a solution, carefully examine the instructions and do everything exactly as it is said. As a rule, the time of setting the solution is about 45 minutes.
It is recommended to perform reinforcement. To do this, you need to do or buy a ready-made kapron mesh with a cell of 2 mm. Apply a strip of a spacion mixture with a thickness of about 2 mm on the wall. The width of this band should not exceed the width of the selected reinforcing grid. After applying the solution, attach the reinforcing wall to the wall and give it to the solution using a spatula. On top of the grid apply a layer of finishing putty.
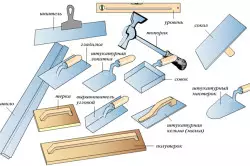
Tools for applying plaster.
Quite often, newcomers allow a typical error, trying to immediately make the surface as smooth as possible. For this, they smoothed protruding strips formed along the edges of the spatula. In fact, they can not pay special attention to them. The most important thing is that there are no places without a solution and large grooves. Just spend on the surface several times, trying to dissolve the transitions between the strips, and those thin tubercles that will remain, do not touch, but take it in the future, before applying the finish putty. Some homemade craftsmen in order to get rid of such a phenomenon decide to apply a spike solution with very small portions. This will also negatively affect the final result. After a while, when you already get a little experience, you can do work without all these flaws.
The putty dries about 6-8 hours. Only after that you can start grinding. To do this, prepare a rough abrasive grid. Experts recommend using a grid with grain size 120. Eliminate protruding irregularities and other shortcomings. But even after that, the surface will remain a grainy, and it will not be possible to apply paint. That is why it is important to correctly perform the next stage, i.e. Apply finishing putty.
Article on the topic: Interior features with bronze wallpaper
Back to the category
The final stage of work

Painting scheme plaster.
Get rid of the graininess and prepare the surface to apply paint using the finish putty. This composition does not contain sand and other major inclusions, so in the end, if everything is done correctly, it will turn out the most smooth and smooth surface.
The finish putty is applied by the same technology as the starting, but its layer thickness should be no more than 2 mm. Otherwise, she simply cracks. The layer of such thickness allows much faster to achieve a smooth surface without any dents and tubercles. However, even after applying the finish putty, the surface still needs to be grinding.
Take the abrasive grid 60-80 and stick the surface. Be careful not to steal the entire layer. If necessary, apply several layers. To verify the quality of the work done, take a lamp with a bright light bulb. Place it so that the light falls to the wall under the oblique angle. So all defects will be noticeable. Available irregularities need to immediately stall, because After painting, they will be very noticeable and extremely negatively affect the appearance of the wall.
Wait until the latter sucerets completely dry, stick the surface and be sure to properly. Before applying primer, clean the walls from dust left after grinding. To do this, use dry rags or vacuum cleaners. Wet rags are impossible to use.