
Photo
Today there is an erroneous opinion that the curtains are a special cornice designed to hang out massive curtains. But in fact it is not so, the curtains are a curtain of light cloth. Eaves for such curtains can be used any, even the simplest in the form of a metal rod. Make Gardina with your own hands is not so difficult, you do not even need to have a special experience, only the skills of using a sewing machine are needed.
Gardin scheme.
How to make Gardina do it yourself?
Gardin is usually a rectangular cut of a tissue with processed seams. Special knowledge is not required, you just need to be able to handle the thread and needle, have the initial skills of working on the sewing machine.
First you need to choose the fabric and the Gardina model. It is usually recommended to take light or medium tissue density that will be beautifully laid in the folds. Color and texture entirely depend on what kind of interior is equipped. For minimalist style, one-photon fabrics are suitable or with a strict geometric pattern, the color can be any corresponding atmosphere.
For modern style, High-tech are selected with silver, gray, white, inhabitant, strict, strict. For the kitchen, you can use bright shades, stripes, plant ornaments, appliques in the form of fruits and vegetables are only welcome. . But for the bedroom, pastel, calm tones are suitable, no excess pattern is needed.

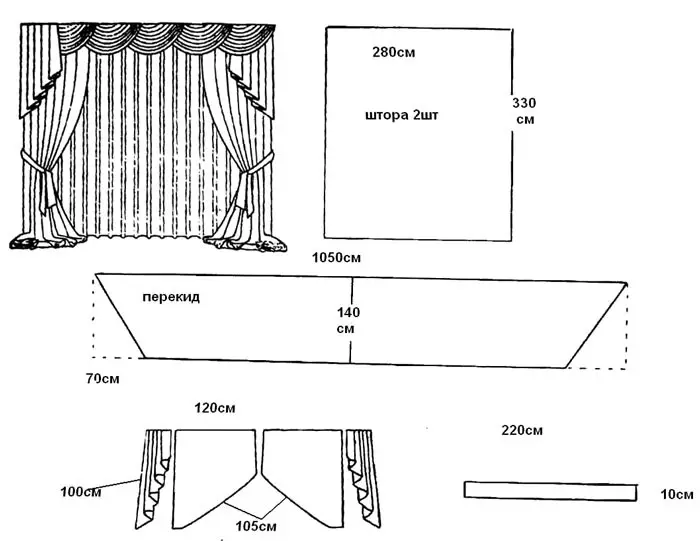
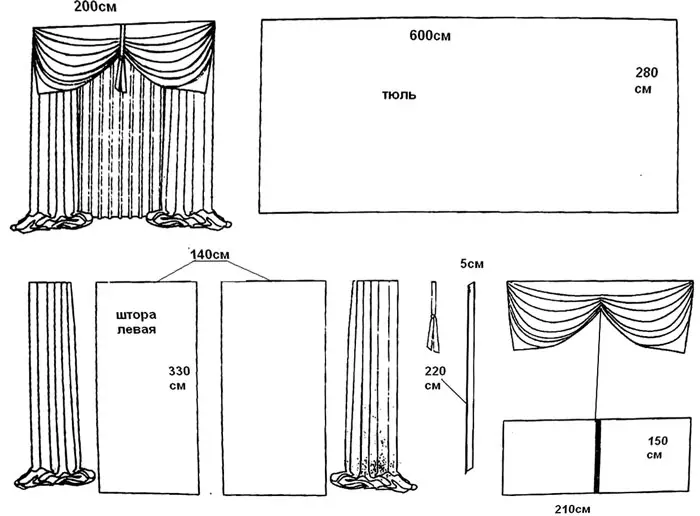
Calculation of fabric for curtains.
After the cloth is selected, it is necessary to perform measurements of the window opening, determine the length of the future curtains. After that, it is necessary to determine the future form. The canvases have a form of a rectangle, a special wisdom for the pattern is not required.
To make Gardina do it yourself, you should immediately prepare all the materials and tools that will be necessary during operation:
- sewing machine;
- threads and needles, scissors;
- Metal long line;
- a piece of soap or special chalk;
- Soft centimeter tape;
- curtain ribbon that will felt on top for assembly;
- Cardic cloth selected color.
Cut is made only on a flat surface, according to previously defined sizes and forms. To do this, use a metal ruler, chalk, centimeter tape, pattern. The fabric is neatly reproduced, leaving 5 cm on each side to finish the seams. During operation, it is necessary to constantly check that all sizes and forms are observed, otherwise the curtains will be powered and not so neat.
Article on the topic: how to bust the furnace with tiles - Phased instructions for a beginner burning
Is it possible to perform my own tailoring yourself?
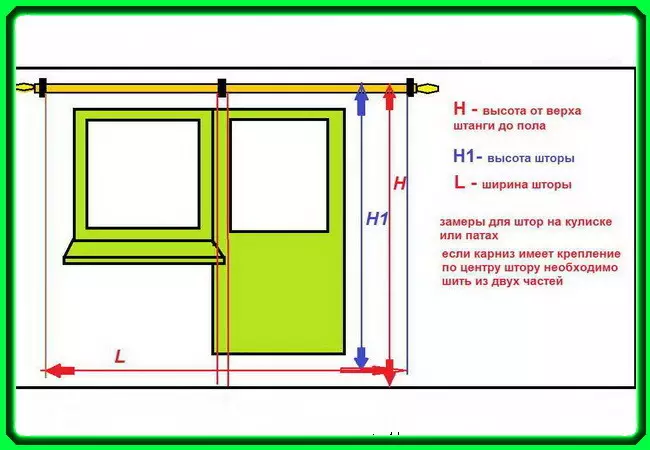
The diagram of the ratio of the length and width of the curtains to the length and width of the window.
Sewing Gardina as simple as possible. It is necessary to first sew 2 cuts from the web or more - depends on the width of the future curtain.
After that, the seam obtained is fluttered, the bends are stroke for future seams along the edges of the fabric. All edges are processed on the sewing machine, the seams are repeatedly stroke.
The curtain tape is sewn up at the top edge, after which special threads are tightened so that Gardin is assembled into neat and beautiful folds.
If the fasteners are used in the form of hooks, then you need to sew them before hanging the curtain on the cornice.
When Curtain is ready, it strokes it. If decorations (for example, fringe) are used, then they are sewn up to the fabric iron.
Beautiful curtains do it yourself from the sheet
When choosing a tissue for the curtain, you must be guided by what room it will be used. Bright and fun tones, appliques, floral ornaments are sufficiently large, images of animals and fabulous characters are suitable for the children's room.
Drawing patterns Gardin.
For the bedroom, the best preference is to give quiet shades, soft patterns. For kitchen, bright colors are suitable, creating the necessary mood. You can use thick branches of trees for such gardines. This decoration element is ideal for country style.
It is necessary to determine the dimensions, the fastening option to the cornice. You can use as fasteners:
- rings or clothespins that will be attached to the upper part of the fabric;
- fabric hinges that are seeded with one part to the curtains, and the other are attached with the helper tape;
- The top edge of the curtains can be wrapped and make solid pockets from above, through which the cornice bar will do.
Any convenient option is selected, it depends on the features of the design of the cornice. Even at the planning stage, it is necessary to decide whether decorations will be used, that is, brushes, fringe and so on. Since the curtain will be sewn from the sheet, it is best to apply an applique, large and beautiful buttons.
Article on the topic: Decorative curtains for the doorway - new trends in the interior
Step-by-step instruction
The sewing process itself is as follows:
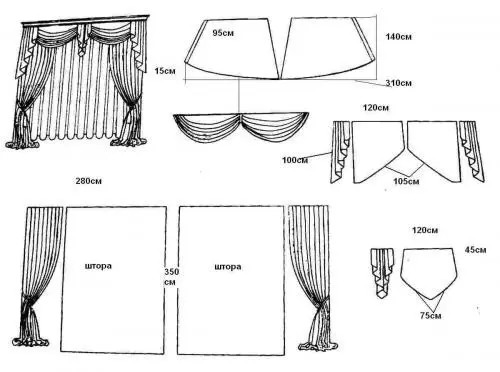
An example of the pattern of a classic curtain with lambrene.
- First you need to measure the eaves and the window opening, determine which length is necessary for the future curtains. Often, at this stage, it turns out that one sheet is not enough, it is best to use 2-3 to make the curtains formed beautiful and neat folds.
- After that, all the tools for work, curtains are preparing. Starting sewing should be on even and free from foreign objects, the table. Immediately, all the necessary fittings are placed near, so that during operation do not interrupt the process.
- First you need to suck all the seams. This is easy, but takes a lot of time, you need to be ready.
- The cornice diameter is measured if pockets or loops are performed for fasteners. In the first case, it is necessary to take into account how long the fabric is needed, and in the second - to prepare sections of fabric or tapes, which will be needed for sewing loops.
- For the manufacture of pocket, you should add 7 mm to the diameter, get the cloth and sew it to the main canvase. If 2 sheets are used and more, then they must be sehered among themselves, after which it is already started to proceed to the processing of seams on the 3rd sides.
- If the loops are used from the tapes, it is necessary to sew one side to the upper edge of the tissue, after which it is necessary to adjust it, strain the neat seam. On the other part of the tapes and on the base of the loops, pieces of tape-velcro are sewn, with which the loops will be attached. You can use beautiful buttons for this, in which case they can go to the front side, creating an unusual decoration.
- All seams are carefully stolen, the canvas of the curtains are stroked, after which it can be hung on the window.
How to make eaves do it yourself?

Wooden cornice scheme.
Often, together with the manufacture of curtains, I want to make a beautiful cornice for them. Everything is not as difficult as it may seem at first glance. Having fantasy, you can easily and quickly assemble the original and attractive design, which will become a real decoration of any interior.
Article on the topic: Double bed with drawers with their own hands: Step-by-step instructions
The selection of the model depends on which design is used in the room. If it is a rustic style, then the eaves can be made of a large and sufficient thick branch with a slight curved shape. It is enough to purchase 2 brackets for fasteners on the surface, varnish, brushes, prepare an electrolybiz. First, it is required to determine the desired length for the eaves, after which it is carefully inspecting the cooked branch. It should be durable, not to have cracks, fades. It must withstand the weight of the curtains - this is the main condition. For such an eaves, Gardin is perfectly suitable made of sheets.
After the markup is ready, it is necessary to clean the branch from the protruding pieces of the bark, it is best to spend it with the help of sandpaper. This work is long, but the result is worth it, the cornice will acquire a stylish appearance.
If the workpiece under the cornice for curtains is made, it is necessary to clean it from dust, cover the layer of varnish.
Gardina attachment scheme on suspended bars.
Small twigs or knots can be left, but it is necessary to imagine exactly how the design will look on the wall. It is easy to achieve this, it is enough to attach a workpiece to the place where it will then be mounted.
If such a cornice is used for style other than country, the branch can not only be covered with a verse or varnish, but also stain in bright, unusual colors.
Separate elements can be highlighted with silver paint. It is important that the design is organically fitted into the overall interior.
Billet is attached using metal brackets, it is best to use 3 pieces, of which 2 will be located on the sides, and 1 - in the center.
For curtains, large wooden rings are well suited, but it is possible to provide tissue loops during sewing. In this case, they are best attached to the help of a velcro tape or beautiful large buttons, so that the chart is easy to remove for washing.
Cardina is a curtain of light or heavy fabric that can be decorated with any room. Make them with your own hands is not so difficult, it is enough to choose a fabric that will harmoniously fit into the overall interior of the room.