
Each time after replacing windows, there is a need to repair window slopes, both internal and outer.
But it is not necessary to take on the device of window openings immediately. You should leave the windows for a couple of days so that the mounting foam, with the help of which filled out the voids between the new window and the opening, frozen well. Only then, when the mounting foam hardens, you can start the installation of window openings. Operactions of windows can be performed using prefabricated sheet materials or plastering method. Be sure to dawn angle in the slopes. The angle should be made not direct to increase the penetration from the street into the daylight room, the angle should be with a dawn. The angle of dawn (SCOS) window openings call the distance between the outer borders of the slopes and internal, where the outer boundaries are larger than the internal. For complete harmony in all rooms, the angle of dawn of windows should do the same.

To carry out all the work on the creation of slopes is independently quite simple, so you can not seek help from experts, which will reduce the total costs of repairs.
The angle of dawn of the outer slopes can be different. The equality of the angle of dawn can be noted with the help of the square. To the kitchen attachment to the bar, which freezes the location of the rule. In this case, the square is set in a quarter of the box. After installed and accurately checked the rule by the construction level, fix it and for its formation we produce shockting the opening of the window. The angle of dawn of windows always indicates a foreman. Consequently, for finishing, each window accounts for 3 rules, and each time you need to measure the angle of dawn.
For installation by plastering, the following tools are needed:
- Mixer for the kneading solution;
- a hammer;
- building level;
- putty knife;
- grater;
- construction knife;
- line;
- Corolnic
Device
Cornel for measuring the angle of dawn
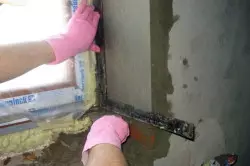
Watching window openings has certain features. First of all, you need to install a metal corner of the window opening at the place of combination of the window opening. Such corners installed vertically, simultaneously play the role of beacons for the wall and leveled and protect the surface of the angle. During the installation of such profiles, the angle of dawn of the window openings is specified by us - an angle formed by the frame planes of the window itself and its opening. As a rule, it should be made more than 90 degrees to increase the perception of the opening and natural lighting of the room.
Competent and correct installation of the metal corner profile is the basis of the correct shuttering of window slopes. After installing the corner profiles on the corners of the openings, vertical lighthouses are installed on the plane. These beacons define the density of the plaster layer between the edge frame edge and the installed corner. Window openings should be prepared for which wooden rules installed using the construction level withstand horizontally and vertical.
Article on the topic: How not to view the floor to eliminate the creaking of the wooden floor in the apartment
We give all the slopes (SCOS) angle of dawn, the angle between the slope and the window, which must be more than 90 degrees. As we have already spoken, the angle of dawn in the room should be the same, so exhibit angle of the coal. To this end, we apply the coal to the corner, fix the resulting angle and check the corners of other parts of the slopes. The width of the room should also withstand the same. It happens that it becomes necessary to comply with the same angle of dawn to expand the window openings. It is possible to do this with a perforator with a chisel nozzle.
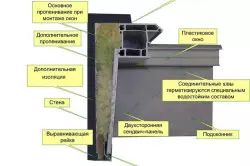
Installation scheme of slopes from PVC panels
There is a carbon with a mobile plate, which constructed the peers, in honor of which he is named. With this tool, the plasterer defines the angle of dawn. For this, the plasterers stick to the box to the box, after which it moves the plate on the line with divisions, then fixes it at the wall level, while measuring the location of the rail. At the rate of 10 cm, the discovery of 1 cm is taken an angle of dawn, based on this notice the size of the dawn on the dividing plate divisions.
The formation of an angle of dawn
So that the plastering squeezes are durable and not trembled, especially external, do not regret the cement. The minimum proportion of its sand ratio should correspond to 1 to 3, where cement 1 part and 3 of smashing sand, can be more, but no less. Sand should be used river, washed to avoid cracking. Before applying the solution, the wall surface must be moistened with water. With internal work in a solution mixture, you can add a little alabastra. Such a solution is obtained convenient for work, especially by the upper slope.
When plastering, you will definitely save a small angle from the box to the wall to save the dawns of the slopes of the window. At the same time, the angles of dawns should be the same.
The most difficult to perform the stucco of irregularities on the jumper of the upper slope. In this case, you need to plaster in several goals. In this case, the break must be until the thick layer is completely frozen. If necessary, you need to fix the mosquito net to the jumper and plastering it. When the solution is ready, you can proceed to plastering and the formation due to the planning mixture. To do this, we put the solution on falcon and the core threw on the wall.
After that, we take a rail and apply according to a certain angle of dawn to the wall in such a way that the plate can continuously slide when moving the rink. Reiki We installed with the help of a level and a plumb. Horizontally from the top of the window openings hosted the rule, with the help of nails or plaster tests fix. Walking starts from the top. After the upper slope was plastered, we take the rules and inspire them now vertically on the sides of the slopes, we shuffle. The solution applied to squeaks, equal to a wide spatula, press to the box and carry out to the attached rule.
Article on the topic: How to make a two-tie roof: step-by-step instructions in photos and video
After performing the upper slope, it is necessary to repeat the expiration of the surface of the side of the side slopes with the observance of the specified angle of dawn. Internal slopes can be placed in cement, cement-limestone or plaster mixtures with polymer fillers. When forming for convenience, it is better to use gypsum mixtures, but in its pure form it is better not to apply.
Features of Skosov
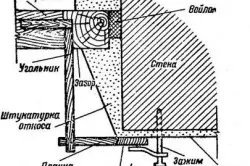
Before entering the device of slopes, it is necessary to apply a silicone layer on the dried foam, capturing part of the frame. This must be done because the coefficient of temperature extensions of such elements such as plastered slopes, and the plastic frame of the windows differs significantly, a through crack appears in the places of the adjoint. Therefore, if the slope is made without a stroke of silicone and a crack appeared, then such a crack need to be revealed to the spatula and fill with silicone.
Plastering of openings is a relatively inexpensive way to process window openings. This is a rather laborious process that is performed manually. The total amount of time spent on plastering window openings is 25% of the decoration of the walls of the walls. A significant part of the time is to prepare before applying plaster due to the fact that everyone should be accomplished and mark the same angle of dawn, to which the plaster layer will be applied. The author of one smart book came up with and developed the framework of the frame, with which you can speed up the finishing of window slopes by 25%.
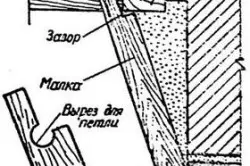
Malka for moving the solution applied to the window slope
A frame of 100 mm wide produced from well-ripped Tesa. By size, the frame should be such that the distance between the angle of dawn and the slopes corresponded to the project. Spikes connect bars frames. In the center of the box, the frame is installed and the clips are fixed in 4-6 places. Walking in this way allows you to make the same angle of dawn without additional measurements. Tools are made from Tesa, which is called Malka, for moving the solution. On the one side of the little girl there is a cutout. Malka side with a neckline moves along the box, the other side - according to the rule. Typically, the solution is applied by a trowel, and moving with a small one. It must be squeezed to frame, box and rules. Hold Malka is needed by two hands. After reclamation of the apparent soil, a solution is prepared for the stacker layer, which is applied to the openings and recall the little ones. Stuccoat to rub better in the rampage.
Emmers
The ends between the slope and the wall are covered with special plastic corners, thanks to which the lifetime of wallpaper is extended near the window, very often leaving animals or children.
The method of finishing the opening of windows from prefabricated sheet materials is much more expensive at the cost of material than plastering. But has a number of advantages: it is much easier to work; Installation is performed by a dry way; Installation is made from smooth sheets, for example, moisture-resistant plasterboard plates, which are then easy to fly and paint; And it is even easier to immediately install PVC or sandwich panels. You can start installation from installation at the beginning of the side slopes, and then the upper, or vice versa, without any difference. Both options are equal.
Article on the topic: Technology facing wall bricks - how to prevent errors?
Sequence of installation of teams of slopes:
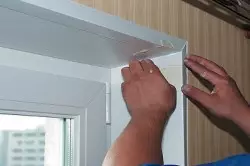
- If the installation of the windows of windows is made together with the installation of PVC windows, then a special P-shaped profile must be screwed to the window frame. We do not forget to check how well the window is stamped, if necessary, additionally blenced foam and wait for it to harden, only after which it starts to install window openings. On the perimeter of the frame, we set the profile flush with its edge.
- In advance, extinted and cut off, insert into the side profile and reject it under the desired angle. The angle of such a fill is called an angle of dawn. It is made necessarily the same on one window, but ideally and on all windows of the room. With the help of a template made on site, measure the angle and transfer it to other windows. It is possible to determine the angle of dawn and with the help of a coolet with fixation.
Keep in mind that if you wish to make the same angle of dawn for all windows in the room and at the same time, the same for vertical and horizontal slopes in most cases you will have to work as a scarpel and a sledge hammer over the window openings, knocking down the protruding sites of the old plaster. Almost any of the leafy materials can be made (V-shaped) from the back and to correct. In order to mate normally, the thickness of the slope and the profile is better so that there are one manufacturer.
Finishing stage
When one end of the slope is at the wall plane, and the other is inserted by the window into the profile, measure the distances between the wall and the slope. Insert a wooden slaughter or trimming profile for drywall. After measuring the slot between the wall and the slope is removed, and a wooden rail is installed on the place of the gap and fasten it with self-draws.
Now it is necessary to take glue and glue the mineral wool insulation to the walls of slopes. Then we install the sheet in the designed position. We turn one edge into his profile, and the other is adjacent to a wooden rail and fasten with self-draws with a step of 250 mm. Similarly, install another side slope. We measure the size of the window and cut the top slope. Just as for lateral openings, the insulation and rails should now be installed. Now you can install the top. We perform the docking of the outer corner of plasterboard sheets. Insert the profile and putty. You can simply cover the place of the joint with a plastic carbon, attaching it to the glue.