
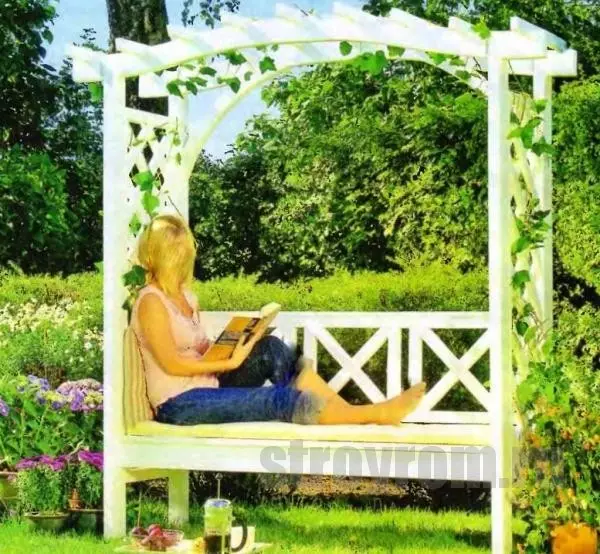
Do you like to be in the garden? For you, this is not only useful work, bringing delicious fruits, but also a rest, indulging in which you get a good positive charge? Then you will be interested in the proposed project of the bench gazebo, which will not only be a place for a comfortable stay, but also a real decoration of your site that attracts the envious views of the neighbors. This effectively looking bench-gazebo is easy to make with your own hands, as the whole process is extremely simple and understandable, and moreover, thanks to the illustrations.
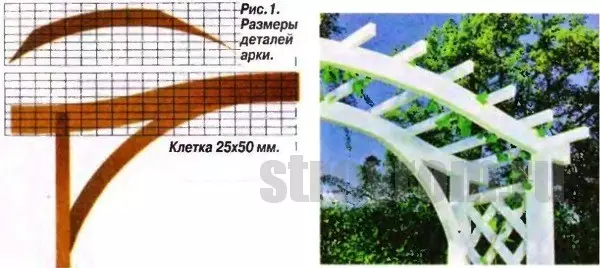
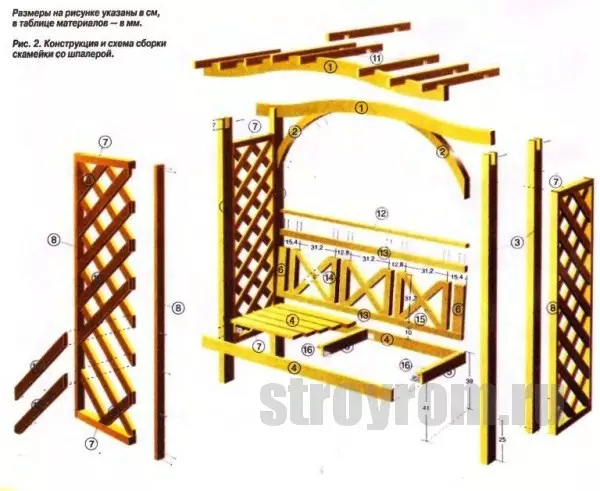
So, in order for all smooth details to be neat, you will need to use the template shown in Figure # 1. Details having a curved form best make it from a pine board with dimensions of 19.5 * 4.5 cm. Arched supports are trimmed only after the arches board are connected to the angular racks. The cutting lines are obtained accurate only after fitting the arched supports under the previously attached arches board.
The back of the bench is better attached to long screws - self-tapping screws, so safer and faster. The holes remaining from the screws do not require spitels, they are masked using a slash rail. It is important to install a back and seat under a slight inclination for a more camphoring rest and in order to eliminate stagnation of rainwater and damage to wood. In detail, the assembly process of the arch and lattices can be considered in the photo 1-7, and the backrest assembly and seats are shown in the photo 1-11 of the corresponding block, respectively, the installation of the Arch is demonstrated in the photo 1-4 of the block dedicated to this point.

Next, describes in more detail each step, demonstrated on the images in each block.
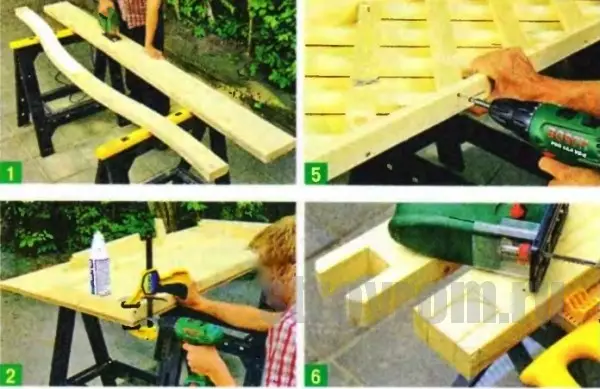
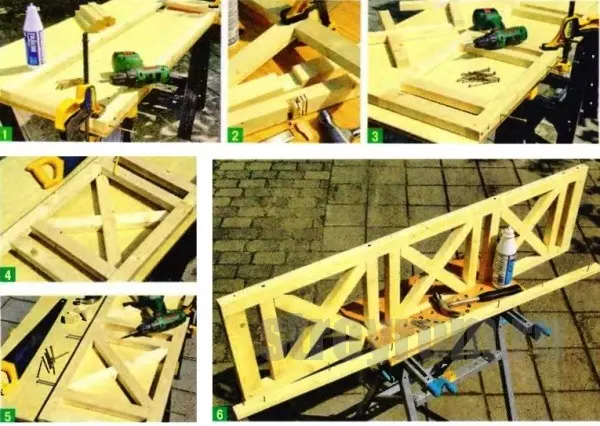
Handle grilles and arch:
1. After carrying the drawing onto a wooden workpiece, the part is neatly chopped.
2. The bars of the frame and the heat rei are best to collect on a flat surface, the assembly lies in the sizing and connecting parts on the screws.
3. Reiki, located diagonally, are cut down in size, which are shown in the table of materials;
Article on the topic: Is it possible to additionally paint fliesline wallpaper
4. Then they (rakes) cut at an angle of 45 degrees need to be inserted into the frame that was previously prepared. Reiki interconnected with galvanized nails.
5. The rack frame is connected using self-tapping screws.
6. Those places where arched boards will be attached to the angular racks are placed, and then the markup is cut with an electrolibb.
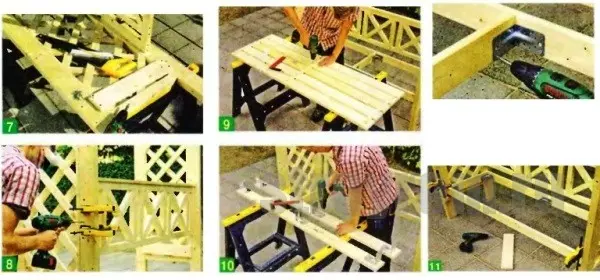
7. The heat grill is placed between corner racks, fixed with clamps and fastened with screws.

Sitting and back:
1. The frame of the bench is sick and bonded on the screws in the same way as it was in the case of a silent lattice frame.
2. To sample the connecting grooves, the chisel is used.
3. Guided by the dimensions specified in Fig. 2, we have vertical parts inside the frame and screw.
4. Crosses are stacked under the frame, then the places where the cross sections will be and after the ends of the bars will be cut off.
5. Crosses are attached to the frame by means of stainless metal screws.
6. Metal screws of self-tapping screws are disguised with the help of a rail installed to the back of glue and small nails.
7. The transverse brushes of the seat frame are attached under the tilt.
8. The back, fixed by clamps, under a slight angle on the screws, the screws are attached to the side racks.
9. Seat boards, longitudinal, are connected by transverse rails, so that there are 10 cm gaps between each of the boards.
10. Galvanized metal corners necessary for fastening the seat are connected to the front ...
11. ... and rear frame detail. After that, the average support timber is attached.
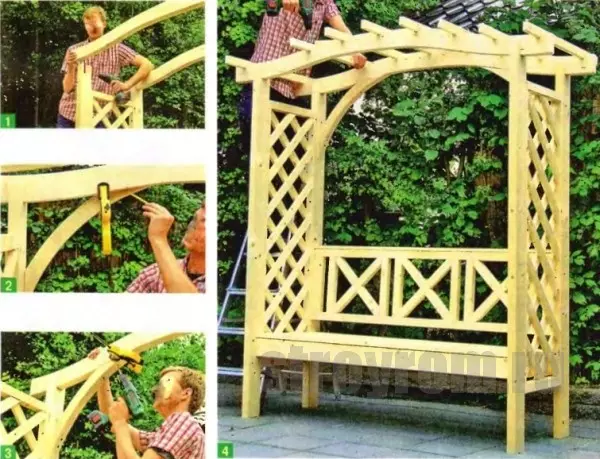
Installation arches:
1. The details of the arches are installed in the grooves of angular racks and fastened with screws.
2. On the arched supports recorded clamps are scheduled, after which, in fact, the cuts themselves are performed.
3. Arched supports below are screwed to the arches boards, the connection location can be temporarily fixed using clamps.
4. In order to insert nine crossbars pergola, the grooves are selected using the chisels. External crossbars are installed at least 5 cm from the arches ends, all the others with a step of 19.5 cm.
Article on the topic: how to prepare wallpaper glue at home
The bench is better installed on a flat solid surface, to ensure better stability. In the event that there is no such surface, it is necessary to think about where it is possible to make a small concrete base, on which, with the help of the corners, fix the finished design. As a base, you can use ready-made concrete blocks available on sale, or sole them yourself directly into the ground using a standard concrete mixture. That's all, it remains only to enjoy a comfortable stay sitting, or lying on an amazing bench-gazebo collected with your own hands.