
A variety of materials are used to align and insulation of the floor. Inexpensive and practical plates of chipboard are considered, it is possible to lay them on the floor independently. This material consists of a pupal base, produced from woodworking waste. Sheets are used for various works, they are indispensable for the walls of the walls, gender and ceiling. Most often, the chipboard is used to align, insulate the surface of the floor. The material is great for the base of concrete or wood, you can carry out the trim on the lags. Work is simple, does not require special experience, but the process should be done step by step.
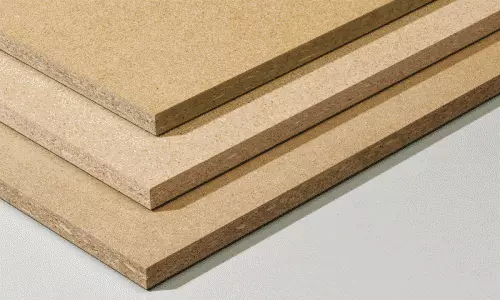
The chipboard is used to align the floors.
Tools and materials for laying
The flooring device from the chipboard is a simple process. Before starting work, all materials should be prepared. Chipboard is a great option for the trim, since it is this material that has the following advantages:
- Alignment is perfect, after laying the plates you can immediately begin finishing work.
- The material is also insulation, the base acquires excellent thermal indicators.
- The cost will be lower than for Phaneur, but the quality will be excellent.
- Such a floor with your own hands to lay quickly and just that it distinguishes it from concrete fill.

Tools for mounting floor from chipboard.
The chipboard cannot be laid when the constant humidity is indoors. It adversely affects the quality of the sheath, the plates will be destroyed in the shortest possible time. The humidity level should be not more than 60% at ambient temperature from 10 ° C heat.
For work, materials and tools will be required:
- building level;
- roulette;
- simple pencil;
- Corolnic;
- Circular Saw;
- electrolovik;
- screwdriver;
- Perforator;
- waterproofing membrane;
- chipboard plates;
- self-tapping screw;
- Dowel;
- Putty.
Article on the topic: Autumn crafts in Quilling technique (20 photos)
Preparation Before laying plates
Before starting to lay a chipboard on the floor, you need to perform a number of preparatory work. The procedure in this case is as follows:
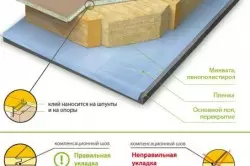
DSP laying scheme on the floor.
- It is necessary to dismantle the old floor covering, after which it is possible to carefully inspect the state of the base, it may be necessary to repair. The complexity of the work depends on what state is found. It will be necessary to inspect the status of the lag or boards, they should not have cracks, places of mold or other damage. Rotten boards should be immediately replaced, while carefully examined the condition of the adjacent elements. It is necessary to check the moisture content of the base base, it is possible that its drying will be required, the waterproofing device.
- For concrete base, the repair may be different. It is required to determine the presence of cracks and chosel, all protruding parts are recommended to be treated with a grinder. The level of floor humidity should be determined, the need for waterproofing.
- After the foundation was examined, it is important to decide whether there will be under the trimming of communication. A device is required not only to special corrugated pipes, but also observation hatches. They will be required to provide periodic service of communications, if necessary, access during repairs.
- For concrete, a special antifungal impregnation will be required, a layer of waterproofing film is required. If the base is wooden, then all the boards before laying, including lags, impregnate with antiseptics.
- DSP plates need to be cut to convenient items. This will require an electrolovka, a simple pencil and a ruler. It is necessary to determine what level the floor should be lifted. For work, construction level, plumb, line, simple pencil or special marking chalk cord are used. Marks are performed on the surface of the walls so that during operation it was possible to clearly see, at what level the casing material will be attached.
Laying chipboard on the basis
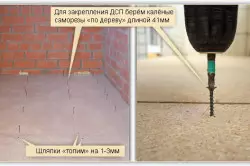
Attaching chipboard to the floor with self-tapping screws.
Article on the topic: Glue for wallpaper Methilana, a small review
After the preparation is finished, you can start aligning the foundation. The floor of the chipboard is stacked from a long corner, it will be much more convenient. It follows to the outlet output. There should be temperature gaps between the stoves and the surface of the walls. In the first case, leave the gaps of 10 mm, and there is a couple of millimeters between the slabs. To align the base, it may be required not to 1 layer of chipboard, but two, if irregularities are too large. For sex by lags, the alignment is carried out at the installation stage of the bar.
Self-tapping screws are used for fasteners, they are mounted around the perimeter of each plate. The screws themselves should be put in such a way that they move away from the edge at least 1 cm, otherwise the stove may be damaged. The step of self-fasteners for fasteners is 30 cm, this will be quite enough.
If the laying is carried out on the floor with lags, the fasteners should be on the bar.
The same rule concerns and joints of individual plates.
After the repair of the floors is finished, it is necessary to start finishing the surface. For this, all the joints and fasteners are shaky. Self-tapping heads must be removed a little in the tree, do not perform above the surface. But this should be done so that the sheet is not covered with cracks. For decorating fastening places, a special putty is used on a tree, it is applied with a thin layer. When the material is driving, the base surface is polished, and you can begin further work on finishing.
Features of laying chipboard on concrete
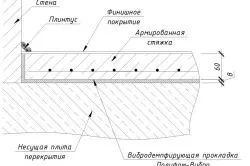
Floor screed circuit.
The above installation is perfect for wooden floors, although it can be used for concrete. However, in the latter case, instead of self-soles, it is still better to use special dowels. If concrete floor has large irregularities, then it is previously required to perform a screed. Before laying the slab should be covered with oil to ensure their protection. Based on the markup, which will match the fastener points. The perforator in the material is made holes, after which it is possible to start laying and fasteners of the panels on the surface.
Article on the topic: how to make a swimming pool in the country: photo reports + video
If the unevenness of the concrete base is not too large, then more than one layer may be required for repair. Such a method is not the best, therefore specialists advise to carry out the lag laying or use a special regulatory system. The plates are placed on special dowels whose height can be installed. It is convenient, such a floor is solid and reliable. When using the rails as a lag, the base can be immediately insulated. This option is maximally reminiscent of lagham installation. Previously, a layer of waterproofing membrane is stacked at a concrete.