
If a person loves masked at home, he will surely need to equip a comfortable and safe place to work for himself. High-quality export workbenches are very expensive, and Chinese fakes cause a lot of doubts. Therefore, it will be useful to find out how to make a workbench with your own hands at home.
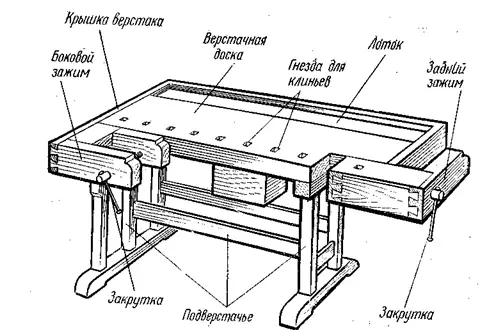
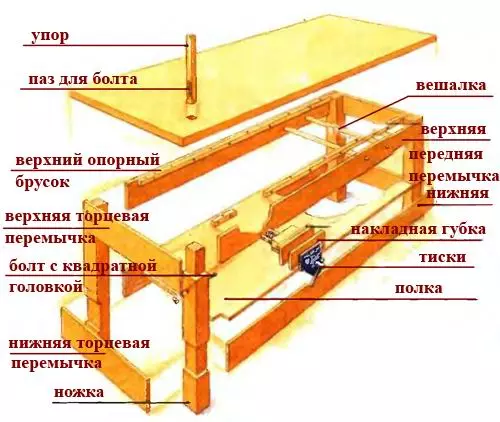
Diagram of a joinery workbench.
Reliable and high-quality workbench can be made it yourself. After all, in reality, its design is a plain table, equipped with fasteners, supports and a place where a set of tools is located.
Design of workbench
Designing the design of the future workbench, it is necessary to take into account several factors affecting the final configuration. First of all, it is worth paying attention to the height of the table: it must correspond to the growth of a person who will work for him. The master should always feel comfortable and reaching all the necessary areas of the workbench. In this case, the table should not be very low, since the work in the bent state causes the stuff. The average workbench has a height of about 75-85 cm.
Regardless of the operations to be made on the workbench, its configuration should include certain supports and several clamps or screws. At the same time, it is worth considering what a master prefers to work, as it affects the location of certain accessories.
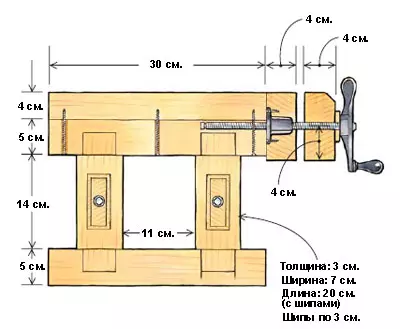
Drawing of homemade workbench.
The dimensions of the table are determined on the basis of the total area of the room, where you plan to place it. Standard workbenches usually do not exceed more than 2.5 m in length and 90-120 cm in width. This size is considered optimal and suitable for most masters. Be sure to provide for the placement of several boxes or Tumba under the projected workbench, as you need space for storing the necessary equipment and set tools.
In the design process, you need to decide whether the table will be removable (dismantling) or fixed and static. With a removable configuration type, it is recommended to select lighter types of material for the manufacture of workbench. It is advisable to make a disassembly table in such a way that it can be enough to simply dismantle the worktop or unscrew / fold the legs.
The most suitable place for the location of the workbench is an area close to the window to the window. It must be installed so that in the process of work there is enough natural lighting. But in case of work at night, an additional light source will be required. Therefore, it is worth making sure that there is a socket or a box with wires nearby so that you can connect the lighting lamp and use electrical tools. Make sure that the entire wiring is well isolated and does not represent danger to a working person.
Article on the topic: Miniature cross-strokes Schemes: Free Little pictures, Teapots with photos, download Rosehip Fruits
Selection of necessary materials
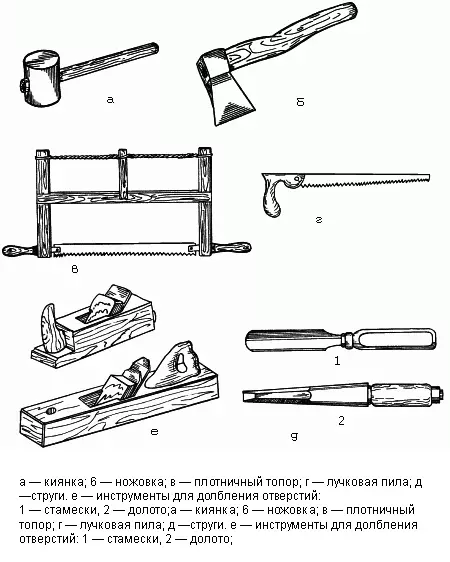
Tools for making workbench.
Before making a workbench, it is necessary to choose the required materials and accessories. The most suitable material for such a table is the planed timber. The crate frame and legs will be manufactured from it. To create legs, a ram is required in size in 10 × 7 cm, and for jumpers will be sufficient size in 10 × 5 cm.
The table top is made of direct uniform boards with a thickness of 50 mm. In addition, this element can be created from an unnecessary solid wooden door or a laminated chipboard with a high-strength surface. As a material for the manufacture of parts, it is recommended to select dense wood species, such as maple, larch or oak. Thick bar and boards will make the design massive, which will give it additional stability. As you know, this factor is one of the main work in the course of the workbench.
Fasteners that will be required to create the table are selected with the orientation to whether it will be stationary or removable.
At the same time, it is necessary to determine the number of piccles installed. The optimal option will be 2 tools, one of which will be located on the right side of the workbench, and the other on the front of the left. The first will be designed for fixing oblong materials, such as boards. The second will be useful for fixing short elements. Standard diameter of testicular lips - 175 mm.
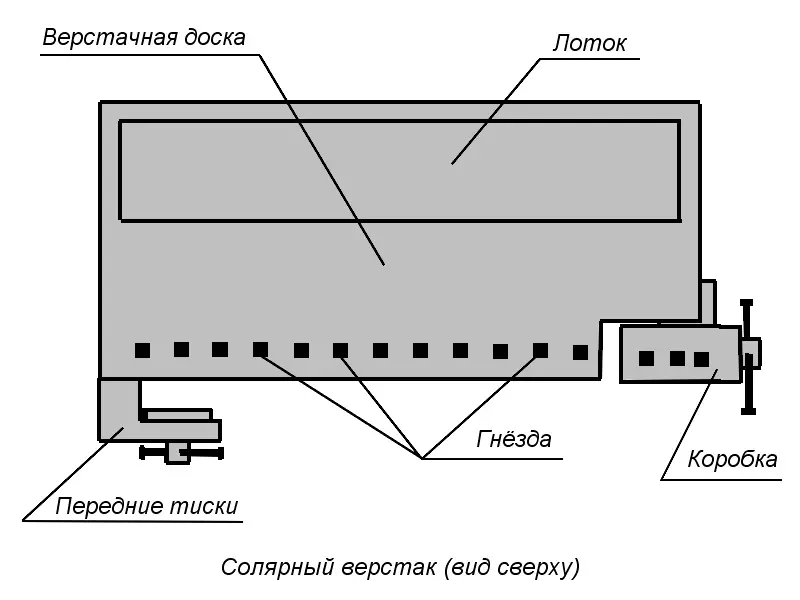
Circuit workbench with jacks for fastening.
In addition to the above materials, you will need the following accessories and tools:
- self-sufficient screws, nails, screws, bolts;
- a hammer;
- Screwdriver Set;
- building level;
- carpentry glue;
- Drill and saw;
- Grinding machine or emery.
Production of the main part of the workbench
The assembly of this table is carried out in 2 stages. The first stage involves the manufacture of the main part, and the second is the placement of the tabletop. Any step of the process implies the exact selection of the elements, they must correspond to the overall size of the structure. Measurement must be carried out using a construction level.
Article on the topic: All about plenty roses
The main part is the laminating frame from the bar, which is connected so that all the base of the workbench is high-strength and tough. To achieve such a result, it is necessary to arrange a transverse jumper in the middle of the feet of the table, and in the very center it will be necessary to provide for the CARGU. The listed elements are placed in 0.5 m from the floor. In the future, they can arrange special shelves for storing various accessories.
The main part of the timber must be joined in the thorn and in the groove, along the way, reinforcing the design with reliable glue. In some places you can use the screw screws if the design allows such a type of strengthening. In the case of the manufacture of a disassembled version of the workbench, several parts of the crate frame can be copper with a metal corner.
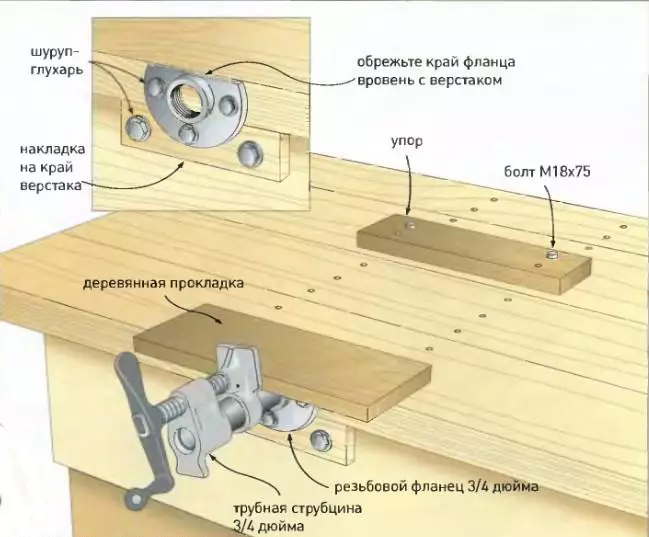
Scheme of fastening clamps and stops for workbench.
Before starting work, you need to prepare spikes and grooves, after which you can start building construction. Attachments you need to reliably smash the carbon glue for wood, and then fix the clamps.
In the manufacture of a fixed type of workbench, it is recommended to provide for the fastening of some parts of the crate frame directly on the wall of the room. Thus, you will get the most reliable design that will withstand high loads. Strength can be enhanced with the help of transverse jumpers or wooden inserts in the form of a wedge, which are located between the legs and the top of the crate. In this case, the mount is performed using screw screws. Skinny ends on top of the crates will also need to combine transverse jumper.
Making countertops
If straight boards are used for the manufacture of table tops, you need to make sure that they are well docked each other. Otherwise, the trash will penetrate the garbage, which will be hard to eliminate. When it struggle this element, its value is calculated in such a way that the edges performed by 10-15 cm into the outer side. This will provide a master more comfortable work for the workbench, in addition, it will be easy to clean and maintain it.Getting Started to make the tabletop, the boards must be knit or secured to 3 bars, which are transversely placed on the other part of this element. In the main part it is necessary to make the place of attachment for these bars. Such a countertop must be completely grounded at least 2-3 times, after which it is necessary to apply a protective mixture (preferably olive or oil). This will prevent the formation of small chips, which can cause the injury to the Master in the future. After that, the table top is fixed on the main part with a metal corner.
Article on the topic: Tile laying options - Methods and recommendations
Fastening other design elements
The required amount of piscovers is attached to the prepared design, which are previously harvested openings in the desired parts of the table top. Under these openings, it is necessary to secure small gaskets from dense plywood. When installing, it is necessary to take into account that the vice sponges should be placed at a single level with the surface of the workbench.
Wheel assembly scheme.
After trying on the vice of the openings, you need to place the attachment points, and then securely secure the tools using hardware on M12. Holes for hardware are predetermined, which allows the bolts to immerse themselves to the end and compare with the surface of the table top. It is not recommended to place vice too close to the corners of the workbench, otherwise there is a risk of a breakdown of the tool from the table at high loads.
After completing the mounting of the vice on the workbench, you need to create support elements. This can be done by fixing ready-made stops, driving on the table opening the desired value, or create them with your own hands. As the stops, it is not recommended to use bolts or braided, since the first can cause damage to the parts being processed, and the second does not allow to reliably fix the installed elements.
The best solution will be the production of stops in the form of a rectangle. They will ensure reliable fastening of parts and place them at the necessary height in the processing process. In order to reliably arrange the stops, it will be necessary to make openings on the surface of the workbench or build a table top by fixing the bars of the desired value in its end part.
The openings are placed apart from a distance of half of the pricks. This will allow you to fix the elements of any value. Kolki can be made of a dense tree or in a rectangular shape, or with the presence of a spring at the fastening site. In the case of the manufacture of rectangular support elements, it is recommended to slightly expand their upper part. So the flasks can be fixed in the openings much more reliable.
Build a homemade workbench for carpentry work is a laborious process, but it is forces to each novice master. This design is an integral part of any workshop, since it includes a lot of useful equipment collected in one place.