
Registration of door slopes - mandatory part of the overhaul or finishing only built at home. Classic design today can be considered to be plastered. This way although it takes a lot of time, but is the most reliable: with such a finish there is no emptiness. Though the difficult thing is, but, when compliance with technology, the plaster of slopes with their own hands can also be made on a good level. In any case, to prepare the surface under pasting wallpaper can be independently.
Plastelling slopes with your own hands: when compliance with technology everything will turn out
Than plastering slopes
Plaster slings for doors can be done using different compositions:
- Cement-sand solution (CPS). On 1 part of the cement, they take 3-4 parts of the sand and are bred by water (less parts) to the state of thick sour cream.
- For a faster "setting" of a solution and increasing its plasticity, you can add a little alabastra or other similar additive to the cement-sandy solution.
- Special mixtures for type plaster (Rotband) and MP 75 Knauf.
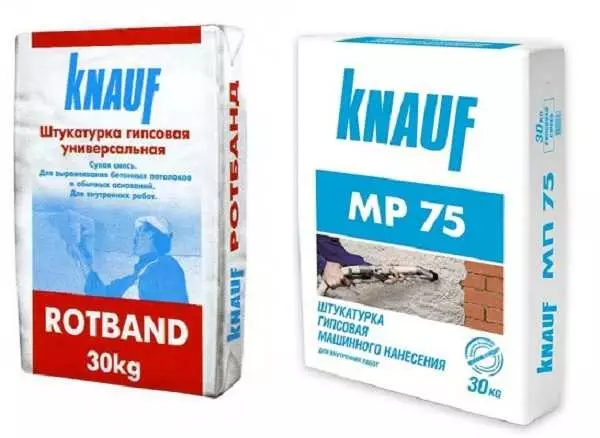
These compositions can be used for door slopes plaster
What plaster is better to stucify the slopes? It is easier to work with the compositions of Knauff, cheaper - cement-sandy. What is preferable to you - to solve you.
Technology
The plaster of slopes begins after the surface of the main walls is aligned. The work is to be dirty, because it is desirable door leaf, the floor and the door frame to close the film, oilcloth or other similar materials. The cant can be saved by painting tape - it will be easier to clean.Preparation
The first stage of the work is to prepare surfaces. First, they remove poorly holding plaster, pieces of bricks, other building material. If the doors changed, the old stucco can hang hard. In this case, even if it holds well, they are frown.
If the old plaster sticks hard, it is frown
Then treated with fatty or oil spots, if any. It is also considered the old paint: the plaster is poorly held. After - dust and dirt are written.
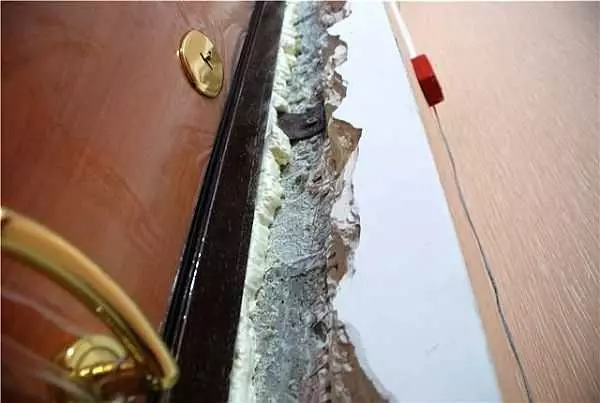
If when installing the door, the gaps did not move, you will need to do it now. The mounting foam is applied to the moistened surface of the volume - not more than 1/3 of the required quantity. First, it is cleaned all the dust, then moisturized with a spray gun. After a few minutes it will increase in the amount of all empty gaps. Waiting when the foam is polymerized (hardening), excess is cut off with a knife. It is more convenient to do it by the usual stationery for paper.
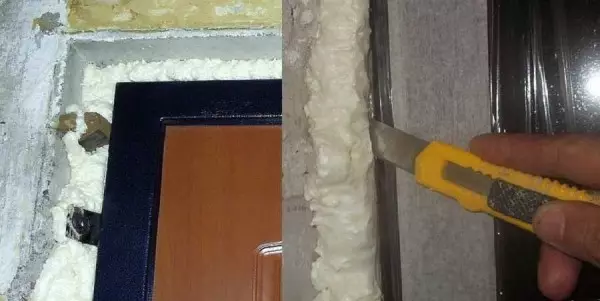
Installation of door slopes with their own hands begins with sealing slots between the door frame and the wall
If plastering is a cement-sandy solution, the surface is moisturized. This can be done from the same pulverizer or with a brush, roller.
Exhibiting guides
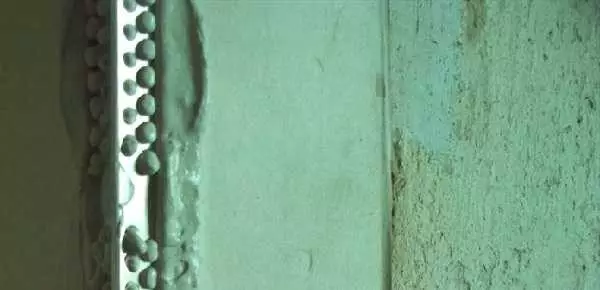
Plastering slopes with your own hands, as well as walls, more convenient by guides. Outside the doorway, to obtain a smooth and hard rib, usually put a perforated greasy corner. Well consolidated, it can be used as a guide.
It is cut down the height of the doorway. The upper edge of the corner that will lay down to the main wall are cut down, at an angle of 45 °. It is better to do it, because when working this edge, for some reason, it always goes away and delivers a lot of inconvenience.
Fix the corner in several ways:
- Gently apply the solution into the corner, then press it to the corner. It is necessary to apply the solution gently: the walls are made very thin and even from a small mass it is closed. Therefore, it is better to use the second way.
- The solution is applied to the angle, and the corner is pressed into it.
Too much solution should not be, but also emptiness too
Well pressing the corner, it is aligned so that its edge is on the same level with the main wall. Speed through the holes, the solution is removed by the spatula. Then they take a smooth bar (you can use a building level or rule), apply it to a corner, checking as far as the corner is set. Check from the main wall, and from the side of the slope.
The procedure is repeated on the other side, and then - on top. In the joints of the corners, the lack of drops can be checked by spending a finger on the joint.
There is another way to attach the corners - on nails or on a self-tapping screw. This method is good when working with plasterboard, but during the plaster it is not used: the hats interfere.
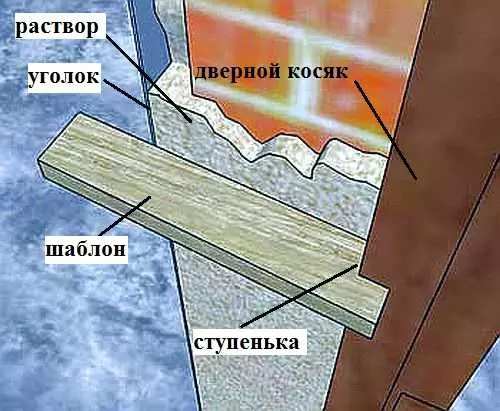
When plastering door slopes, it is convenient to use a template
Second guide - door jamb. When installing the door, they were exhibited exactly, so it is a good landmark. But since the solution should not cover the entire surface of the jam, from some dense material, a template is cut out, which then level the solution. Cut it better from a piece of plastic: and the edge is smooth, and slides well, and quite dense. You can use a piece of a smooth wooden plank. Only the face that will cut the excess solution should be perfectly smooth. That part of the template that will slide on the jamb is made in the form of a step. This protrusion will be removed the extra solution.
You can work with a spatula or rule, but then a lighthouse is installed along the knocker at the desired distance and the lighthouse is fixed. The tool is based on it, when cutting up an extra solution.
Fewing of slopes can be carried out on the separation
In this video class on the plaster, the slopes are explained in detail the technology of fastening perforated corners, explanations on the technique of applying putty during finishing decoration.
Blacknian plaster slopes with their own hands
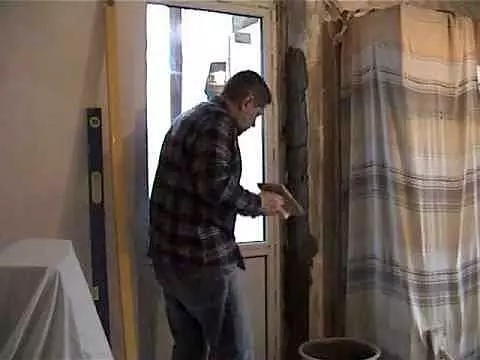
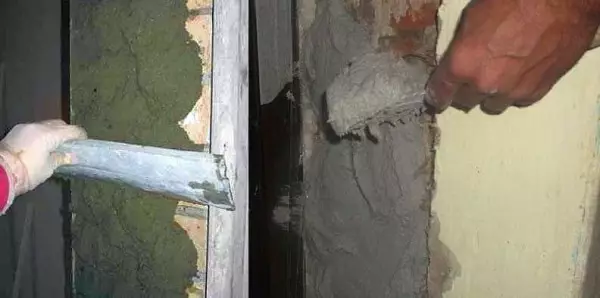
The process of applying plaster on the slope is no different: on the surface purified from dust and moistened surface. Make it with a wide spatula or painting bucket - who is used. Begin more convenient from below, moving up.
Leading the rule or template on the guides, striking from side to side, the solution is aligned, the extra is removed back into the container. For the first penetration, you can not seek a particularly smooth surface, but to monitor the condition of the angles. - Excess the solution regularly remove.
Plaster slings make in two stages: the first - rough, second - finishing
Some problems may occur in the stucco of the upper slope: it is more difficult to apply the solution. It takes a wide cielma (spatula) and slightly pressing, applied with a small stretch. If the surface of the rough, problems usually do not happen. They may occur if a concrete beam is installed on top. To such a surface, the solution, especially cement-sand, "lipnet" is bad. In this case, it is necessary to pre-impregnate it with primer, which serves to improve adhesion (adhesion) with finishing materials.
It will take treatment maybe even if the surface on which the CSP is applied to the plaster strongly absorbs water (silicate and clinker brick, for example). Only in this case the primer should still reduce the absorption of moisture. The second output is to use special compositions of Knauf - they are not so sharply reacting to the lack of fluid. And the third method - on the surface-treated surface to apply a layer of tiled adhesive, forming a wave toothed spatula. The tile glue is remarkably "clinging" to the most complex surfaces, and it serves as a wonderful basis.
If all this seems very difficult to you, read the article on how to make slopes from MDF. There everything is extremely simple. No solutions and spatulas, and the result is excellent. Or you can make slips from drywall. The view is almost the same, and make faster. After installing plastic windows, you can make slopes from plastic.
Pure layer
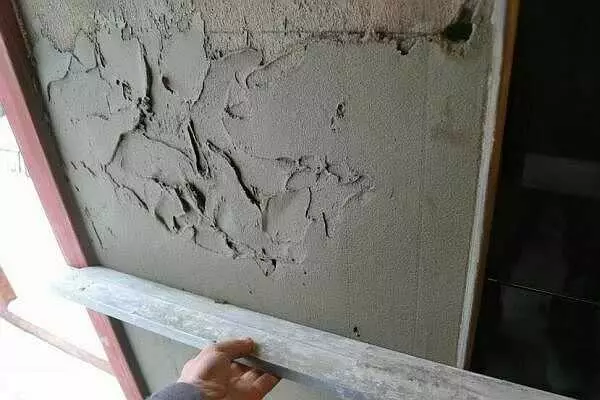
After a while, or the next day, the fucked plaster is aligned, inflicting the second pure layer. It is impossible to start smooth too early - the solution "floats", loses shape. Touch the plastered surface: the solution should crumble, but not "sailing."
For finishing alignment, the solution is made slightly more liquid. It is also applied and stretched. Only this time you need to ensure that the surface is smooth. If necessary, a solution is re-added in voids, filling even minor pits.
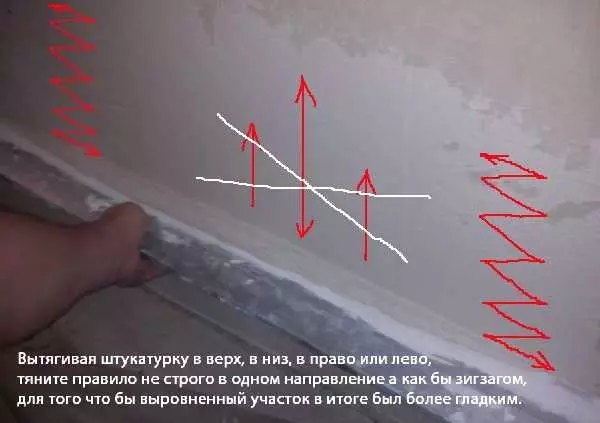
Streets of smooth plaster: Rule pull not exactly, and zigzags
Put
This stage creates a perfectly smooth surface. Put the plaster can only after the solution clings. To do this, go through at least 16-24 hours (depends on moisture and temperature). To determine whether it is possible to start a grout, take a little solution from the wall in the fingers and wrap. If it crumbles - you can work if it is smeared - we are still waiting.The solution is made even more liquid. It is no longer applied, but rather, poured on the surface. And it is distributed not with a spatula or template, but a grater - a foam surface with a handle. This graded circular movement is distributed over the surface. The plaster becomes smooth, monophonic. This procedure is optional, especially if then everything will be putty. But so your jacket plaster with their own hands is becoming a finished look. But once again repeat - this is not necessary.
In this video, it is told how to plaster the slopes of the door with cement-sand plaster. The case is difficult, explanation detailed, only in some places the sound is not the best.
Finishing decoration of plastered slopes
If further breaks, the putty is aligned perfectly. For this apply two layers: start and finishing. Starting spike has a larger grain, it can fit the layer to 1 cm. With it, it is eliminated by all flaws that are difficult to remove cement mortar. After the finish putty dries, all irregularities and protrusions are grinding with a special grid. After the layer of finishing plaster is applied. It is even more plastic than the start-up, and can be applied by a completely thin layer. With it, you can achieve perfect smoothness.
For a beginner plaster, get a perfectly smooth surface under painting - very difficult. It is much easier to align sloping under the shook wallpaper. In this case, you can stop on the starting putty.
If, when installing the door, the old slopes suffered randomly and they can simply renovate, work will be less. It will only be necessary to throw in a solution of depression and aligned with a long cell (spatula).
Plaster door opening
Sometimes doors in the opening do not put, but in this case the doorway requires finishing. And the easiest way to do this with the help of plaster. The technology of plaster itself is similar, but the guides and methods of their installation are others.
Plastering the doorway begins only after both adjacent walls are already plastered. The water itself is covered with primer (the selection principle is the same).
Guides are installed from the sides. It can be boards, metal profiles, two rules, pieces of plastic, fiberboard, etc. One is installed on the right, the second one - on the left, they are fixed. It is most convenient to fix them with clamps. If there is no clamp, it is bargainable to use nails or screws - the remaining holes then it will be necessary to neatly close.
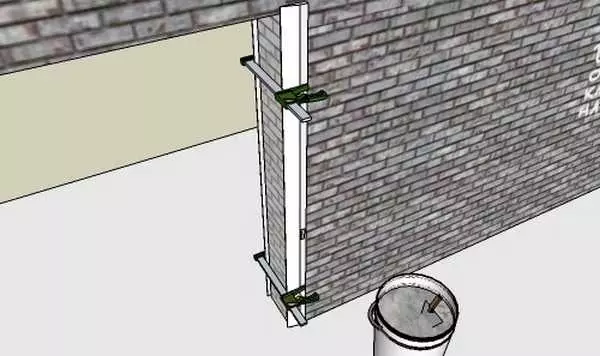
For plastering the doorway, we need two guides that are installed on both sides.
The front edges of the guides will serve as the basis for which the rule or a wide spatula will move. The sequence of actions is the former: the first layer - rough, the second - purple, if necessary, to bring to the perfect state - they make a grout. Read more about how to put the doorway watch in the video.
Article on the topic: Bath: Economy repair with your own hands, photo instruction