
Acquaintance with the device for a hydraulic device in a kitchen sink
The siphon of the kitchen sink serves to ensure that the remnants of food, cleaning vegetables, extraneous items (ring, for example), located periodically in the sink, did not come directly into the sewer pipe. In addition, this plumbing device saves water from overflow serves as a water shutter, which prevents the supply of sewer gases into the room. It accounts for a constant and quite large load leading to a violation of integrity.
The purpose of the siphon is that the sewers do not fall into the sewage, cleaning vegetables and other foreign objects.
Therefore, it is quite realistic that it will be necessary to change the siphon in the kitchen. This is a fairly simple procedure, and even an unprepared person can accomplish it.
The first thing to be done is to carefully consider the model of the siphon to change the spoiled device to a similar one.
Modern siphons are made of brass or plastic. The most common devices made of polypropylene or polyethylene, which do not rot and do not rust. The instrument pipes are usually suitable for any opening and are adjusted along the length.
Siphon varieties for washing
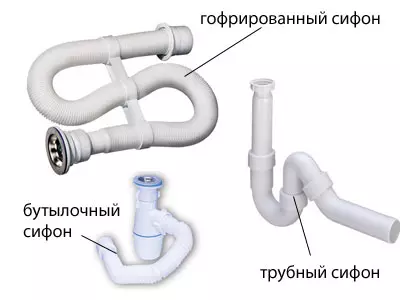
Siphon types: corrugated, bottle and tubular.
If another twenty years ago, the kitchen equipped with one sink. Today the situation has changed in the root. Compact washing and dishwashers are installed in the kitchens.
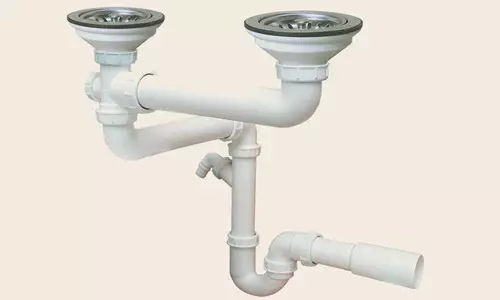
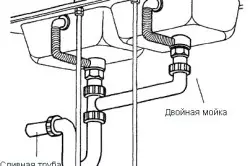
The designs of plumbing equipment are changed. For example, for dual sinks, which are installed for washing dishes and vegetables, invented dual siphons. The sanitary market offers instruments that provide overflow and automatic discovery of plum plug.
Popular simple single appliances depending on the design and materials are divided into three groups.
The easiest, available, giving the smallest amount of leakage (due to the small number of connections) - siphon-corrugation. It is a plastic tube, which is bent a zigzag to obtain a water shutter. Bending is fixed by a plastic clamp. Material and simple design device allow it to save mobility and plasticity. Due to the properties of the corrugations, it is easy to stretch the washing easily to move to another place. Minus - the corrugated surface of the pipe is easily clogged with fat.
Pipe siphon (knee) is a traditional rigid construction in the form of a curved pipe from a metal, which occupies a large space. Another drawback is possible only from large garbage.
The bottle siphon is most often installed under the sink sink. The flask is separated from the sump with an outlet tube (more often corrugated).
Article on the topic: space between the balcony and room: design options
If a siphon with holes for the future installation of additional plumbing devices, such as a washing machine, can be closed with tight gaskets for a while.
Preparatory work on the replacement of siphon in the kitchen
The success of the installation of a siphon between the washing and drain into the sewer system depends on the quality of the plumbing equipment and the correctness of the assembly.The siphon also serves as a water castle that does not give sewage pairs to penetrate the apartment.
Therefore, before purchasing the device, you need to get acquainted with its device.
For example, a bottle siphon made of plastic consists of a housing, a removal, a squabble with an insulation of the square, the sewer tube. Tightness is achieved by pads laid between the details. It is necessary to carefully examine them when buying. Damage detected may be related to the fact that the product is stored and transported in polyethylene packaging. This may be the cause of scratches on polished products, as well as chips. The factory marriage can be associated both with the deformation of rubber parts and with poor-quality threads leading to the appearance of sharp burrs.
You should promote the acquired device and decompose the items in the order and position in which it is planned to be connected according to the instructions.
To work on dismantling, system assembly requires some materials:
- transition cuff;
- Silicone sealant-gasket;
- Insulating tape (FMU).
Depending on the type of device, as instruments are used:
- flat screwdriver;
- adjustable wrench;
- Pliers used for nuts.
Siphon dismantling sequence in the kitchen
Before analyzing the plumbing site, it is necessary to unwell the rag under the sink and put a bucket on it.
First of all, turn off the water supply in the apartment or in the kitchen.
Before replacing plumbing devices, you need to unwell a rag under the sink and put a bucket for collecting dirty water on it.
The old system disassembles with a flat screwdriver. The first step is to remove the grid to release the screw connecting the outlet and release. Then the screw is unscrewed with a flat screwdriver. The case of the device is adhered to from the bottom to prevent its fall to the floor.
After that, corrugation or pipe is removed from the sewer pipe, the old siphon is separated from the system.
After that, the order is in order. Flavor and drain are thoroughly cleaned from old sealant and dirt. The inner surface of the pipe is determined by the abrasive skurt, is rubbed with a rag. It is desirable that she dries. Then inside the termination of the pipes on the entire depth, it is necessary to introduce a rubber sealing ring with a lubricated silicone sealant of the outer surface. After that, the pipe is temporarily closed with a rag or cork. The sink is wiped with a damp cloth.
Article on the topic: Imitation of bricks with your own hands
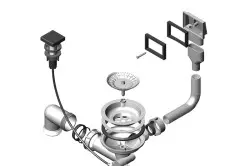
Standard equipment bottle siphon
In the kitchen, such a design is set most often due to the ease of installation and maintenance during operation. The set of parts from which you can collect a bottle siphon include:- plastic case of the device;
- the exhaust pipe from plastic equipped with a pressed threaded insert of stainless steel;
- plastic nuts (diameter 32 mm);
- rubber gasket of the outlet;
- cone rubber cuffs (diameter 32 mm);
- soft plastic cuff;
- lower tube device and ring gasket to it;
- tie screw;
- rubber plug;
- Decorative lining on the drain hole of the sink;
- A decorative chain with rings can be included in the kit.
Procedure for assembling a bottle siphon in the kitchen
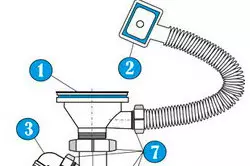
A bottleneck of a bottle siphon: 1. Issue for water 2. Overflow for water 3. Special removal for additional connection of the drain pipe from the dishwasher or washing machine 4. Flask 5. Outlet nozzle 6. Laying 7. Connecting screws and nuts.
The assembly order is usually described in the instructions attached to the set.
In the process of assembling the siphon, three stages can be distinguished:
- Attaching parts to the sink;
- Installation of the siphon case;
- Attaching the device to sewage.
First of all, you should carefully examine the lower docking surface. If burgers or sharp particles are detected on the threaded surface, which can damage the ring gasket, they are eliminated with a sharp knife. In the groove of the sump (bottom stopper) is inserted to achieve a tightness of the gasket, wrapped with sealant. After that, the sump is screwed at the bottom of the siphon.
On the graduation (removal) nozzle, the plastic brass nut and the cone gasket (most often blue) is put on alternately. At the same time, the gasket is fixed, retreating 3-5 centimeters from the edge of the nozzle.
Instead of cone gasket, a rubber cuff is sometimes used, which can be included. It is used with the difference between the diameters of the ziphon and the sewer tube. For example, a 40/32 mm marking cuff allows you to connect a pipe having a diameter of 32 mm and a device with a diameter of 40 mm.
The prepared nozzle is inserted into the housing of the flask so that it does not enter the stop, otherwise the water will remain in the sink. The connection strength is achieved by twisting the hands of a tie nut. After that, the design takes the shape of the bottle. The tools are not recommended to apply not to drag the nut, otherwise it can burst.
To achieve the tightness of the siphones of washing, threads and gaskets need to be lubricated by a sealant protecting against the flow.
Replacing the bottle siphon
In the drain hole with a free hand, release is inserted with a thin gasket under it. The siphon nozzle is supplied to the bottom of the sink, equipped with a thick gasket. It is tightly pressed to the lower surface of the sink and check whether there are no displacements and gaps. Combine the release on one side and the hole of the plum nozzle on the other.Article on the topic: Learn everything about polyester curtains: from choosing to care
We carefully spin the hollow screw so as not to destroy plastic parts and do not thread the thread. Top to release secure the grid.
After to the nozzle, the siphon is connected and tighten the locking nut. To the sewer, located on the side of the siphon, is screwed to the corrugation using a coupling nut.
On the other edge of the pipe they put on a conical gasket and insert the pipe into the removal.
Testing the collected system for tightness is simply enough to open a tap with water.
Installation of a bottle siphon with overflow system
Most high-quality plumbing devices have a special device called overflow. Due to the design features, the assembly and installation require special attention.
The first step is to build a plum. Previously, a thick rubber gasket is superimposed on the plastic base of the drain-release.
On the inside of the release there is a thin, flat, soft gasket. It should provide a dense fit of the inside of the release and the surface of the shell near the hole.
In order to achieve the necessary tightness of the siphon and car wash, as well as all rubber gaskets can be lubricated with sealant.
From above to the hole of the sink, the release is lowered, a drop is supplied from below. They are installed opposite each other so that the hole of the overflow in the sink is on the lines of the overpressure. Holding the details on top and bottom with someone's help, they are twisted with a plastic hollow screw with a coin or a flat screwdriver.
Collecting overflows, first of all, you need to adjust the tube in the depths of the shell. This is done simply: the tube (white) is simply plugged into the retainer (black).
On the tube of overpressure - white part - a nut is put on. On the edge of the nozzle placed a cone-shaped gasket.
Pumping nozzle is introduced into the removal of the release, the nut is manually tightened.
After that, from the bottom side of the shell to the hole to attach the overflow, the rubber gasket overflow, which is available at the end of the black retainer. On the one hand, it has roundings that adapt to the sink.
By connecting the openings of the perelive and sink fixture, they are twisted with a screwdriver with a screwdriver.
The next stage is the assembly of the hydraulic assembly (sump) and corrugations.
In a special groove of the siphon case, the gasket is inserted and connecting it with the release. It is necessary to trace so that the gasket does not wed up. After that, the nut is tight, but neatly twisted with his hands. Under the same scheme, the corrugation is screwed to the hole of the housing. After that, the sink is installed in the worktop. Corrugation with a rigid branch covered by the sealer is connected to the sewer.
At the final stage, a grid-plug is inserted into the hollow screw.