Photo
In the design of private houses, the tree is most often associated with ancient. Therefore, wood lamps have an old appearance. The most popular structures are chandeliers in the shape of a wheel from the trolley.

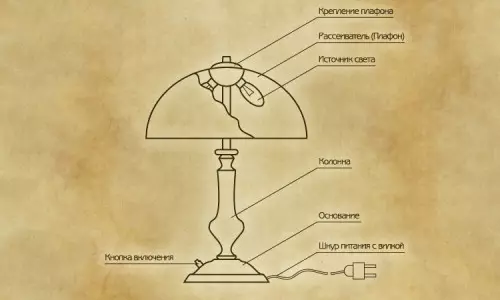
Diagram of a desktop wooden lamp device.
How to make a lamp do it yourself from the tree?
Advantages and disadvantages of wooden structures
The design of this type has the following advantages:
- If you evenly place the candles, the design will give the same illumination of all elements of the room;
- The knitting needles will not create obstacles to light.
The same advantages also have modern stylization, but today instead of candles from wax and lamps are used lamps. In most cases, similar structures are made in the form of a candle.
Designs from wood have the following advantages:

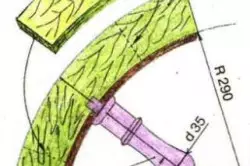
Scheme of a round wooden lamp: 1 - segments for rim, 2-needle-spin, 3 - hub.
- Material is environmentally friendly. It will not only not be distinguished by harmful substances, but also will saturate the air with aromatic resins, which facilitate the breath of people.
- Tree can be easily handled. If special tools will be needed for the production of plastic or metal design, then the lamps can be made with their own hands using the minimum set of fixtures.
Disadvantages of wooden structures:
- The tree is a flammable material. Place elements from this material next to incandescent lamps are not recommended. If a contact is firing in the lamp patron, then the design may be disguised.
- Lamps made of wood for ceiling are attacked by beetles, fungus and other pests. The least suffer from rotten and pests coniferous species of trees. For deciduous breeds, it is recommended to use antiseptic agents that are able to reduce the flammability of the material.
- Tree is a hygroscopic material. It absorbs moisture out of the air, as a result of which, in the process of drying, the material can change volume, shape or cracking. In order for the design to serve for a long time, it will be needed to provide it in constant temperature and humidity.
Article on the topic: How to watch HD movies from a smartphone on the wall! Simple home cinema do it yourself
Nuances that should be considered in the manufacture of wooden structures
In the process of building lamps from wood, it is necessary to take into account the following nuances:
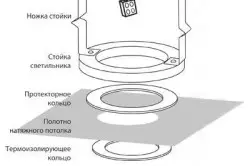
Scheme of the assembly of the lamp made of wooden rings.
- Designs should be such a form so that all heating elements are removed from the devices that are made of wood. Lamps should look up, since only in this case the upstream air flow will not cause tree deformation.
- Fire safety rules are prohibited from placing wood chandeliers under ignite elements.
- Wood lamp is perfect for a bedroom or living room. In the kitchen room or bathroom, where there is a sufficiently large amount of steam, such structures are not allowed.
In case of closing the phase, you can easily get a blow to the current.
Making a lamp in the form of a coffee service
To make a lamp do it yourself, you will need to prepare the following items:

Scheme of the LED wooden lamp.
- Dry board of wood of any kind. You can use both ordinary pine or birch and ash. Oak, which does not need to be painted or varnishing.
- Several translucent coffee cups and saucers to them.
- Several cartridges for a small base with fasteners for them.
- Required bulbs. In this case, it is recommended to use LED elements.
- A small number of rubber pads. Their quantity will depend on the method of fixing the cartridges.
- Two-housing wire of copper of a small section and small length. It is best to use a cable with a cross section of 0.75 mm.
- The chain of a small thickness or twisted cord. These items will be used to secure the product on the ceiling construction.
- Required number of screws with rings. The lamp will be suspended using data items.
- Electric drill.
- Drills for working with wood and cafenel.
- Passatia.
- Screwdriver or screwdriver.
The design of the construction of the design is:
- The sharp board is treated with emery paper (first coarse, after that - the bottom).
- Next, you will need to drill a few holes in those places where the cartridges are planned.
- If the noble wood varieties are used, then it will not be necessary to process the material. If other varieties of wood are used, the material must be coated with a veneer, then dry and cover with varnish in several layers. In the open air, nitrolac will dry several hours, because this process will not take much time.
Article on the topic: What grinder to choose for wood: species, features
- At the next stage, you will need to drill in coffee bowls and holes of the hole, while it is very important not to damage them. In this case, you only need to use the drill for work with glass and a tile. It is not allowed to make great efforts. You need to drill with low speed, in the process you need to ensure that there are no distortions. If you slow down to the electric drill, then the bowl or saucer can split.
- To all available cartridges need to attach the wires. At this stage, it should not be bonded with each other.
- The whole design is repeated in a single whole. If the cartridges will use the pads with holes for fastening elements, they need to be attracted to the board through the holes in savings or cups. If there is a pipe with a carvings and a nut on the end of the cartridge, then they need to be skipped through cups, saucers and a board. Between metal and glass elements you need to install rubber gaskets. Such a device can be made independently from an unused camera from a bike or car.
- In the back side of the board you will need to screw the screws with rings.
- In parallel, the cartridges are connected. No need to leave twists, which are closed with a tape. Neatfully need to do even the part of the lamp, which no one can see. To fasten the wires you will need to use the block.
- The block must be fixed on the back of the board by any method: a small amount of adhesive mixture or screws. It needs to push the segment of the wire that will be connected to the wiring.
- On the back to the rings join chains or cords. The second end of these elements is fixed to the hook in the ceiling. The wire must be started on any of the chains. At the end you need to install light bulbs.
Design with plywood lace
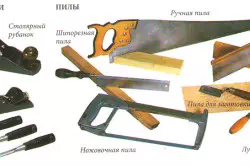
Tools for the manufacture of a wooden lamp.
It should be noted that this design is not ideal from the point of view of fire safety. However, in this case, LED lamps are used, which are economical. It should be remembered that such fixtures practically do not heat. Therefore, the risk of fire in this case is excluded.
Article on the topic: Installing the entrance door in a wooden house
From the plywood of a small thickness with the help of a manual jigsaw, you can make masterpieces of applied art. Make such lamps with their own hands as follows:
- First of all, you will need to pass the sheet of plywood.
- Using the use of copier paper, you need to transfer the drawing of parts.
- The design elements will be needed to cut down the contour.
- Inside each of the pieces that need to be deleted, you will need to drill holes. In this case, it is recommended to use a 1 mm thick drill.
- In the next step, you need to cut the inner parts.
- In small files, various forms will need to clean the edges of the structure.
- Next you need to make all the elements of each other. To do this, it is recommended to use the adhesive mixture. It should be noted that PVA glue can be brightened after a while. Therefore, it is best to use a special adhesive solution for wood. The remnants of the adhesive mixture on the visible parts of the design will be thoroughly removed.
- In the end, the product should be covered with varnish.
If you plan to use incandescent lamps, then it should be remembered that their power should be less than 40 W.
It is necessary to place them at the maximum distance from the elements from the tree. Only in this case can avoid overheating of the lamp.
Other options for wooden lamps
You can make other lamps with your own hands:
- Design from boards and rope. In this case, several matte plafones are used as light sources. There is nothing complicated in the manufacture of such a design. It should be noted that in this case only energy-saving or LED light bulbs should be applied. Light power incandescent bulbs quite often create a fire.
- Bruks with pots. In order to drill pots of pots, you should use a drill to work with a tile. In this case, it is not allowed to install incandescent bulbs of any power.
- Circled logs with sofits. It should be borne in mind that it is difficult to extend the product.
From the tree, the lamps do with their own hands quite simply. It will only be necessary to show fantasy and prepare all the elements that will be needed for the manufacture of the design.