
One of the most important points in repair or construction is the selection of the right light. This moment relates to any room in the house, be it a living room, bedroom, bathroom or kitchen. Very relevant just recently was the use of LED lighting, which will quite satisfy the needs of each. LED backlight kitchen with their own hands is quite feasible and a simple amateur, there is no need to know any specific things. The main thing is to make a project and calculate.
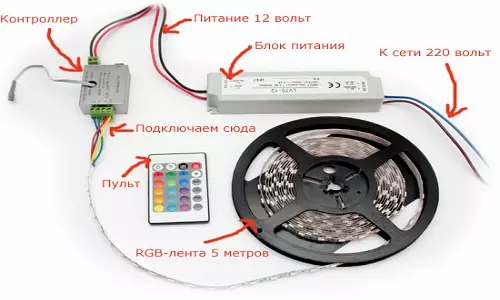
Connection diagram RGB-LED tape.
How do LEDs work?
The LED is a semiconductor emitting light when electrical energy passes through it. To find the necessary brightness, you need to know the chemical composition of the material itself. Immediately say that the LEDs are not connected to the power source, since in this case overheating will occur, which leads to a breakdown. In order to avoid this, a stabilizer is used, which is a tok stabilizing chain.In colors they can be absolutely any tone. But if you wish, you can make infrared or ultraviolet backlight in the kitchen.
LEDs are not the main lighting, they play the role of highlighting. Therefore, they are used to enhance portable lamps or headlights by car.
Common form of execution of the LED.
In order to reorganize the interior of the kitchen with their own hands, you can use the LED ribbon. It will add a certain elegance and will help express accents. Such highlighting has its advantages:
- In the kitchen will always be enough enough light for cooking;
- Not afraid of mechanical damage;
- If one day such lighting will work for 16 hours, it will last a little more than 15 years;
- There are no problems with the choice of color lamps;
- immediately gives the brightness of light, since there is no need for warming up;
- If necessary, it is easy to choose the desired angle of radiation;
- fireproof, also for their installation there is no need to create certain temperature indicators in the environment in the kitchen;
- During operation there is no release of toxic substances, which makes them safe for the dwelling.
Article on the topic: What glue is better to glue the ceiling tile
SMD ribbons are suitable for installation in the kitchen. They are single-two-three and fourcristal. Depending on the section, monochrome and full-color stand out. The size varies in the range from 1.6x0.8 mm to 5x5 mm.
What are the types of LED ribbons?

Popular series of LED ribbons.
Many have seen such designation as LED tape on store signs. So, this is the LED tape. In one order, small LEDs are located. The shape of the tape is very convenient for installation with your own hands.
There are several types of ribbons, depending on the location density of lamps per sq. M: 60,120 and 240 pieces. Accordingly, than them more, the brighter will be lighting in the kitchen. Also, the types of protection against moisture should also be allocated:
- IP 20 - the weakest defense. Such LED backlight is intended for living rooms or bedrooms, since there is a level of moisture mainly on the optimal indicator.
- IP 65 - medium protection. This type can already be applied not only in the kitchen, but also in the bathroom.
- IP 68 - Strong protection. This species can be attributed to professional illumination, as it is mainly used in the design of landscape design, for example, to fountains or pools.
Before buying material, it is necessary to determine the place of lighting.
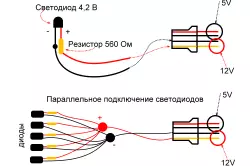
A variant of parallel connection.
If it is a working surface, it is better to choose a brand that is more powerful, and if these lockers, and the LEDs will perform the role of purely decorative, then you can do with low-power ribbons. The same LED backlight can be used on the ceiling, in order to zoning the kitchen on the working and dining area.
As mentioned above, the lighting intensity depends on the number of crystals. In addition, this parameter affects the color changes. Choosing a tape, you should pay attention to its labeling. There is the possibility of a combination of different tapes, which will create 15 million shades.
Such material is sold in rolls, each length is 5 meters. But besides the tape itself, the power supply and fasteners should be purchased separately.
Article on the topic: Bamboo wallpapers: photo in the interior, wallpaper under the bamboo, with a pattern, video, how to glue on a tissue basis, to what, sticking
How to make a kitchen with LED backlight?
In order to have enough lighting for personal needs in the kitchen, the LED backlight can be issued in several places:

The connection of the LED tapes using the Navigator connectors.
- With the help of it, you can arrange glass shelves, eaves, cabinets and stained glass windows. And it will turn on, as soon as the doors open, and when they are closed, and it will not work.
- Lighting table tops as the main working surface.
- If the LED backlight is installed on the lower parts of the kitchen headset, it will create the effect of the furniture hire.
- If a multi-level ceiling is made in the kitchen, then each of the levels or only one can be illuminated.
- With the help of LED backlight, it is possible to divide the room on the zones using different intensity and color solutions.
- If desired, the backlight can be mounted in the door leaf, and in the kitchen arch, if available.
- The backlight may be a cut for decorative interior elements, such as photos or pictures.
- If the table top is made of glass, then it can be decorated with point lighting.
Designers recommend using warm colors to create classic lighting, respectively, if you want a modern style, then cold tones are used.
How to mount backlight in the kitchen with your own hands?
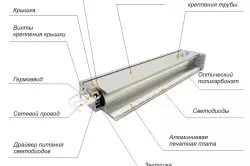
Scheme of the lamp housing.
Regardless of the selected lighting option, the main thing is to remember that the LED backlight should provide the required amount of light on the selected space.
Before starting to install, you should stock:
- LED ribbons with a power of 12 W;
- electrical cable (diameter 0.75 mm²);
- forks;
- electrical storage brackets;
- soldering iron;
- transformers;
- bilateral scotch;
- tape;
- LED profiles;
- scissors;
- 12 W power supply;
- Corners under highlighting.
Installing the LED tape is as follows:
- First of all, the working surface should be prepared, that is, purified and degreased.
- The tape is measured on the necessary segments, after which it is cut. From the edges it is necessary to bargain contacts (1-1.5 cm). Next, two billets of the cable are soldered. All contacts must be protected by insulation.
- On the corners on the one hand glued tape, and on the other - the LED ribbon. Near the transformer itself is installed near. But before it is installed, it is necessary to remove its body to determine the lower voltage, since on this side the stripped illumination contacts are soldered. From the opposite side, an electrocable and fork is attached to it.
- The plastic box is placed inside the cabinet, in which it is necessary to secure the extra wires so that they do not interfere. For this, there is a necessary size of a hole through which the wires are stretched and fastened by brackets. They must connect in one place where the power supply will be mounted. By the way, with regard to the connection of the wires. The main thing is to remember that the plus should approach the plus, and minus, respectively, to minus. Next, they are connected to the block.
- The last step is the installation of the switch and connecting it to all the same block.
Article on the topic: how to equip a cottage
Practical recommendations
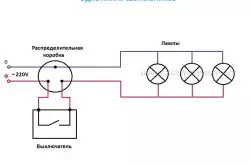
Elektric diagram of connecting point lamps.
There are several tips that you need to know to set the backlight in the kitchen with your own hands:
- Buying a led tape, the optimal option will do this in the appropriate store. In addition, attention is better to pay for the average product. They will burn quite brightly and do not overheat.
- In order for the LED backlight to work, carefully keep track of the insulation of the wires, the lighting will not work in a different way.
- On LED tapes are "+" and "-", in the process of cutting blanks, they will help to navigate. This designation has a type of vertical line, according to which it is necessary to make an incision of the material.
- At the procurement phase, the priority point is the correct selection of power supply power ratio and LED tape. In the opposite case, this unit will not work for a long time.
- Many use connectors for fastening wires, but it is better to use an ordinary soldering iron.
- For soldering, it is recommended to use rosin;
- If there is a desire to adjust the lighting intensity, the dimmer and amplifiers are required. They are installed with a power source.
- So that such lighting is quickly tired, it is better to combine different colors.
In general, as it is clear from the foregoing, to establish in the kitchen with their own hands the LED highlighting will not work.