
Table of contents: [Hide]
- Details about beds with pendulum do it yourself
- How to make a pendulum for a bed with your own hands?
- Procedure of work and necessary tools with independent manufacture of a baby bed
- Completion of the assembly process
So, your family can be congratulated! All members are in the joyful waiting for a miracle. But, despite the anticipation of the holiday, someone from loved ones must take care of the preparation of a comfortable bedroom for a newborn. Buy or sew bed linen kits can grandmothers, give toys and clothes - grandfathers, uncle and aunt, but make a crib for crumbs should, of course, the future dad!
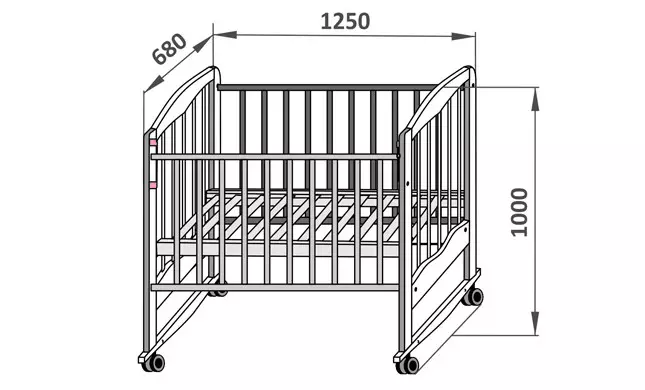
Scheme of a baby cot with sizes.
This process will be pleasant, and useful, and will also help save financial resources to a young family. Convenience, environmental friendliness and security - this is what the baby bed is distinguished by their own hands. The pendulum in its device will add functionality and comfort.
Details about beds with pendulum do it yourself
Many are unnecessary such as a pendulum, for a children's bed. And some parents, on the contrary, want to acquire or make their own hands just swinging a crib. Basically, the opinions were divided in this matter. What will you choose, you can decide, familiarize yourself with all the nuances of using such a device as a pendulum.
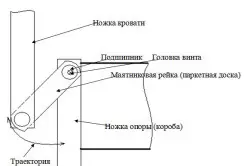
The diagram of the pendulum mechanism.
- Some modern mothers adhere to the opinions about the fact that the child's mentaling is an unnecessary and useless process. But another half of the parents think in a completely reverse direction and believes that it is impossible to do without it. But choose to you;
- It is wrong to assume that scolding the child will only have the first few months of life. It may be so, but some children demand to swing them before bedtime and at an older age. For example, your baby is already a year, it weighs about 10 kg and does not fall asleep until you shake it. It's hard! At these points you will save the presence of a bed with a pendulum. With your own hands, make such a bed will not be much difficult, and, at the request, the option of the swinging bed can be purchased in the store.
Article on the topic: How to sew a curtain tape: technologies of use of narrow and wide ribbons
Today you can choose the design of the pendulum mechanism from two options. This is the transverse view of the pendulum and longitudinal. If you choose a longitudinal mechanism, then the bed will move towards back and forth. And if you like the transverse view, then the bed can be right left and back.
The main thing is to correctly calculate the free place in the room, so that the procession of the instruction does not interfere with the interior items and walls. At least 10 cm free space will be enough to install a bed with a pendulum.
Back to the category
How to make a pendulum for a bed with your own hands?
Let's figure out how to make a pendulum for a baby bed with your own hands. For these purposes you need:
Mounting diagram of the pendulum mechanism.
- Bearings, the external diametrical size of which corresponds to the value of 3.5 cm. Required amount - 8 pieces;
- Metal sleeves having a thread on 6. They will also need 8 pieces. You can purchase such in any market specializing in the sale of furniture fittings;
- Screws with a hint-type head. With their help will be attached pendulum. Need 8 pieces;
- Planks - 4 pieces. The elements of the parquet made of oak (plate) are suitable;
- Washers in the amount of 8 pieces. The most appropriate choice will be the use of plastic instances. They will be needed in order to avoid friction of the legs of the bed at contact with the support structure;
- In addition to purchased ready-made materials, you will need metal bushings (8 pcs.), which should be tightly tightly pressed into bearings, more precisely in their inner hole. Made such sleeves only to order.
What else can you need? For a bed, it will be necessary to make a special box (frame), the design of which will serve as the base for the bed suspension.
And now about prices. The approximate value of one bearing is 35-45 rubles, factory production bushings from 6 to 12 rubles, but the price of the sleeve, customized, can reach 50 rubles or more. It all depends on the requests of the wizard. There are, of course, the location of the cot with a rope, but it is not entirely safe.
There is such a chance that in the process of changing the rope can be pulled out. And yet, the use of ropes as a suspended material can give a significant backlash when swing, it means that your bed with a pendulum will knock on the support frame.
Article on the topic: Features of the vinyl wallpaper on the phlizelin
Back to the category
Procedure of work and necessary tools with independent manufacture of a baby bed
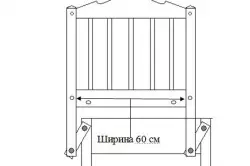
Bed back sized diagram.
Before proceeding with the manufacture of a cot, you need to evaluate your set of tools available. And if something is missing, it is better to take care of their acquisition in advance.
- A hammer.
- Roulette.
- Level.
- Lobzik, the best will be the electrical option.
- Grinders.
- Rasp.
- Tools for wood processing.
- Any version of the milling machine and a set of cutters to it.
- Electric drill and drill set.
- Vaima - you will need to fasten pieces.
This is all related to construction tools, and for materials there is a separate list. It includes:
- Edged board (40 mm). Better if it is a tree of coniferous rocks.
- Bar (50x30 mm).
- Oak or beech rails (20x20).
- Glue, desirable epoxy.
- Saws.
- High quality lacquer for furniture and stool.
- Plugs.
- Corners for furniture.
- Plywood (3-4 mm).
- Nails.
If all of this you have already purchased, you can start making a bed with your own hands.
To determine the sizes of a future bed, you must navigate the mattress.

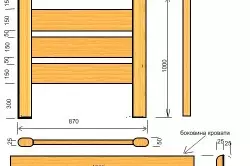
Tools for making a cot.
Standard mattress size in a crib - 1200x600 mm.
So, bedding cots will be located at an altitude of 900 mm from the floor. The back of the crib will be slightly higher - 1100 mm. In order for a child when it is growing, he could independently climb into bed, the height of the bedroom should not exceed the value of 340 mm. And one more important point, the vertical slats of the end and side walls of the crib must have a gap for more than 120 mm. Only in this case the child will be safe, as it will not be able to shove the head between the planks.
The process of manufacturing a children's bed begins with the manufacture of cutting parts for transverse lateral and end walls. Boards are processed using manual tools or on a woodworking machine. Their width must correspond to a value of 7 cm, and the thickness is 3.5 cm.
- Frame under the location of the mattress will be made of bars. For standard size, the transverse bars in the amount of 6 pieces are needed;
- The framework details must be glued using the Viima, while it is very important to monitor its rectangles;
- Next, you can start making a backrest for a bed. Its size is calculated according to the following formula - to 60 cm add the value of the double thickness of the side parts and plus 2 more. Everything is simple enough. Next, the backrest is assembled on a spike of 3.5 cm;
- To calculate the size of the length of the transverse parts of the back, it is necessary - from the value of the backrest width, the width of the bed legs multiplied by 2, and then add a dual spike value;
- In order to make a bed strip, use rails. As noted above, it is very good if they are made of such wood as an oak or beech. Next, the bar must be combined with transverse parts with a deaf single spike;
- After the backrest frame is assembled (without using glue), it is necessary to make the length of the planks. To the length that we have turned out, you need to add 2 more values of the length of spikes.
Article on the topic: How to repair the pallets of shower cabins do it yourself
Pay attention to such a requirement for the quality of a crib, as the absence of sharp parts, corners and burrs. Very carefully perform the grinding of the rods, and all the angles must be rounded using a special milling mill. All these actions must be executed before you begin to assemble the details of the bed.
Back to the category
Completion of the assembly process
Collect the back of a children's bed. To do this, all the planks put on glue and immediately end the backing assembly completely. With the help of the weema, you compress the resulting design, without forgetting to verify the correctness of the direct angle.
- In the same way, collect side walls of the bed. All internal angles of the collected bed location must be processed using a cutter (rounded);
- In order to collect in a single whole side and end walls of beds, use self-tapping screws designed for wood work. Their length is usually from 80 to 100 mm;
- The bottom of the crib must be displayed with a sheet of plywood and fix with small nails.
At the end of the assembly, the most pleasant moment comes to the finish. Walking our crib will be lacquer. For children's furniture it is better to choose a more harmless option. For aesthetic appearance, it is necessary to perform 3 layers. After each application, wait for complete drying, then perform grinding. Now the baby cot is ready to use. Sweet dreams and good health to your baby!