
A modern computer is no longer only a favorite toy, not only an advanced printed machine, not only a multifunctional media center. In addition to many pleasant and useful qualities, computers of recent years have acquired some drawbacks. The struggle for the increase in parrots does not pass in vain - the heat dissipation is inevitably growing, which is in the computer. The first thing that comes to the mind is a lot of large and involuntary coolers. The temperature, of course, falls, but the next problem comes: after that, the computer begins to remind the sound of a vacuum cleaner or, in particularly severe cases, the turbine of the jet aircraft :).
The solution is - use the cooling system. The last generation of devices offers a silent water option.
Such a system is a closed loop: the water supply on the processor-> radiator-> pump-> water supply. Most of these systems are much more productive than air cooling and at the same time much quieter. In addition, from the inside the computer begins to resemble a sort of hardcore symbiosis of hoses and wires. An obstacle is only the price that may vary from 80-90 $ to $ 2-300, and even this is not the limit. Dear systems are usually completed absolutely to all than you can, for cooling all computer components. They include not only the radiator, pump, hoses and processor drill, but also a water-block for a video card, chipset, and even a hard disk. I think not every modder will lay out 200 green for such a system. It remains either to make it yourself, or buy ready-made cheaper and easier. The system simply usually includes all the same radiator, pump and only one water-block - for the processor. The processor of course the main source of heat in our iron friend. But video cards, especially from the last generations, are also heated, not weakly, as well as the chipset remains.
It remains to finish the missing water blocks, and we will get a full-fledged water :).
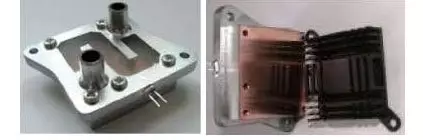
On the manufacture of a water-block on the northern bridge or GPU, with your own hands, it will be discussed in this article. The only thing perhaps that in this block will not be able to make it yourself - this is milling channels in a copper base. You will have to find a familiar milling machine "Uncle Vasya". So, we will need:
Materials
- A piece of copper suitable size 40x40x10 mm (I used a piece of copper electric bus with a thickness of 1 cm, judging by the size from the power station ... no less;
- Plexiglas with a thickness of at least 5mm;
- tube for diameter fittings suitable for your system hoses (I used 8mm);
- M3 screws;
- Superwar LED (better 2);
- Hoven for metal or better Dremel, if any;
- Drills with a diameter of 2,7mm, 3mm and 0.2 mm thick of the tube used for fittings;
- set of testers m3 (№1 and №2);
- Schucker number0 and some more larger;
- file (if there is no Dremel);
- a hammer;
- clamp or vice;
- screwdriver;
- Malyary Scotch;
- Split EFFECT spray paint (or any other color you like);
- Poxipol glue;
- Silicone sealant;
- Just sharpened kerner or awl.
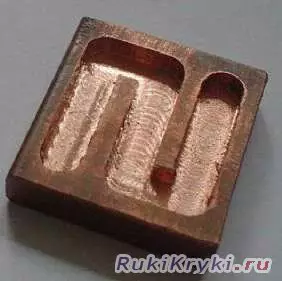
Step 1 . So, proceed. To start running to "Uncle Vasya" with the workpiece of the future of the water-block and for the appropriate remuneration, please promote channels in it according to the attached drawing, and at the same time and give it the shape of a square 40x40 mm.
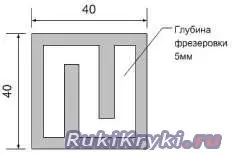
The form can be given and independently with a hacksaw and a file, but believe me if it is possible to do it on the machine, you need to use it. I did not immediately manage to find the right "Uncle Vasya", and the desire to start to start was great and I handled the workpiece manually. Copper is a very viscous metal, the hacksaw saw it tight, and the file is not very. In the process of processing, I was decently pleasant and my hands were sick, as if I had a weight. Both parts of the workpiece must be inserted on the skin of the zero, and the one that will lay down to the object of cooling, and pollute. To do this, secure the skirt on a flat surface, making sure that she does not fall under it chips or some more nastiness and uniform movements in one direction we carry out the part before getting an ideally smooth surface without scratching and dents. Then the lower surface (the one on which there are no channels
Article on the topic: How to bookmark paper for book: Corner video and photo
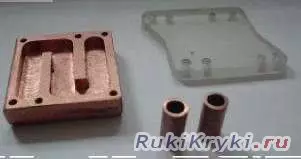
Step 2. . From above, the channels will close the cap from the plexigla, which we will be attached to screws. Drills holes for screws 2.7mm drill. Do not forget to check the drilling places so that the drill does not go away. You need to drill very carefully by holding the part in the vice or clamp. It is necessary to ensure that the drill should be strictly perpendicular to the surface of the workpiece and did not lean in different directions, otherwise the holes will turn out of the larger diameter, it will not be possible to cut the threads in them and you will have to sweat with a hacksaw and a file or run to "Uncle Vasya".
Step 3. . Now proceed to cutting the thread. First, we cut the tag No. 1 (the one with the more gentle-toh SCOS at the beginning of the thread). When carving a thread, the tap must go exactly along the hole axis. Having done 2-3 turns clockwise, you need to turn the tap back by 0.5-1 turnover to remove shavings, then again 2-3 turns forward. It is not necessary to carry badly, and then you can break the tap inside the hole and, as a result, again, hacksaw, a file or "Uncle Vasya" :). And so until the thread is cut along the entire length. The tap before work is nice to lubricate with machinery. After the carving of the No. 1 tread is cut in all holes, cutting No. 2 by toll. This tap must go easier by almost ready-made thread. However, it also needs from time to time to turn back to remove the chips.
Step 4. . At the next stage, we need to make a plexiglass lid. I used the Dremel with a cut off disk. It is better if the lid comes out a little more copper base, so that then the excess sealant, squeezed when attracting the covers, formed an adder side on this allen. You also need to not forget about the "ears", for which our water-block will be attached to the board. The distance between the holes must be pulled. For reliability, I placed them on the radiator removed from the chipset, applying it to the lid. After the lid is cut, its edges need to be treated with a file and a skin, first more and then zero.
Article on the topic: Templates for paper applications for children class 1: butterflies and vase
Step 5. . Next, placing holes under the screws in the lid, imposing it on the copper blank. Future holes should also be counted, but it is not necessary to knock the hammer on the roll, the risk of split the glass is great. It is better to "check out" their sewer, pulling strongly and rotating it :). Holes drilling 3mm drill. Plexiglas - soft material, and the holes will turn out a little more - it is necessary for us to go there with M3 screws. If you are so confident in your abilities and you will be able to drill perfect holes, not "raving" them, neither millimeter, then immediately use a 3.2mm drill :).
Step 6. . Now you attach the cover to the copper blank and place the centers of the holes under the fitting exactly in the middle of the milling channels, the curls also seer. We turn off the lid and drill in it the holes with a drill by 0.2 mm thicker than the fitting tube. Next, on the inside of the lid, we make small serfs on the edges of the holes, so that the glue filled them, and the fitting was better kept. In order to make the glass slightly matte, we grind the outer side on the skin of the zero, putting it on a flat surface. We scream from the tube two pieces of approximately 1.5-2 cm long, we proceed the places dug off to a file to remove the burrs.

Step 7. . We divorce Poxipol glue according to the instructions in the box (there is nothing complex there, it is necessary to simply mix 2 components in equal proportions) and smear it with a thin layer on the glass thickness. Insert the fitting into the lid from the outside. Excess glue forms a neat ring around the fitting, additionally sealing seams. The residues of the divorced glue fill sers from the inside. After the glue solidifies (the instructions have written 1 hour, in fact - much earlier), we remove the remnants of the adhesive on the skin, also putting it on a flat surface. Grind the rear side of the cover with the zero to get a matte color.
Step 8. . It's time to collect the water block together. Slip copper blank in touch places with a lid thin layer of silicone sealant. Gently press on top of the cover and secure screws. It is advisable not to move already pressed the lid so as not to lubricate the sealant. Screws must be tightened until it stops, but you do not need to invest in this process all the silicon :), the plexiglass can crack. It is better not to reach out than to drag. Insufficiently tightened water-block still will not give the sealant.
Step 9. . After grappling the sealant, the water unit is ready to use. And the ordinary person probably would put him in the computer and enjoyed. But any modder will say ... no even cry: "But what about the backlight!?" :). For the backlight, we will use one or two superwatch LEDs (I, unfortunately, was only one at hand). If the LED is two, it is better to install them on opposite sides of the lid, sending a slightly "in the disintegration" so that together they covered the large area. If you have 3-millimeter LEDs, then the recesses in the end of the lid are simply drilled. If the LEDs are 5 millimeter as I, and the cover is also 5mm, you will have to modify them with a file or Dremel, having reduced their dimensions and giving them a rectangular shape.
Article on the topic: how to sew a peignoir: video instructions for sewing with your own hands
Step 10. . Under the finalized LEDs, it is necessary to carefully "professionalize" the drill the oblong recesses in the end of the cover. LEDs are attached in recesses using sealant or poxipol, to choose from. Both of them remain transparent after the frozen. Poxipol keeps reliable, but the sealant in the case of the combustion of the LED can be seen and notice the diode. Washing LEDs is made from the standard Molex power connector from 12 or 5 volts through the resistor. I chose 5 volts and a resistor in 100 ohms.
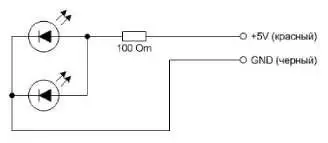
Step 11. . You can roll with wires directly to the outputs of the LEDs, I used the chip from the old speaker (it would be better for 2 contacts from the reset, for example :). You can also connect the LED into the HDD LED Motherboard connector, then it will blink your hard disk. In general, the flight of fantasy is not limited.
Step 12. . You can stay at this, but we will go further ... We will make a glowing "drawing" on the waterclock. We put together by painting tape the ends of the fittings and the places we want to leave glowing, also do not forget to flick the polished bottom of the water block.
Step 13. . We take an aerosol paint can (I used the "chromium effect") shake it and paint the water supply. It is not worth pouring a lot of paint, otherwise it can then form incomplete. Quote from the instruction on the balloon: "Several thin layers give the best effect than one thick."
Step 14. . After drying, the paint carefully remove the scotch and enjoy the resulting creation;).
In a similar way, it is possible to make a water supply on the processor, only the dimensions need to be increased to 50x50 mm. In my computer stands homemade.
Step 15. . Now it's time to establish our waterwork in your place. We take out the motherboard from the computer. Remove the "native" radiator from the chipset. In the mounting holes, we put the fastening racks and fix them from the bottom of the nuts. We get this design:
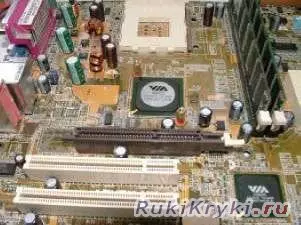
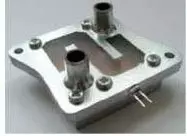
Step 16. . We set the waterwork in your place, not forgetting to apply a fresh thermal path on the chip. Fresh screws are tight, but not too tight, otherwise they can burst the chip or glass cover. Further install the motherboard in place and collect the computer. I turned on the droplock of the chipset into the burst of the hose in front of the processor. Of course, a variant with the branches of the hose by 2 channels and parallel, and not by consistent cooling of the processor and the chipset, but for this you need 2 tees and a little more hose ... which I did not have. After installing the water-block, the temperature of the chipset with 35 degrees fell to 29-30, the temperature of the processor has not changed (it was also cooled with water).
This is how the entire water cooling system with illuminated assemblies looks like:
