
Whatever area house without a barn on the plot is not to do. Not everything can be entered into the house, even if there is a place, but already if there is no place, even more so - the housekeeping is necessary. This, by the way, may be the first experience in self-building: you can build a barn with your own hands without skills. The main thing is that the hands grow from the right place.

If desired, the barn can be made like a small house
What materials build
If the shed is located near the house and your appearance takes you, it makes sense to use the same material material as in the construction of the house. If you do not want to spend a big amount on the host building, you can pick up the finish so that we have been published and not distinguished. In most cases, this is not very difficult: technologies a lot and many materials very accurately reproduce the appearance of expensive finishing materials. A vivid example of this is siding. It is under the log, bar, brick, stone with different textures. So it is not necessary to use expensive materials to build a shed. It is more practical to use low-cost construction technology, and then decide the material with the texture similar to the finishing of the main structure.How to quickly and cheap build a barn
The fastest and at the same time an inexpensive version of the construction of the shed - on the framework technology. The frame may be wooden or metallic, it is trimmed outside the trim, put the roof and everything, the shed is ready. If the shed is planned wooden, it is collected from a bar and boards. The shed metal can be easily made from the profiled pipe: a square cross section and cook and shook easier at times. There is still a special metal frame. It is going to the self-tapping screw, and the whole design is ordered and manufactured at the factory. Such houses are considered the cheapest, hardly sheds will be expensive. Assembly and metal and wooden barn takes a few days: not once verified.

Half-built shed: Paul and two long walls stand, it remains to install short and make a charter system
Frame construction is light, because the foundation under the barn is needed lightweight. In most cases, there are enough columns, concrete blocks, sometimes screw piles are installed or they make burbilic. On more complex soils and for those who like reliability, it is possible to build a monolithic or prefabricated (from the foundation blocks) a ribbon foundation of small embedding.
On a reinforced belt foundation, you can even put a barn of building blocks or bricks. In this case, even on bunny soils, the building will stand normally. It is if it will move, together with the foundation, so the risk of cracks is minimal.
Frame shed can be built without foundation. Then the racks (process from rotting) will need to burst at 60-80 cm, concrete, and then fix the lower strapping, but which will be laid down the floor. But in this way you will not build a big structure. Maximum - a small camork and the woodwood nearby.
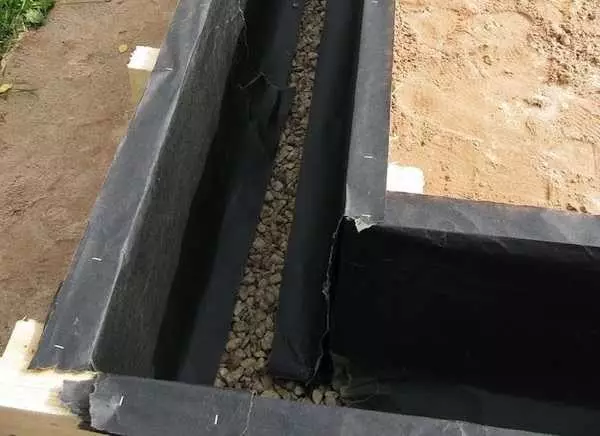
Another option. It is suitable for soils, from which water is well out, and the subsidized waters are located deeply. Then there are a plot, which is more planned by a 50 cm barn in each direction, remove the turne and make sandy-gravel submet. On the ramble crushed stone laid the strapping bar and fasten the lags of the floor (processed by an anti-splicer for direct contact of wood with a soil). That's all. No difficulties.

Shed without foundation
This is not the best option: even with a low level of groundwater and thorough processing of wood, the shed will not have a short. If it suits you, you can do it.
What to build a toilet at the cottage read here (schemes and drawings).
Foundation for frame shed
All types of pile or bar foundation suggest the location of single supports around the perimeter: necessarily at the corners of the structure and in places of jumpers adjoining (partitions), if such are provided. The support step depends on the shed size and on what lags are planning to use. The greater the span, the larger cross section they need lags.
Article on the topic: Types of glue for linoleum - how to choose correctly
For example, for a width of a shed 2 meters, you can put only two rows of columns and lags will be 150 * 50 mm (in extreme cases 150 * 40 mm). If the width of the shed is 3 meters, then or put intermediate supports (columns, piles), or take the board 150 * 70 mm. Calculate that it will be cheaper in your area, and choose.

Dumped pitfalls under the poles
With a width of the board, 100 mm floor under his feet is noticeably bent. So there is a step of installing a lag to do about 30 cm. Then the deflection is not at all, or it is insignificant (depends on weight).
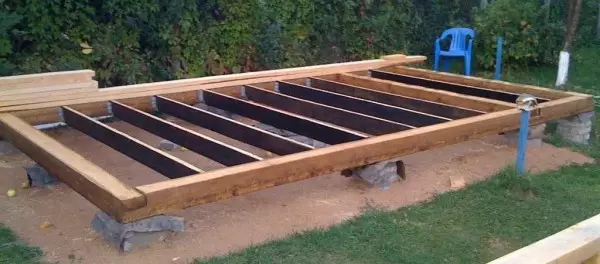
Faster to make a foundation on finished blocks: you can buy or do it yourself. They are frightened by a slightly larger in size than blocks. On the bottom, sand, trambet, then gravel, he is trambed too. The thickness of the intake in the rammed form is 20-30 cm. Blocks are installed on it, and the lower block is mounted on the blocks.

After the blocks are posted, the lower strapping is mounted on them
If we are talking about a small-breeding ribbon foundation, then the trench is digged by 40-60 cm relative to the soil level, the tape width of about 25 cm, and the trench itself should be wider at least half a meter or more: formwork is installed in it. Dno level, trambet. Crushed stone on the bottom and tram.
For formwork used boards 150 * 50 mm, so that there was an opportunity to use them in the future, they were overtaken by pergamin. After dismantling the formwork (as a concrete grabbed) they were dismantled and put as lags of the floor
From the rod 12-14 mm knit the frame. Four ribbed longitudinal rods are associated with a frame made of a smooth rod 6-8 mm. The sizes of the framework should be such that the entire reinforcement is from the edges of the ribbon at a distance of at least 5 cm. For example, if the foundation is 40 * 25 cm, then the rods are associated with a construction with a rectangular cross section of 30 * 15 cm.

The boundary frame is installed in the formwork, which is then filled with concrete brand not lower than M-200
Read more about the frame for a ribbon foundation, read here.
Wooden frame shed do it yourself: step by step with photo
A shedron shed of 6 * 3 meters was built. The roof is a single bed, the root of Ondulin. The height of the front wall is 3 meters, the back - 2.4 m. Operation showed that with such a drop of snow heights do not accumulate a lot (flax area).
Standard FBS 600 * 300 * 200 were used as a foundation for the shed. They are laid on a sandy-gravel benching with a thickness of 25 cm. On top of the blocks, the shut-off waterproofing is a layer of rubberoid, on bitumen mastic. Top is still glued to the same mastic layer of "Hydrotect". Such a cake is made because the groundwater level is high, it was necessary to protect the construction from dampness.
Beginning of the construction of a barn. The foundation contains waterproofing, on it - a strapping, and a bar is attached to the strapping
The waterproofing was stacked by a sequence of 150 * 150 mm (all sawn timber were processed). It was connected to Poledev, he fought with nails - 100 * 4 mm. For those who are unfamiliar with a carpentry business, you can connect the bars to the jack, the reinforced corners are inserted into the connection places, outside the mounting plate.
In this embodiment, the framework to the blocks was not attached. In regions with elevated wind loads, it is unreasonable. It is possible to mount with the help of studs: for them, through the bar, in the block, the hole is drilled by the same diameter (12-14 mm). The stud is rushed into it, the bolt is then tightened with the key. So that the hat is hidden, the hole can be drilled under it.
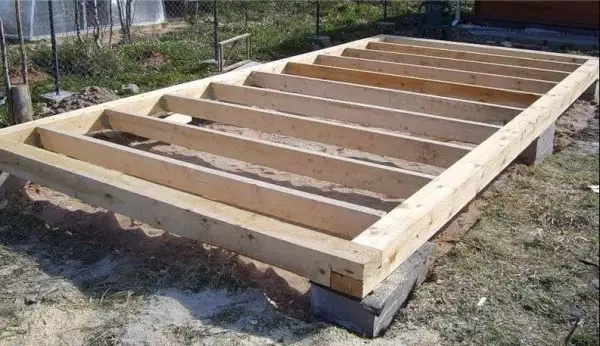
The next step is the fastening of the floor lag. Installed on the rib board 150 * 60 mm. Mix to the strapping with special brackets of the appropriate size. Cold on nails 100 * 4 mm.
Article on the topic: The angle of dawn of window slopes: installation sequence
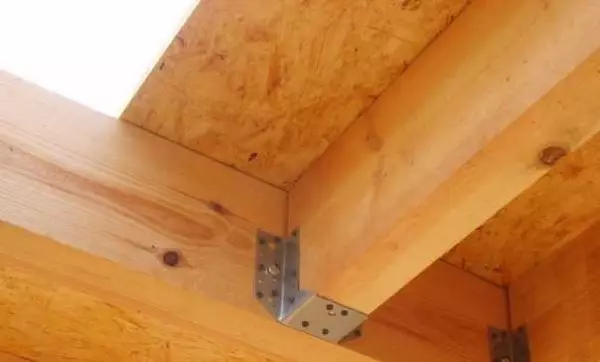
Floor lags are attached to the strapping with such brackets.
Lags were aligned at the top edge of the strapping bar. Everything must be smooth, otherwise the floor will be hard enough. Perhaps you will have to show a planer or redo.
The frame was going on the technology "platform": first the floor was used, and the walls were mounted on it. Wall frame or part of it are collected on the floor. In some cases, they are immediately trimmed from the outside, if a slab material is selected. And already in this form (with or without trim), it is set vertically and secured.
There is a second technology "Balloon". According to it, the frame is mounted gradually: on the strapping or even immediately on the blocks are mounted angular frame racks. They are exhibited in all planes. Between them stretch the rope, along which the remaining racks are then exposed. They are also nailed on one, bonding with shapes and temporary crossings.
You may be interested in an article "We make wraps and pioneers with your own hands"
In this case, the "Platform" technology was chosen and an OSP of 18 mm thickness was elected. In general, the floor can be made of boards, plywood (moisture resistant), OSP, etc. The board will need 20, plywood - 13-15 mm, but moisture-resistant (OSB moisture-resistant by default).
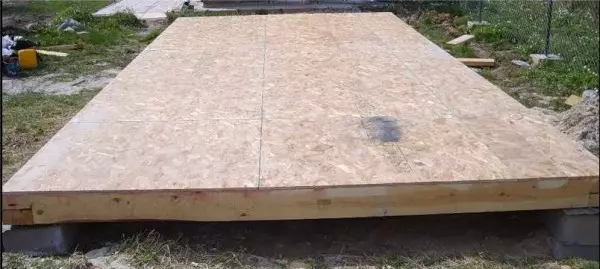
Note floor in Saraj
Next began assembling walls. Frames are completely knocked down: lower strapping, racks, upper strapping. In this form, it is set exactly along the edge of the strapping timber, is set, strengthened by safety struts, stops, hide. It is nailed through the flooring to the bar of the strapping. Nails took 200 * 4 mm.

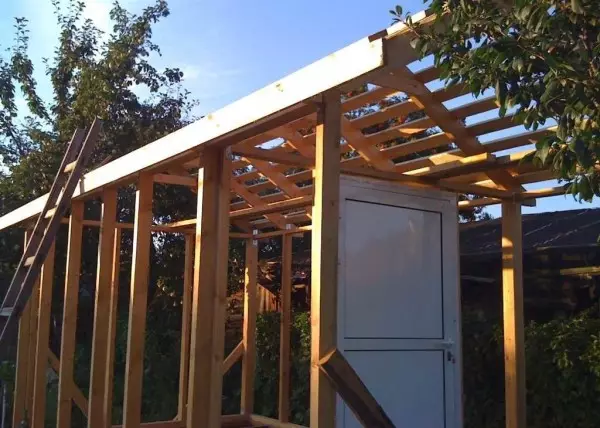
Collected walls. Upper strapping will immediately and support for rafters
For assembling the frame, 100 * 50 mm boards are used, the distance between the racks is 600 mm, the rafters are installed with the same step. The rafting system was collected from 150 * 40 mm.
Window and doorways are reinforced - two boards are nailed, which are broken with nails in a checker manner after 20 cm. The load is more here, therefore the gain is required. In one of the ends there are gates - to load / unload large-sized things. Therefore, in this wall (in the photo you can see) only angular racks and reinforced - for fastening the sash.
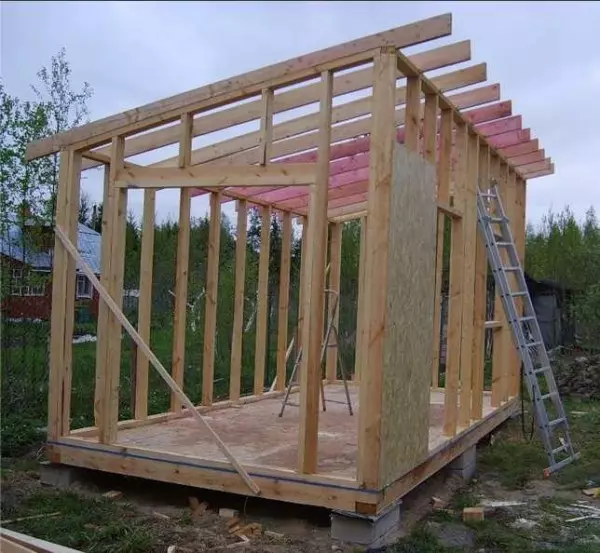
View of the end in which there will be wide bivalve doors
Since the roof is a single-table, the rafter system is simple: stacked on the edges of the boards that are chosen under rafters. Their length is greater, since the sinks are necessary. It is usually 30-50 cm on each side. In this embodiment, with a width of a shed of 3 meters, the length of the rafter legs (taking into account the slope) was 3840 mm.
They nailed with nails, two on each side. You can strengthen the installation of the corners: it will even withstand significant wind and snow loads.
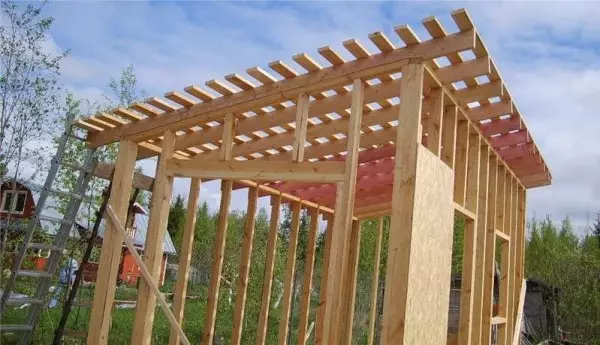
Ogelpet under Ondulin
Next - the roof is mounted (100 * 25 mm). The step of its installation is on the recommendations of the manufacturer "Ondulina" - 40 cm. And the roofing material is noted (nails were bought together with the coating).
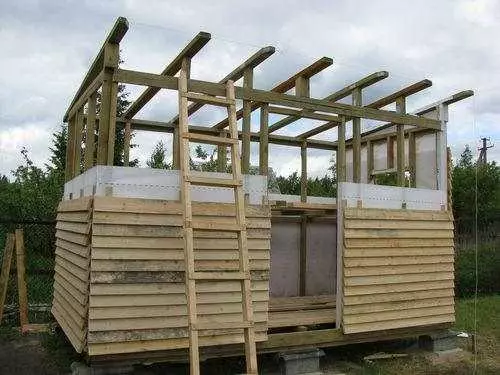
The walls from the outside sewed 9.5 mm thick.
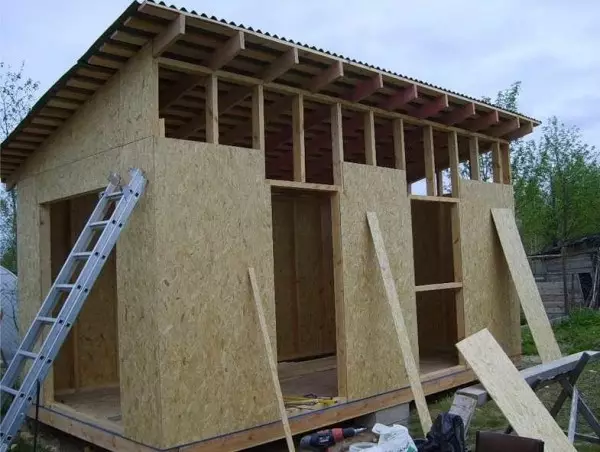
Process of outdoor shedding
Installed doors, small steps are made.

The doors are installed old ones.
The latter strokes installed a wind board. Then the barn was truncated and painted paint to the rest of the buildings on the site. Shed do with your own hands on the finished foundation built in two days off. The covering of the clapboard and painting was significantly later than in a month.

Final version of the barn ... beautiful
The unattractive foundation is sewn sliced in size asbestos. Beautiful turned out the barn.
For more information about the principles of frame construction from wood, read here.
Shed from a bartal roof of metal tile
This barn was built alone. Building, too, frame: the cheapest way. In this case, the assembly method is "Bullun" - gradual racks. It all starts too: first made columns under the foundation. Only this time bricks.

Foundation under the shed of brick columns
As you can see, studs are mounted in the angular racks. In the strapping timber, the holes are drilled and it dresses on the hairpins. They can be made not only in the corners, but also in intermediate pillars too: it will hold onto the stronger.
Article on the topic: How to adjust micro-taking on plastic windows
This barn has a small porch veranda, because a transverse timber is installed at the required distance. And he will rely a wall. Under it is pre-made and columns.
Lags were attracted too on the plates
Lags can also be attached to a wrist. Then in the strapping bar cut out the lag shape. At a depth, it should not exceed 30% of the timing of timber, because the lag cuts up so that it gets up at one level with the strapping. This is a way more time-consuming.
Next was going to the frame: the angular racks 100 * 100 mm, intermediate - 50 * 100 mm, the upper blockage and the rafter system was collected from the same board. Triangles at the top are reinforced with overhead metal plates. Little-size plates were attached and in the places of docking of the upper strapping and racks. They joined the jack without wrinkle, nailed from above and macaw nails. The plates reduced the likelihood of folding during lateral loads.

Frame collected
Next, a rafter system was collected - a board of 150 * 50 mm, a doomle for metal tile. It was chosen, since the same material indoor cottage.
Collected rafting system with crate
The frame was covered with OSP sheets - the most convenient size for the construction. Subsequently, the walls will be decorated with siding under the tree.

This is an almost ready-made barn roof. Stayed decoration of walls
The covering, by the way, does not necessarily have to be plywood or OSP. You can fix the lining or board immediately and racks. But then, when assembling a frame, you need to put ukos: without rigidity of the plate material, the construction will be a slop. If the ducks do not put, you can swing with your hand.

Such discharge will give sufficient rigidity to the walls of a frame bar
After installing the sinks, you can fill the board, lining, block house, timber imitation, siding - the choice is yours.
Frame shed is trimmed by board
Similar frame sheds can be made from the profile pipe. For strapping and angular racks, a section is enough 60 * 60 mm or 60 * 40 mm, for intermediate and less - 20 * 40 will be normal. Only for the fastening of the outer sheathing will need to be assembled and attached to the crate. Read more about building a shed of pipes and metal profiles here .
For those who are concerned about the appearance of the structure, several ideas about how to make a shed beautiful in video format.
You can read about planning the site and basics of landscape design here.
Video about the construction of sheds from wood
The barn turned out to be beautiful but not cheap. But decent sizes, strong and in appearance does not differ from the house - fits into the composition. Everything is shown / painted in detail, there is one violation: waterproofing for metal tile is laid vertically. Even with good bonding strips sooner or later, water will make a path. Otherwise - everything is competent.In this case, the shed with their own hands is built in the cheapest, probably the foundation: the concrete will flood into the old tires. On these "columns" and stands the framework. Naturally, it is necessary to exhibit them on a flat reliable surface and they themselves should be in the same level. For strength, the base will not give way to the best concrete blocks, and may also exceed them. Speakers from under the structure of the tire can be closed by making a step and putting flowers later on it or using for other needs. It will be more practical.
Another video with a step-by-step illustration of a frame barrier from a bar.
Drawings with dimensions
Several drawings that will help you navigate with the dimensions of the building. If necessary, adjust to your site or needs.

Shed with a single-sided roof - drawing with the layout of the racks
Shed on three compartments under a single-sided roof. The dotted line indicates the place of installation of the racks (and supports for them)

Shed design with all required elements

Duscate Roof on Metal Poll Saraj

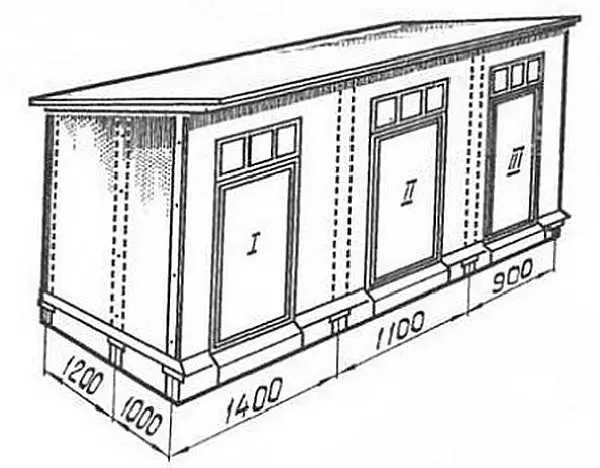
Square Shed - Dimensions

Shed with a broken roof