
Suspension ceilings made from various materials are greatly popular today. Such structures can be mounted from drywall, plastic, PVC films. This design will hide any irregularity and quite simple in execution. In order to illuminate the premises, various lighting devices are also used. If in the past times the ceiling decorated only the chandelier, today there is more often the point lighting of the ceiling. Such lamps can be distributed over the entire area. In addition, they take part in the zoning of the room and perform this feature on excellent.
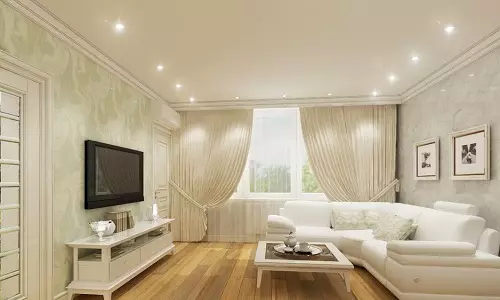
The point lighting of the ceiling is usually used as a background lighting of the room.
Illumination using such elements can be performed independently, most importantly, comply with certain rules and take into account features. Depending on the material from which the ceiling is made, the features of its installation are distinguished.
The main characteristics of the design of point lighting elements
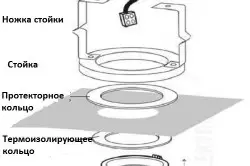
Device point lamp.
Point illumination is a small lighting device that is installed in the suspended structure. As a result, the devices will be on the same level with the surface. They have small sizes, so in order to fully light the room, you need to use several elements. It is very important to place them all over the area.
The structure of the lamps that are intended for installation in plasterboard sheets, has special spring fasteners. Such a fastening is started in a special prepared hole and straightens it. With it, they are very reliably held on a plasterboard sheet. In order to close the gap between the hole and the base, a special decorative lining is done on the outside. It can have a different form, color, size, so it will not be difficult to choose the one that is most suitable for the interior of the room.
Article on the topic: Frameless furniture with your own hands: Frameless sofa
Basic guidelines for lamp location
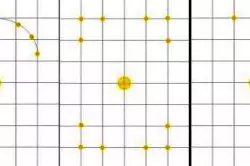
Options for the location of point lamps.
Almost all point illumination has a small lighting sector, which does not exceed 30 °. Therefore, it is necessary to have lamps in a row, it should be observed a certain distance between them.
- Lighting devices should be located rows, while the distance between them should not exceed 1 m.
- In a row between elements of illumination, the distance should not be more than 1.5 m.
- From the wall, it is necessary to retreat no more than 60 cm.
In order to illuminate the room as evenly uniform, it is recommended to arrange a point backlight in a checker order.
Such a ceiling light can also be installed on plasterboard elements of walls, furniture and other decor elements.
Basic varieties of point lamps
At the planning stage it is worth thinking about which devices will be used for lighting. In order to choose the most suitable option, it is worth considering certain factors. Depending on the type of design of the device, they can be divided into two types - swivel and non-turning.
Non-reflective lamps are distinguished by a very simple system.
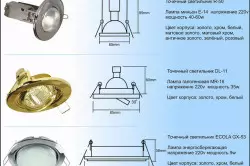
Types of point lamps.
In this case, they are installed in the same position, while the flow of light is always directed in one direction, and it is impossible to send it to the other side.
Swivel devices have a more complex form that entails a more time-consuming process for installing such a lamp in a plasterboard ceiling. The advantage of such a lamp is the ability to direct the flow of light in the required direction.
The source of light can be the following types of lamps:
- conventional incandescent lamp;
- halogen variety;
- luminescent;
- LED options.
From the one source of light is selected, the amount of energy consumed, the emission spectrum, size and parameters will depend on. In order to establish a conventional incandescent lamp, you need to use the backlight, the height of which has a size of 12 cm. Therefore, you need to consider the height in advance to which the plasterboard base will be omitted. As for LED and luminescent options, it is necessary to immediately lower the level for their installation. It is worth noting that the cost of such lamps will be significantly higher.
Article on the topic: Septic Tver: Description, Disadvantages, Negative Reviews
Each type is represented by a huge model side, which makes it possible to acquire the necessary option to get each customer. Before buying, it is important to study all the subtleties of the model represented and only after that make the final choice.
Ceiling backlight: Planning Stage and Preparatory Works
Duplex ceiling with spotlights around the perimeter of the room.
After the lighting devices are selected, you can begin to mount them. If the ceiling backlight is created with their own hands, it is necessary to start its execution at the stage of mounting a metal-pylon frame. Such an advantage makes it possible to carry out the postcasting of the wiring and lay the lamps in the required locations.
During the planning it is worth performing the following work:
- Based on the ceiling to make a markup in which light sources will be installed;
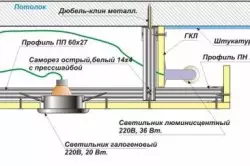
- All lighting devices must be located at a distance of 25-30 cm from the metal profile;
- It is very important to take into account the ceiling levels and make the markup of different levels of the suspended ceiling.
At the planning stage it is very important to take into account such lighting devices as the ceiling chandelier, wall lights and sconces. If a suspension chandelier is installed in the center of the ceiling, the point light may be located around the perimeter of the room or in separate areas.
Wiring Laying: Recommendations
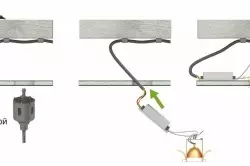
Wiring layout diagram in suspended ceiling and mounting point lamp.
At the mounting stage of the frame for the suspended ceiling, it is worth making the markup, which will cover the wiring. On such a markup it is very important to make a note, where the backlight, switches, chandelier will be located. If the walls are present on the wall, the markup must be made for it.
For wiring, you can use different wires. To select the wire, it is worth considering some aspects. To securely connect to the lamps, it is recommended to use a soft stranded wire. To perform all the wiring it is worth using a hard or soft Wire of the VG or ShVVP - 3x1.5. The second option will be advisable to use if terminal blocks are used to connect the luminaires. For wiring you need to use corrugated plastic pipes. Such insulation will prevent various mechanical damage.
Article on the topic: Designer tips for tulle-veils for windows
Corrugated pipe will prevent moisture from entering the wiring. In order for the wiring to do not hang under the frame, it can be attached to metal profiles with special plastic clamps.
Hole performing lighting
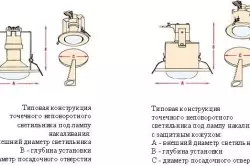
Hole circuit for spotlights.
In order to establish a point lighting device in a plasterboard sheet, you need to make holes for a suitable diameter. In order to make the openings of the correct diameter, it is worth examining the information on the packaging from the lamp. Often, manufacturers indicate which diameter needs to be done. It is also recommended to check the sizes.
Most often holes are made with a diameter of 60-75 mm. To perform such a hole, you need to use a drill with a special nozzle "crown". Perform such works is on loose sheets, but you can perform work on the finished design.
After all the holes are made and wiring is carried out, you can start finishing work. Such works are shtowning, sanding and painting. Point illumination is set after the ceiling is completely ready.
The first in the hole is installed frame of a point lamp. After it is fixed, you can start setting the selected light source. The light is connected to the cartridge, and ultimately put on a decorative lining. After installing all elements, you can check the performance of the entire system.
Check the wiring system is recommended before it is covered with plasterboard. To do this, you need to install light bulbs in all cartridges. If the system does not work, you can fix everything.