
The light in the house is a very important component when creating comfort and beauty. In addition, human health depends on the lighting. The view and eye health is directly related to what lighting is organized at us at work and at home. Although many people do not pay attention, but the psychological state of human depends on the quality of lighting. A very good option will make a ceiling lamp with your own hands.
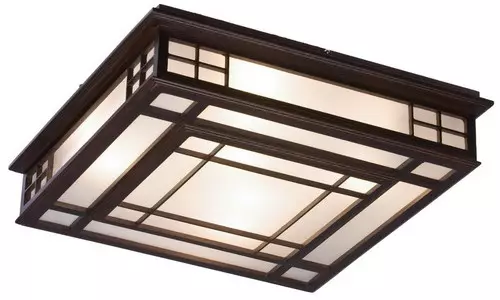
Figure 1. Plafon with lamps inside Save the ceiling clean.
Types of lighting devices
When the house is repaired, the mandatory new decor element is the lighting device. The modern market of such products is quite diverse. The range of lighting devices is characterized by design, shape, principle of work and constructive features. What to stop your choice? What are the parameters to choose a chandelier?
Very important and relevant to date is the moment to acquire such a device in which you can install an energy-saving light bulb. The cost savings depend on this. It is best to stop your choice on the design, the lamps in which are located inside the slap, and not outside. Thanks to this, the ceiling will always remain clean and beautiful (Fig. 1).
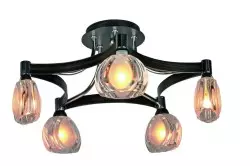
Figure 2. Ceiling lamp with lamps directed down, suitable for small rooms.
If I really liked the ceiling chandelier with open light bulbs, then make sure that the flow of light will be directed down. It is very important to remember that the simpler the design is the easier it will be the installation of ceiling lights (Fig. 2).
Choosing a lamp on the ceiling, it is important to consider the features of the room for which it is intended. The spacious hall with a high ceiling involves suspended volumetric chandeliers. And in a small apartment, it is best to get a flat version of the ceiling lamp.
Article on the topic: Children's wallpaper 2019: How to meet fashion trends
All ceiling lighting devices are divided into suspended traditional and flat, whose installation involves the mount as close to the surface (Fig. 3). Flat devices, in turn, are divided into embedded and overhead.
Overhead Plafones are the perfect solution for the bathroom, kitchen, corridor or hallway. They are quickly cooled at the expense of a special separation platform, so they are absolutely safe.
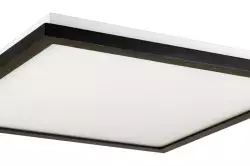
Figure 3. Flat lamp attached to the ceiling as close as possible.
Embedded or point lamps are most often installed in furniture cornices, suspended structures and arched openings.
Currently, there are flat lighting devices of all kinds of species, forms, colors and configurations.
In addition to the varieties of lamp designs, light sources are distinguished:
- Incandescent lamp is the most common, simple and cheapest light source. Such products are fairly easy to damage, they have a vulnerable design and often burn out.
- Daylight lamps are the same energy-saving lamps in a more convenient design. Their advantage in economy, long service life. In all developed countries, this is the most popular light source.
- LEDs are pretty expensive light sources and low-prolonged. However, it is worth noting that they have very high efficiency (more than 90%), have high durability and reliability.
Materials for mounting
Installation of ceiling lights involves the presence of the following materials and tools:

Fastening diagram chandeliers to concrete ceiling.
- lighting device;
- branching boxes;
- screwdriver;
- dimmers or switches;
- wires;
- insulating tape or polymer caps;
- probe indicator or voltage tester;
- Passatia;
- Screw terminal clamps (connecting blocks).
Best of all, when installing ceiling lamps to independently connect wires using connecting pads. However, if for any reason you did not have such a product, you can simply twist the bare conductors by passatages, after which it is tightly wrapped with a tape, or put inside the polymer caps. IMPORTANT When twisting, make sure that the wires are tightly wrapped each other.
Article on the topic: how to optimize the output of the sawn timber from round forest
It should be taken into account when installing and material wires. Preferably it is identical to: aluminum - aluminum; Copper - copper. If you twist the wires from different materials, then over time they will burn them and the contact will be disturbed.
Algorithm of work
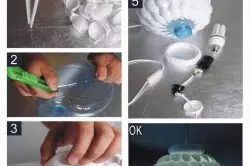
Stages of manufacturing a ceiling lamp from a plastic bottle and spoons.
Initially, it is necessary to determine the phases of the wires on the ceiling to install the ceiling lights with their own hands. To do this, use the dipstick. When connected with phase veins, it will light up, and when the zero phase is connected to the zero phase, it will not happen.
The second stage is the definition of phases on the lighting device. To do this, turn on two wires in the outlet, while not touching the third. If the chandelier has several light bulbs, then half of them should turn around. Then you need one wire to leave in the outlet, and the second half of the bulbs should turn around the second half of the bulbs. It is important to achieve such an effect so that two wires for alternately turn on the lamps, and the third, in the outlet all the time, will be zero.
Then the ceiling lamp is fixed to the ceiling. Installation of many modern products is carried out not using a hook sticking out of the ceiling, but with the help of a special fastener rail, which comes with a lighting device. If a hook remained from the old chandelier, then it must be removed.
Connecting lamps
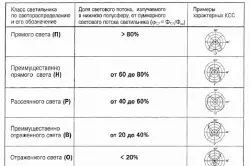
Classification of lighting luminaries.
If you need to connect a flooring or a lamp to a two-housing cable and the chandelier is also two removal, then you caught the easiest version of the lighting installation. It is enough to connect one removal with one residential, and the second one on the other. When there are several components of the lamps, it is important to twist them in pairs in two groups and connect each individual group to a certain cable core.
Article on the topic: Pouring of a warm floor: Step-by-step instructions
When the cable has three veins, it means that two veins carry 2 phases, and the third lived - zero. It is important to accurately determine the probe indicator, on which vein there is no voltage, and only after that turn off the power and install the lamp.
Consider the wires emerging from the highlight itself. Ends with blue insulation twist together. Next, we connect pairs of taps with brown insulation. Both brown groups should be connected to two veins, in which the voltage when checking was, but the blue wires are connected to the dwelling, where there was no phase voltage.
Sometimes the cable in the ceiling has another 4 dumping grounds. Most often it has yellow-green. It must be screwed to the lamp housing with the screw. All connected wires should be isolate. Installation is ready.
Creative on the ceiling
Sometimes the owner of the house or apartment wants to organize unusual lighting in his room. In this case, you will have to make the lighting device with your own hands.
Country residence or country house can assume the presence of lamps from natural or infirred materials.
The most unusual things for the production of chandeliers can be used: thick branches of trees, leaves pre-coated with varnish, thick twine of any color and diameter, baskets from the vine and even old vinyl plates. Chandeliers made with their own hands will cost almost for nothing. Only elements of electricians will be purchased. It is important to comply with safety and understand that the selected materials will come into contact to one degree or another with a hot light bulb.