
It's not so difficult to make a cozy house. The main thing is to determine the wishes, to paint the project and be patient. The lighting is plays an important role in creating comfortable conditions. Depending on whether the light of which spectrum prevails in the room, mood is formed (and sometimes even well-being). Lighting type is also important: general, point, combined. Recently, a popular LED backlight becomes popular, which has several advantages even compared to modern halogen and neon lamps.
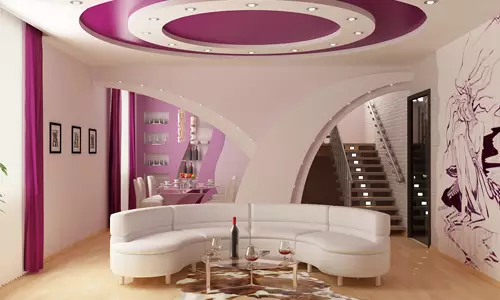
With the help of the ceiling backlight, you can revive and decorate any interior.
Especially effectively looks like the backlight of the ceiling. Flight of the designer thought can turn this essential element of the room in a truly unique object: if you make a backlight, multi-level ceilings can take the shape of a star, a flower, snails. Even the simplest suspended ceiling, equipped with a LED ribbon hidden in niche, will be a harmonious addition to the interior, will help smooth the shortcomings of the room, if any, or allocate individual accents.
LED backlight: advantages and features
The advantages of LED backlight, in addition to low cost, include:
- Bright smooth light;
- long service life (up to 13 years);
- energy efficiency;
- Easy styling (the tape is attached in the space of the niche to the plasterboard with a sticky tape);
- Color modes variability, which can be controlled remotely using the remote;
- the ability to give a variety of products due to the flexibility of the product;
- Excellent efficiency (almost all the energy goes to the release of light, and not on heating air);
- No flickering and ultraviolet radiation.
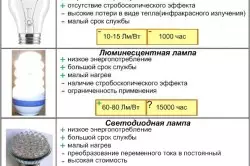
Comparison of LED bulbs with other illumination elements.
The modern market provides a wide selection of LED tapes for backlight (or LED tapes). They differ according to the characteristics:
- type of LEDs, their size and amount of 1 m / n (density);
- color (monochrome or color);
- Color temperature (2700-10000 K);
- voltage (12/24 c);
- Resistance to moisture (individual models have silicone insulation, which can be used in rooms with high humidity).
Even if you drop such a product with a fairly high height, you can not be afraid for its integrity.
With this tape, you can build an advertising sign, place the landscape, the facade of the house. The complex designs of the ceiling of plasterboard, highlighted by diodes, create amazing effects. The elements of the ceiling illumination are placed in the drywall niche.
Necessary materials and tools
How to make backlight with your own hands fast and accessible? First you need to develop the design of the ceiling and niche. You can come up with your own solution or take advantage of the services of a professional designer. A niche for the backlight has the type of protrusion going around the perimeter of the room or the edge of individual parts of the ceiling. Naturally, it is necessary to consider the color gamut of the backlight, suitable for the situation and the overall interior.
Article on the topic: Features of the choice of paper wallpapers for the bedroom
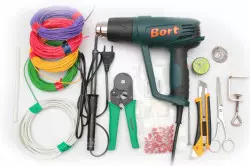
Tools for mounting LED backlighting: soldering iron, scissors, industrial hairdryer, crimping for contacts, wires, shrink tube.
Do not forget that the mounted ceiling and niche will "eat" a part of the height of the room. Therefore, by pondering the design of the design, it is necessary to take into account this fact and choose the corresponding profile.
Then you need to purchase the necessary materials:
- Plasterboard (based on the availability of humidity in the room) - ordinary or moisture-resistant;
- Profile - starter and main;
- Susishes straight;
- fasteners (dowels, selflessness);
- Ribbon with LEDs for backlight, power supply, conductor with a cross section from 0.75 mm.
From the tools you will need:
- Water level, cord for marking;
- Perforator;
- screwdriver with special fixtures for plasterboard work;
- Bulgarian;
- pliers;
- knife;
- screwdriver;
- Tools for work with putty, sandpaper.
Calculation of materials
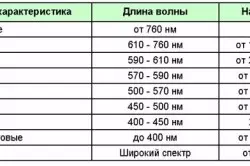
Table of varieties of LEDs.
Before acquiring the necessary consumables, you need to calculate the need for them.
To do this, it is necessary to determine the size of the surface for the binder with plasterboard. If the ceiling is planned to be done at one level, then it is necessary to simply multiply the length and width of the ceiling, for a multi-level structure - to calculate the sum of all areas. The size and view of the niche also take into account.
Based on the fact that one sheet of drywall has an area of 3 m² (1200x2500 mm), you can count the desired number of sheets. The number obtained at the same time is rounded upward. You can use the formula: n = (S1 / S2) * k, in which N - sheets, S1- area under the decoration (m²), S2 - leaf area (m²), k-coefficient amendment.
There are three coefficients for different areas:
- less than 10 m² - k = 1.3;
- from 10 to 20 m² - k = 1.2;
- More than 20 m² - k = 1.1.
Calculate the number of starting profile (UD) is simple: the perimeter of the room is divided into the profile length (3 or 4 m).
The main profile (CD) is considered as follows: one sheet it is necessary to 3 CD. The required number of sheets is divided into 3 and receive consumption.
Suspension "Butterfly" for fastening the CD profile to the ceiling is considered taking into account a step (60-80 cm). One suspension is needed two dowels and suitable screws. The same dowels go for the starting profile: for one meter, the rabidity consumption is three pieces.
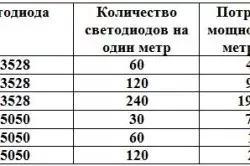
Table of power consumed LED ribbons.
Consumption of self-tapping screws No. 1 on one sheet of cyprum is about 40 pcs. The suspensions are fastened with these self-pressing, both profiles, connections and connecting brackets are fixed.
To mount one sheet, 50 pcs will need. Self-tapping screws with a length of 25 mm.
Naturally, fine fasteners should be taken with a good stock.
For premises with at least one linear size of more than 3 m, the connecting brackets are needed. They are considered as follows: n = (L / 0.4) -1) * k, where N-brackets, L-large length, k - coefficient.
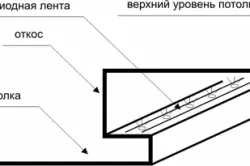
Where to hide the backlight?
A niche for laying a backlight can be attached immediately to overlapping, and on a plasterboard ceiling at one level. It is possible to draw backlight using the molding of sufficient width and thickness.
Article on the topic: how to make a house of plywood with your own hands
In any case, before starting work on installation, you need to think about where to place the LED backlight power supply, because it has much large sizes than the tape itself, bes noticeably heats up when working. Therefore, it is necessary to mount it in an easily accessible place, but at the same time so that it is not visible and it was possible to replace it easily. And of course, it is necessary to ensure at least a small heat dissipation. In advance, before mounting a niche, you need to bring the wire to the power supply to connect the backlight.
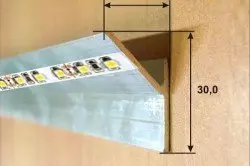
Fastening an aluminum corner for LED tape.
So, an alternative version of the niche - plinth. If it is decided to go through the smallest costs and hide the backlight for the molding, you must first take care of the elimination of the ceiling defects: after installing the LED ribbon, they will become more explicit. Therefore, the surface must be carefully soaked, and then paint. The plinth is pasted in such a way as to leave the gap between it and the ceiling is not less than 10 cm. The tape is glued on top to the molding closer to the edge.
But still much more effectively looks like a niche backlight. Here you have to tinker a little.
Build a niche frame and mounting backlight
Plasterboard plates for setting the ceiling backlight are attached to the frame, assembled from the same metal profile that is used for the ceiling design.
Initially mount the starting profile:
- On the wall with the help of the level, it is applied to the line, retreating from the ceiling of 7-10 cm.
- A profile is fixed throughout the perimeter.
- To form an internal perimeter, an indentation from the wall is 15-20 cm, and the UD profile is fixed on the ceiling.
- After every 40-50 cm, the main profile segments are attached to the starting, the length of them should be equal to the ceiling to the applied line.
- The starting profile, fixed on the wall, is connected to the suspensions from the CD profile by segments of 30 cm. The protrusion of 15 cm will be the basis for a niche.
- Strengthen the frame of significant sizes is possible using the main profile, it is attached from the bottom.
The layout of the LED tape on the ceiling.
When the basis is ready, the cable is placed to connect the backlight. It is performed in a plastic corrugation, which, in turn, is attached to the clamps to the ceiling racks.
After assembling the main frame, you can already make the sheathing sheets of plasterboard, for which it is necessary:
- Cut off the unintelligine strip of plasterboard and sew the vertical part to hide the wiring.
- If you need to change the shape of the cut (when wearing rounded and curved surfaces), drywall must be rolled with a roller with a needle surface, moisten and only bend.
- Then shape the base of the niches, the nasal sheets at the bottom.
Article on the topic: Stove-fireplace of long burning for the cottage - we make the right choice
Niche can be done open or closed. Using open type, you can immediately mount the backlight, and with closed - still work.
A closed niche should be equipped with a board, which will redirect the glow into the ceiling. To create it, the starting profile is fixed on the edge of the protrusion, and the plasterboard bands are fastened with a height of up to 5 cm. The outer angle should be protected from deformations by sticking overlaps (from plastic or metal).
After the completion of the main work on the installation, the ready-made niche for the backlight is spacing, additional finishes - at will (color, plaster, wallpapers, etc.).
Finally, the installation of the LED tape itself. Before installing LEDs in a niche, you need to prepare a tape: to attach individual segments to the trunk cable, which, in turn, connects to the power supply. The process is as follows:
Sequence of connecting tape with LEDs.
- Sliced the ribbon of the required length, making it only in places, which are indicated by special marking.
- If necessary, several ribbons can be connected using a connector or solder with a conventional soldering iron. At the same time, if the segments of the ribbon are longer than 5 m, it is better to make a parallel connection, thus the uniformity of the glow is ensured.
- The backlight is connected to the power supply unit in compliance with polarity. When choosing a block, it is better to give preference to models having a slightly higher than the total power of the connected LEDs (approximately 30%).
- If a multicolor tape is used, an additional RGB controller (or LED) is required.
Before mounting, the entire system must be checked for performance. After mounting the tape in the niche fix something will be difficult. If everything is in order, the tape passes on the cornice. When laying backlighting in a niche beyond the side, it is necessary to trace the wires and light bulbs to touch the metal elements of the structure.
Before the sticker of the backlight tape, you also need to observe several non-hard rules:
- Niche for highlighting must be predetermined from contamination and dust sediments.
- When mounting the tape on plasterboard, high-quality primer is important for the tape not twisted.
- If the tape is still making a profile (which it is recommended to be avoided), it is necessarily necessary for insulation, at least the usual tape passed on the profile.
To the surfaces, the LED tape is attached using the adhesive layer applied on the reverse side. The protective coating is removed immediately before installation. It is necessary to secure the backlight in the niche correctly, for this it is necessary to ensure that the tape does not twist and not bend, it cannot be exhausted.
Observing fairly simple rules and stupid patience, you can literally for 1-2 days with your own hands backlight in a niche, transform the room and enjoy the achieved effect for a long time.