
Plumbing siphon is a water shutter, which prevents the appearance of sewer gases into the room. This is known to many people. However, do not everyone know how to install the siphon correctly.
Before installing the siphon, it is necessary to disassemble and miss all rubber gaskets, as well as threads with silicone lubrication.
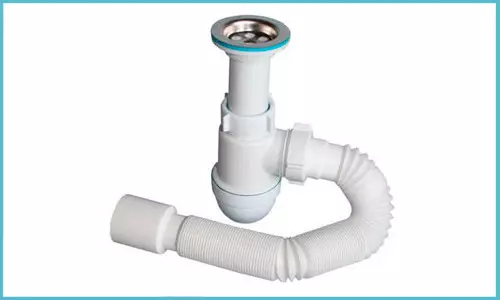
As you know, the set of a siphon consists of 12 components, so before installing it, it follows at the time of purchase, carefully check the staffing and quality of the product. It is worth noting that the replacement of the siphon under the sink is a light process. It is necessary to check the device of the siphon, as well as the details on the absence of damage and marriage.
Qualitative materials for performing work
You will need:
- transition cuff;
- plastic tape;
- screwdriver.
In order to be easier to navigate, the installation is best started with the layout of all the parts of the siphon in the position and order in which they must connect. Depending on the diameter of the pipe, you must install the transition cuff.
For installation, it is worth prepare all the necessary materials.
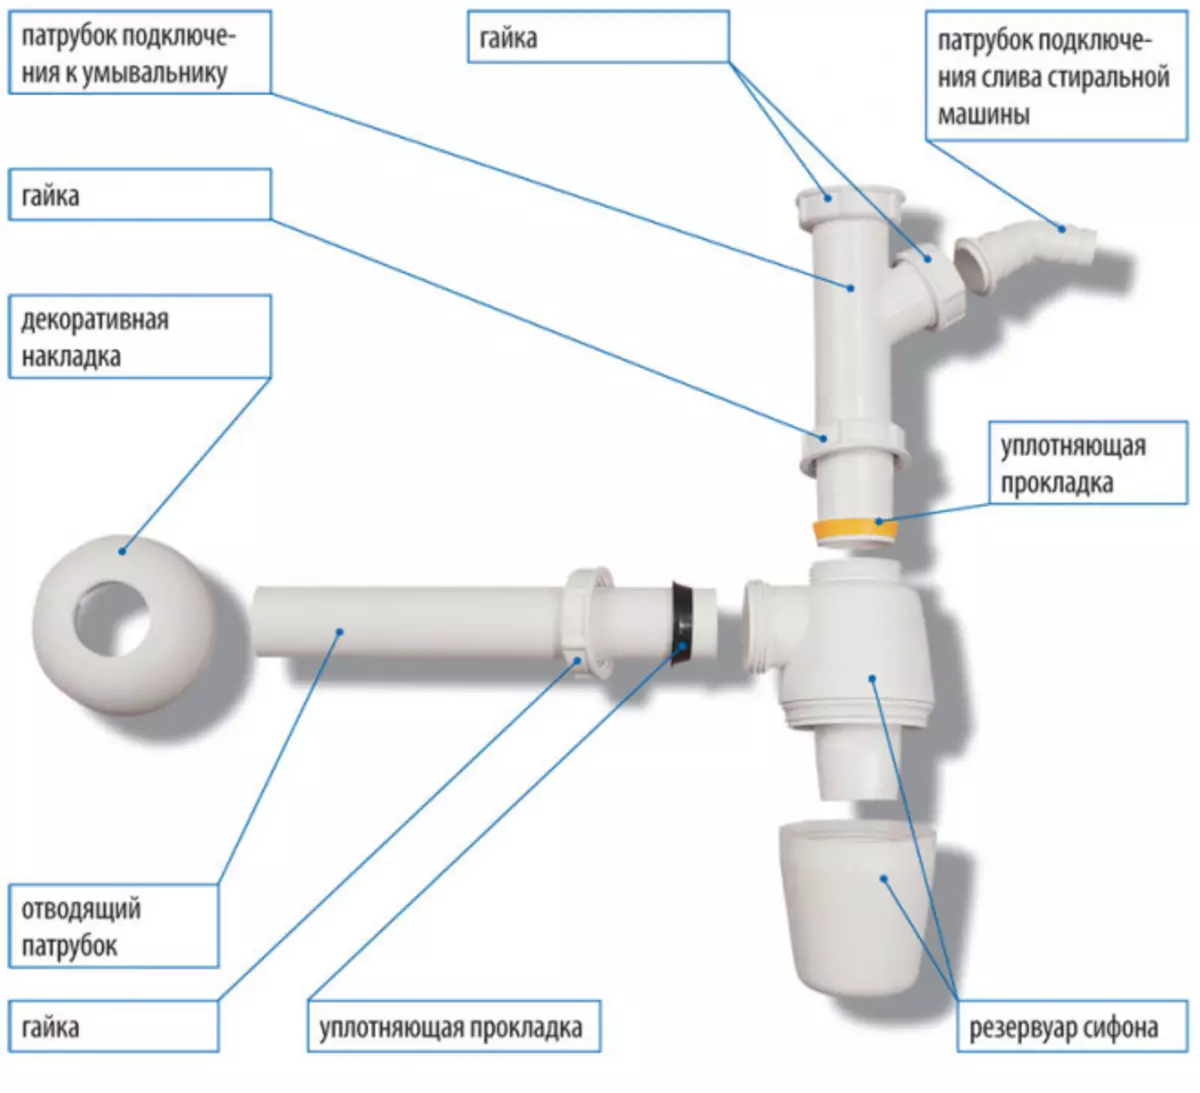
Siphon device diagram.
For example, a solid installation of a siphon on a washing or bathroom can be carried out solely in the presence of silicone sealant - gaskets.
More qualitative plastic tape is still needed. It will be useful to purchase a flat screwdriver for crimping the possible clamps on pipes or disassembly of the old system, and everything else is preferable to twist manually.
Prerequish the old system dismantling. Remove the old siphon for a washbasin over the bucket, including a sewer to sewer. If the coupling has lost elasticity, it should be replaced with a new one.
After cleared the drain and fool from dirt and old sealant, it is required to close the trunk temporarily with a cloth, and then perform the installation of the siphon. That is how the whole process will be done correctly.
Article on the topic: Hidden hatch under the tile: a secret basement and invisible with their own hands, the inspection flooring
In addition, you must understand that the high-quality replacement of the siphon in the kitchen is a process that can be performed independently. Yes, and the connection washing, including the sinks, possibly a standard corrugated tube, in particular, a tube with plastic rigid tips, which is unwanted for the bath.
Replacing the siphon in the kitchen
Siphon types: corrugated, bottle and tubular.Thanks to universal corrugated pipes for systems of various diameters, you can get a cut of an excess part. Siphon threads can be connected with a flat gasket and a plastic nut. However, it is wiser to use the complete cone gasket, it is more reliable.
High-quality replacement of the siphon in the kitchen with their own hands is that at first a siphon assembly is disassembled with the goal to check the strength of the thread, the presence of gaskets, the absence of the soot. Only after that you can make the installation of the siphon in the kitchen.
Further performing moderate lubrication of gaskets and threads with selence promotes reliable protection against the flow (correctly make the process will help the scheme).
Siphon with thick gasket should be squeezed to the sink drain. It is required that the gasket fits enough to fit all over the perimeter.
A free hand insert a mesh with a screw and gasket into the drain hole and the screw is styled. After that, it is necessary to give it completely. The corrugated pipe with the gasket is inserted into the drain fuus of the siphon and is tightened with a barish nut.
To competently make the installation of the siphon in the kitchen, it is recommended to put a rubber in the sealing pipe, and the root of the corrugated pipe is recommended.
Be sure to check if there is no leakage. To do this, you need to open a tap with water, and if everything is fine, then you can consider the installation of the device completed.
Montage of conical cuffs
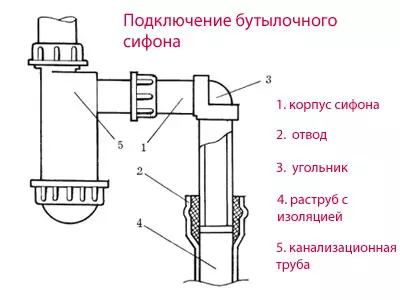
Connection diagram of a bottle siphon.
On the pipe overflow in front of rubber tapered cuffs, you need to put nuts from plastic. On the nozzles, slightly above the nuts, as tightly to the belts of the limiters wear cuffs, usually with a wide side of the nut.
Article on the topic: Pros and Cons of Iron Baths
In one design, two pipes should be collected: an exhaust M-shaped and forming a water shutter F-shaped. It also happens that the narrow portion of the cuff enters all over the perimeter into the socket of this part, in this case, you need to pull the nut.
Each you want to install the device on the bath from the first time and for a long time. It is possible to achieve the desired one if you lubricate the threads and gaskets with a sealant, insulating the plastic tape.
In the eye, the overlaying overlap, which is directed strictly down, one spring ring chain is set, trying not to clamp it between enamel and lining. The second ring must be returned to the eye of the rubber stopper.
The overflow and exhaust pipe are installed on a corrugated pipe, stretching it into the desired length. Often, the installation of a siphon for a bath is carried out using the use of plastic nuts, which need to be firmly tightened with their hands.
Before installation, rubber gaskets are moderately covered with a silicone sealant-gasket, and not acidic.
Installation of siphon in the kitchen
Double rubber gasket is best fixed at the top of the graduation side, so more reliably. Around the paws of the retainer on the transfuster nozzle you need to put a flat gasket.The presence of a retainer is required for pig-iron baths with thick walls. Installing a siphon to a bath with thin walls involves the removal of the half-colts of the retainer. Therefore, it should be slightly cropping his paws above the installation feature.
The final stage of the assembly of the siphon is the connection of water shutter nozzles along with the graduation. Some corrections are then possible, so that the fastening axes of the drain nozzle were not noticeable through the hole.
The original solution will be, if during the installation of a siphon for a bath slot on the helns on the helns will be parallel to each other. Most people are looking for an answer to the question of how to make the installation of the siphon, so that water leaves faster.
Clean the siphon can be cleaned by various methods, for example, if ringed with hot water, fats completely dissolved. And the caustic soda will help to speed up this process. This question can also be solved with the help of special chemicals intended for pipe cleaning. Well, of course, the Vanutuz, presented in the form of a rubber cap on the handle, which needs to close the hole slightly closely, and he squints the garbage.
Article on the topic: Cross-embroidery schemes for boys: with girl Download, Embroidery and kiss, Metrics free download
When to change the siphon better?
It should be noted that repair work is recommended to be carried out during the flow of water from the siphon, the occurrence of unpleasant gases from the sewage in the apartment (it is best to immediately change the siphon). If there is a flow on the conjunction with the sink, certainly delete the sulb smelting.
If the bottom stopper proceeds, it should be screwed it as close as possible. In addition, the disassembly and repair of the siphon produce accompanied by cleaning parts from the old sealant, thereby ensuring the subsequent high-quality assembly. Make this work will help you.
Material quality and competent sequential assembly allow you to carry out a successful installation and installation of a siphon for washing or bath.