
In some areas, the garage appears before home. You can spend the night in the tent yourself, and the car is to put under the roof. Therefore, the question of how to build a garage with your own hands is not idle. We start with the choice of place.
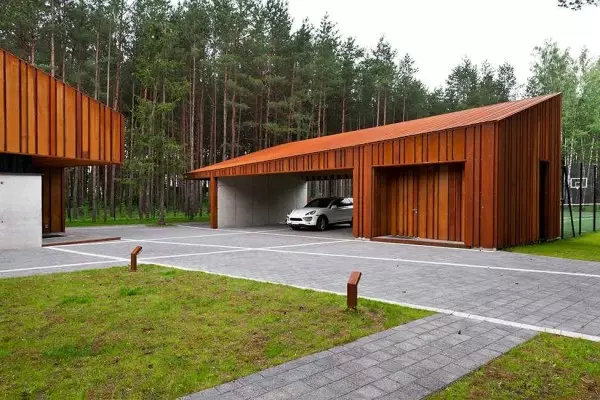
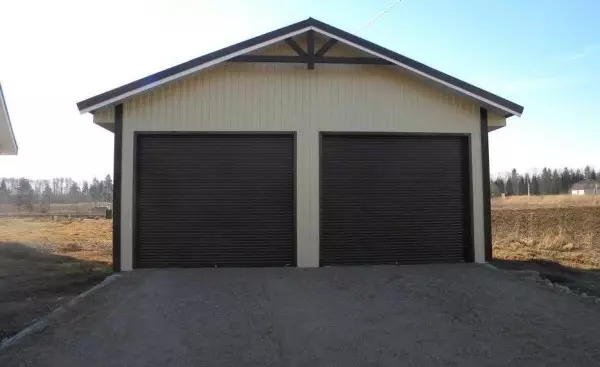
One of the chic options
Choosing a place
The choice of place for the garage is not an easy task. I really want to be convenient to use them, but at the same time that the construction does not spoil the appearance of the site. Immediately it is necessary to decide it separately or attached to home or another building on the site.
- Standing separately. This option is chosen if the house has already been built and / or the shape of the site is such that access roads take too much space. In this case, it makes sense to bring the construction closer to the entrance gate, or to make the garage gate to open right outside.
- Which are part of the construction. It can be a house or hosbler, and the garage itself can be built together with the building, or to adoperate later. Good in the event that the house is built close to the border of the site. Attractive with the fact that there is no need to think about how to pull it and pull additional communications.
With independent construction, the garage is most often put separately, since the extension to the existing home requires serious measures to strengthen the foundation, and this is accurately expensive. Cheaper will build separately. Only when choosing a place should be borne in mind that the distance to the neighboring site should be at least 1 m, and the entrance at a distance of at least 10 meters from the neighbor's windows. Also normal is normalized to the nearest residential building. It should be more than 9 meters if a house of non-combustible material and 15 meters, if the house is fire-haired.
The gate opens straight to the street - one of good options
Dimensions and designs
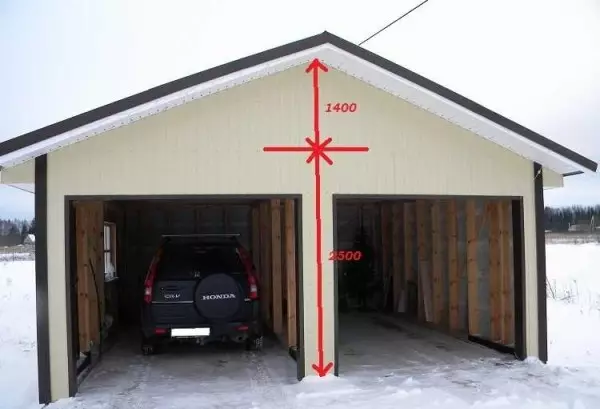
First you need to decide for what purposes the garage will be used. If this is only a parking place, the dimensions can be made back - to the dimensions of the machine add to the length in length and width. This is enough for the place of parking. If repair works will also be held in the garage, the lift or observation pit will be needed, a bunch of equipment and spare parts, then the sizes should be greater. It is advisable to leave at least a meter on the sides and as much ahead. Rear is still enough half-meter. If the garage is used as a workshop or as a club, dimensions can be even more. Restrictions only in existing areas and budget for construction.With pit or without
The most important thing is to determine the pit or not. It depends on how and what the foundation will do. You can make a basement under the garage, and the pit will be an "entrance" or only part of a busy space. An attractive option, but expensive and requiring large volumes of earthworks.
How to make a viewing pit in the garage look here.
The second option is more economical: only a hole of a depth of 1.8-2 meters and a width of about 1 meter. The width is optimal, but the height depends on the growth and it is better to choose this option individually: the depth must be 15-20 cm more than your height. Length of the pit is about 2 m. This is enough to inspect any passenger car.
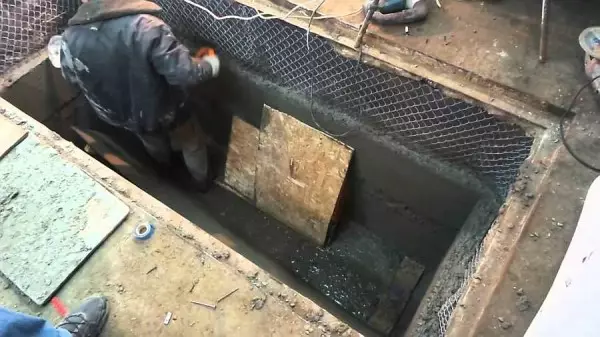
Example of construction of observation pit
It is even easier to implement the floor in the garage without a pit. Then the monolithic plate is simply poured without any difficulties.
Foundation for garage
The foundation for the garage without a pit can be any, even a tape, even pile-rustling. Another question is that the floor will still have to fill. And if so, it is easier to make a monolithic reinforced plate immediately and not to do the foundation first, and then the floor.Ribbon - monolithic and precast
If you decide to make a ribbon foundation, and the soils are powdered and the groundwater level is high, you need to make it below the depth of the soil. In the middle strip it is about 1.7-1.9 meters. The trench is digging on this depth, they put a formwork (the tape width is not less than the thickness of the walls). The framework of reinforcement is placed in it and all this is poured concrete. After the concrete reaches 50% of the strength, the formwork is removed and you can proceed to the pouring of the floor in the garage.
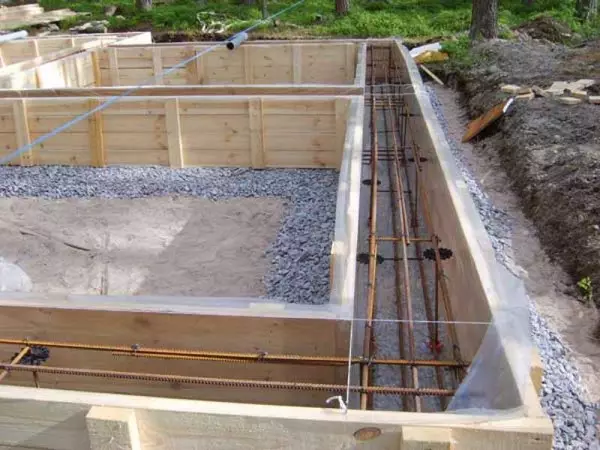
Ribbon foundation is ready under the fill with concrete
In the case of sand and lack of close groundwater for garages, a prefabricated ribbon foundation or a finely brewed belt (tape height of about 40-50 cm). The national foundation is built from finished blocks. Connect blocks using a solution, and the rows are reinforced by laying the rods with a diameter of 10-14 mm (depends on the soils, the material of the walls and the storeinations of the garage). But such foundations normally cost only on soils, not inclined to beanted: sands and squeeces, and with a low level of groundwater.
Article on the topic: Gypsum stone and its manufacture with your own hands
Another option is to make a ribbon in the level with the ground and overlap it with reinforced concrete plates. This option is also good on sandy soils.
More about belt foundations and their types can be read here.
Pile or pile
Economical foundation that for some reason is rarely used under garages. The pile in pure form under the garage is not very suitable - the floor turns out to be raised above the ground, but if you make a check in, you can use it. He and the pile-tall-string-hard framework - an excellent option for bunching soils (clay, loams with a high level of groundwater).
The pupil is associated with the painter - this is the pile-painting foundation
In the manufacture of Schwayn-Screwdriver around the perimeter, the shallow pit in the form of a ribbon is digging (about 40-50 cm deep). In it, with a step of 1.5-2 meters, the wells are dried below the depth of the soil freezing, the formwork (plastic pipe or rolled up rolled rubberoid is inserted into them. Inside the formwork put three or four rods of fittings with a release of 70 cm and poured concrete. After they put a formwork on the tape and knit the reinforcement frame for the tape, tying it with the release of piles fittings. And it is also poured with concrete.
You can read more about the pile-roster foundations here and in this article describes the piles of tees.
Monolithic plate
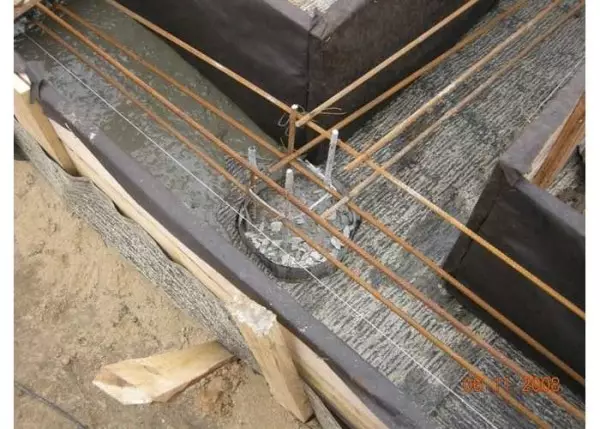
For any type of soil, a monolithic reinforced concrete plate is suitable. In the perimeter, it is done more than the size of the garage at least 30 cm. The ground is removed, the digging of the depth of 40-45 cm. Line the bottom, pour the gravel layer. Its thickness of about 20-25 cm. Gravel is well trambed using vibrating plates.
On the perimeter, they put a formwork, an immaturity is placed on a rammed submetage with a step of 15-20 cm (along and across, getting a cell). Usually 10-14 mm are used in diameter, two reinforcement tiers, the distance between which is about 20 cm. All this is poured by concrete Mark M 250 - M 300.
Immediately and the floor and foundation
What to do walls
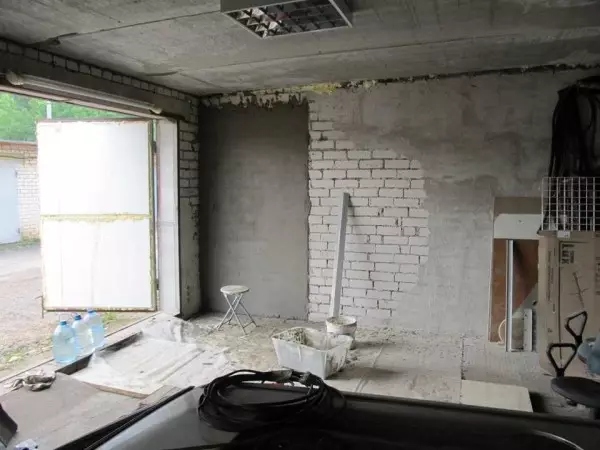
A bowl of all the walls in the garage are made from building blocks. It can be a cellular concrete (foam block and gasoblock), and maybe with a flagging place or clamzite. They are good because the warm and subsequent heating of the garage of the problem does not occur: a sufficiently small stove in order to heat the air to normal temperatures. True, with such a choice you need an outdoor finish. It, as a rule, make the same as on the house or as much as possible.The second popular technology of building the walls of the garage - frame. The frame is made from a metal profile pipe or impregnated with antipirens (decreasing flawed additives) of a wooden bar. The sheathing can be any - from sheet metal to siding (on metal), lining, timing of timber, plywood (moisture resistant) or OSB. Yes, some materials are combustible and you will not call them reliable, but if you need a cheap garage, for example, for giving, and only as a temporary parking, then why not.
Read about the frame construction from the wood here, and in this article describes metal framework technologies.
Types of roof
It's easier and more efficient to make a flat roof with a slope of several degrees. For the middle strip, the minimum bias is 8 °, but it is better at least 10-12 ° - the snow is better.
In the case of a separate garage, the front wall is higher and all the precipitate flows / creep back. It is necessary to keep in mind and do not put any items there, do not place the construction. If the garage is attached to the wall of the existing structure, the bias are taken away from the house.
An example of a soling system of a bone roof
Minus one-piece roof for the garage - no attic. Pros is a simple device and low cost. Another positive point concerns improvements: then the attic floor can be built above the garage.
A row roof is more complicated in the implementation: the assembly of the rafter system and the roofing material is greater. But - there is a attic and the appearance of more "Civic". It is often possible to see the attic floor above the garage. The room can be used as a guest house. The costs of arrangement of attic, of course, more than on the construction of a conventional two-sheet roof, but also additionally, a decent square is obtained.
The manufacture of a two-tie roof is described here (photo report), read the device on the devices of the attic roof here.
Goal
Gate for the garage can be swollen, sliding, lifting. Swing - the simplest and well acquaintances. If you wish, you can automate them (as read here).Retractable gate can be done if the departure from the garage is in one plane with the fence, and next to the free section of the wall, 1.5 meters longer than the width of the gate. What they are good - the fact that in winter it is easier to dig.
Article on the topic: how to make a sliding table with your own hands
The gate with the lifting mechanism is perhaps the most comfortable, but also the most expensive. In the simplest variant, you can put a roller shutter. If you take non-automatic, they are unlikely to be too expensive. Rollette strips are made of metal thoroughly, the color may be any.
If you want automation, pneumatic lifts that raise the entire sash. In the case, immediately need to develop the doorway and the design of the garage, taking into account the work of such a mechanism. Sectional models are more comfortable in this sense. In the folded state, they occupy less space. But all of them are decent, although certainly comfortable.
Interior decoration
The type of trimming of the garage walls is largely depends on the material of the walls. If these are building blocks, the walls are most often plastered. Some do not really pay attention to the attention and leave as it is. But in the case of some blocks, they are better to plaster (non-autoclave cellular concrete, for example, or crust with limestone) to protect against high humidity.
Plaster - Best of Finishes
Frame garages often inside plywood. If the garage has permanent heating, you can use anyone if they hang from the case to occasion, or at all at all - then you need moisture-proof. You can make a lining with any sheet material - GLC, for example.
You can read more about the framework of construction here.
Heating and Garage Heating
If you plan to use the garage all year round, it is necessary or the walls to immediately make warm (from blocks with low thermal conductivity) or warming up the framework-built technology. Materials for insulation Standards: mineral wool, polystyrene (extruded or conventional foam). There is another embodiment of a non-combustible insulation, which, in the case of a garage, is simply a great option - a small density foam concrete. It can be laid between the frame racks. Non-flamm, inexpensive, keeps warm well. It is bad just that you will not hang anything on it, but there is a frame of a frame, here they can be attached to them.There are two types of heating in the garage: permanent and periodic. Permanent can be separate or part of the heating of the house. If you do separately, this is the same house system, only in a smaller volume. It turns out expensive and difficult: a separate boiler, which is also necessary to serve and control.
One option to organize heating in the garage is to reach the branch of the house. But here it is also not easy: a pipeline requiring good insulation, a large volume of land for its laying, and, it is desirable not just to the ground, but in the sewer.
Periodic heating - bourgeoque stoves and modifications. They can be drowned by firewood, every flammable trash, which is usually enough. But the most attractive thought looks like a stove on working out - fuel around full, and the task (or almost). The designs are different, they are described with the article "Oven on the exhaust oil with their own hands."
This type of heating is easiest to organize the easiest: put the stove and rust, but comfort less. Firstly, warm mainly near the stove, and secondly, you come in a cold garage and still melt until it starts to warm up ...
Drawings and schemes
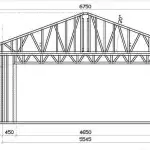
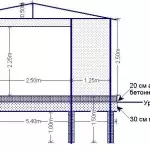
Photo reports from construction
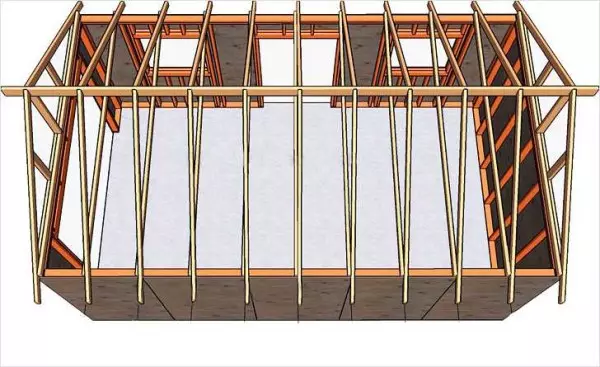
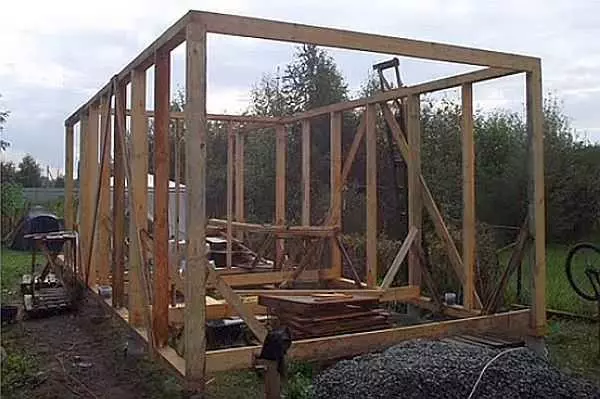
Often it is difficult to understand the essence of technological processes according to the verbal description, but drawings or photos help to put everything in places. More questions arises about frame garages. They are obtained the cheapest and are built quickly. Several examples are given below.Frame garage from wood
The garage was built 4 * 6.5 m, with a gazebo of 4 * 2 m. The lumber was brought up, impregnated with antiseptic and folded into the ventilated stacks - dry.
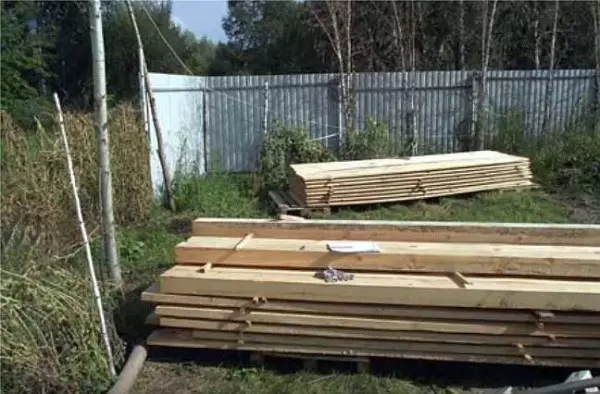
Materials for the construction of a skeleton garage
The foundation is made column. The manual brown was made of wells with a depth of 150 cm, diameter 35 cm. The sleeves from the runneroid were put in them, three rods of plastic reinforcement are inserted, filled with concrete.
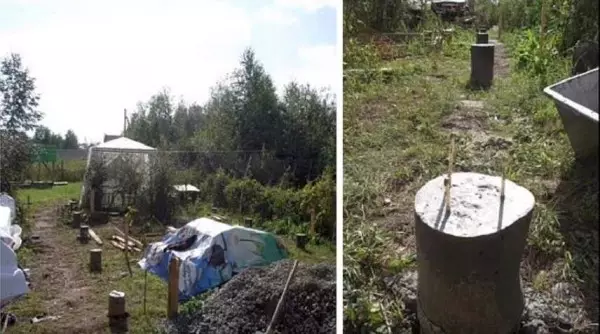
Concrete piles for brown-stuff technology
Two weeks later, when the concrete is almost ready, they began to put the walls. The first collected the bottom strapping. Used ram 150 * 100 mm. The strapping was installed on three sides, the fourth remained open - there will be an entry.
The bunch of plastic reinforcement turned out to be problematic. Not a particularly successful idea: drilled holes for it drilled, and how to fix it - it is not clear. Anchors fastened to concrete (two on the pillar), and the holes with the reinforcement were poured with epoxy. They will help or not unclear, but we hope to somehow keep it.
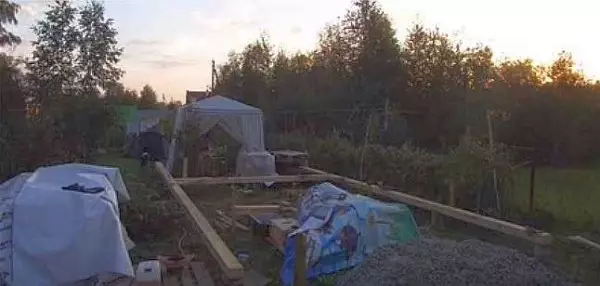
Lower strapping
Next over each column (step 1.5 meters) put the racks. They must be put strictly up, without deviations, otherwise the design will be unsustainable - driving loads will appear. Started with corners. One put out, recorded by temporary bodies, then knocked, moved to the next. At the exhibited angles, the rest, not forgetting to check the verticality (plumb, as the level gives an error). Bashed on nails, reinforced with metal mounting plates.
In order for the free ends of the lower strapping, they were brought together temporarily, the board.
Article on the topic: How to securely mount bales to the floor and steps
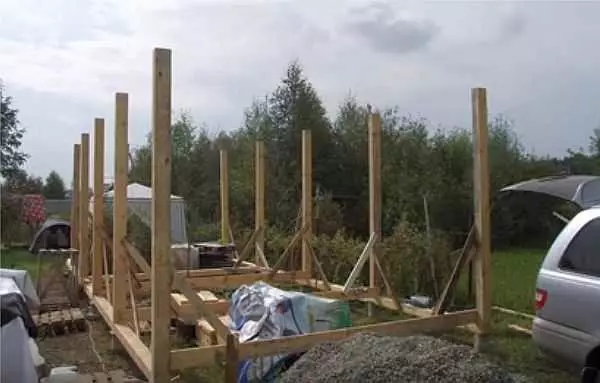
Vertical stands
After installing all the racks at the bottom, lagows were attached. They gave rigidity, and it is necessary, since we will climb up and mount the upper strapping.

Top strapping
Next collected intermediate racks and bodies. Again for greater rigidity.
We continue to collect a garage frame
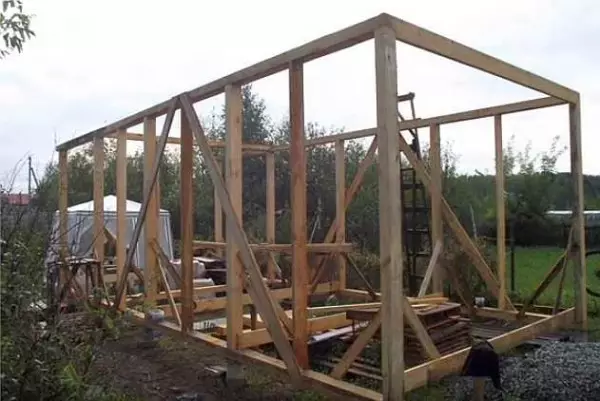
Side
When all the beams are installed and assembled, we start collecting the solo system. The roof is decided to make a moon, and it is temporary. Subsequently, the garage will be tortured to the house (this is the first building on the plot).

We collect rafal
Having collected the right number of farms installed on the upper strapping. Fixed pieces of boards to racks on both sides, then scored with nails, reinforced with corners on self-drawing.
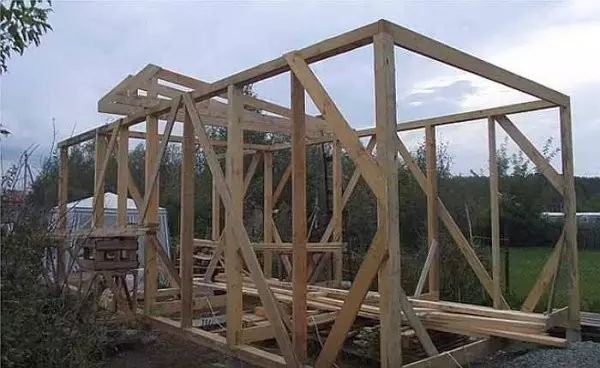
Install the roof rafters
The rafters should also be put precisely up, otherwise the roof will lead the roof. Because it should be checked as correctly: before you score, and after ....
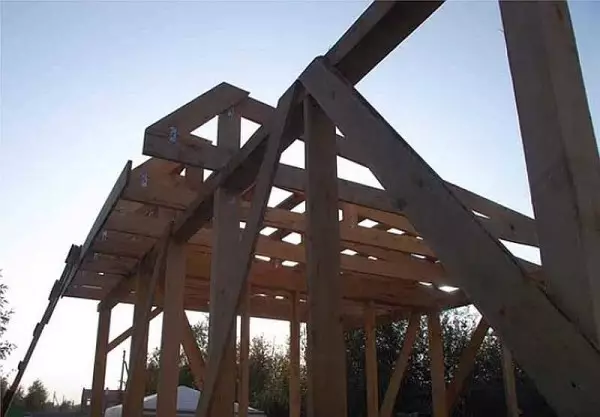
Rafters from below
Everything is in place
After all are installed and secured, the crate has been installed. A 40 * 150 mm board went on it, stacked with a gap 40 cm.
Dorthet, for not roofing material
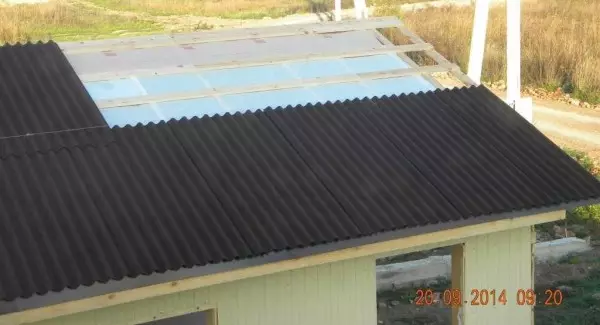
The crucible was impatible professional flooring.
Roofing professional flooring on the roof of the garage
Began to make a zone mounting the gate. Installed beam at the top and sides.
Parallel began to design a gate zone
The gate will be lifting-swivels. Under them inside the framework is boiled, through which they will drip off. From the profile pipe 25 * 50 mm, the gate frame is boiled in size of the opening (with a small gap).
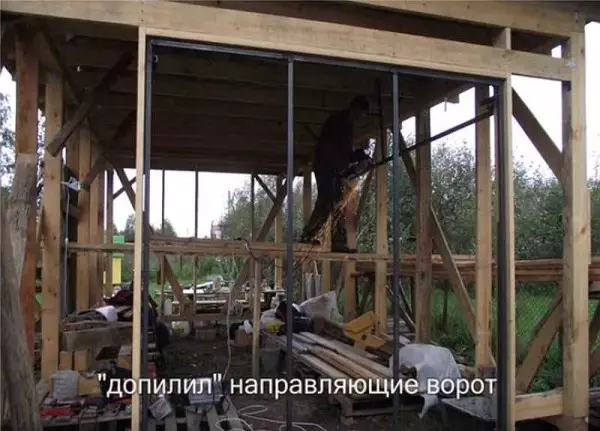
Raming door frame
Next, they brought the CSP, the framework of the frame began. Sheets cut a grinder with a diamond disk. It cuts well, but a lot of dust.
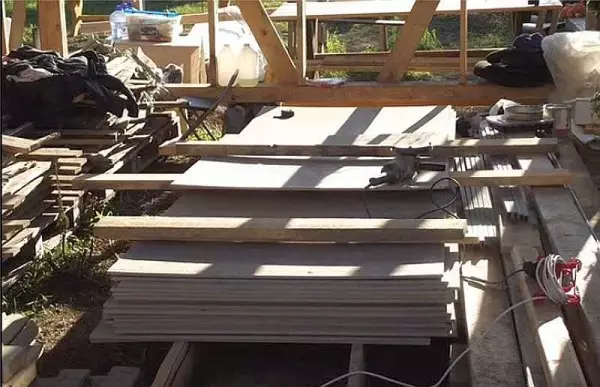
Brought CSP.
Bashed sheets needed with a gap of about 10 mm. For humidity and temperature expansion.
The trim started
The casing continues

Soup

It has already mounted gates
There is still a lot of work, but mostly everything is ready. The crushed stone was poured inside until the floor was filled, but the car can already be put as drinking tea in the gazebo))
Garage do it yourself on a tape foundation
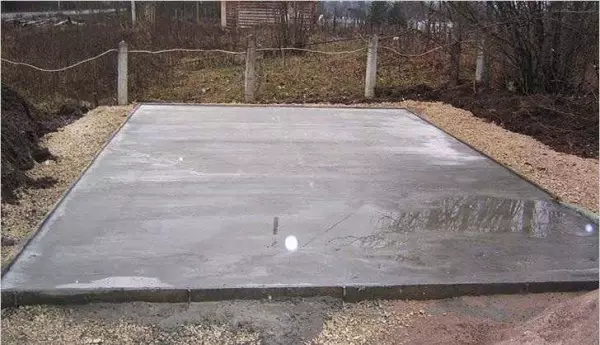
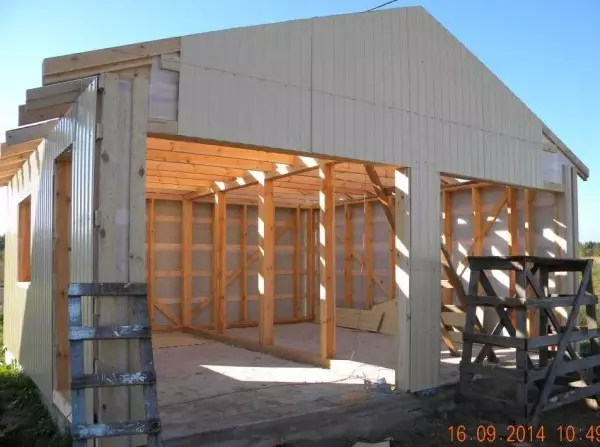
The garage for two cars (separate boxes) is unheard. Built on sandy soil with low groundwater. Therefore, the foundation is finely brewed. They dug around the perimeter trench, put the formwork, tied the reinforcement frame. Everything is as usual. Bled concrete.

Ribbon ready to fill
Inside the ribbon was made over the excess ground, leveled the pit. The bottom was shown geotextiles and floated with sand. His shed and tumped (vibrating).
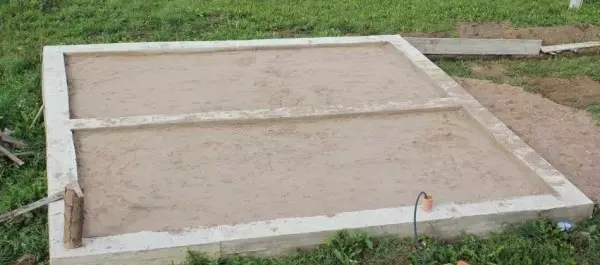
Dummy sand
From above, a polyethylene film was laid (for waterproofing), laid the metal grid and poured with concrete M300.
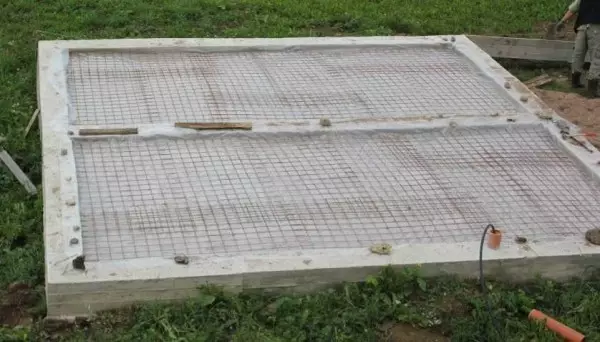
Mesh on film for reinforcement
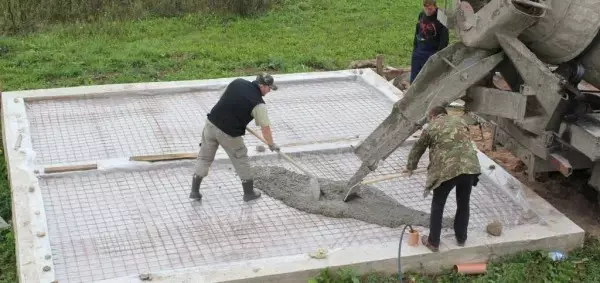
Camered concrete mixer
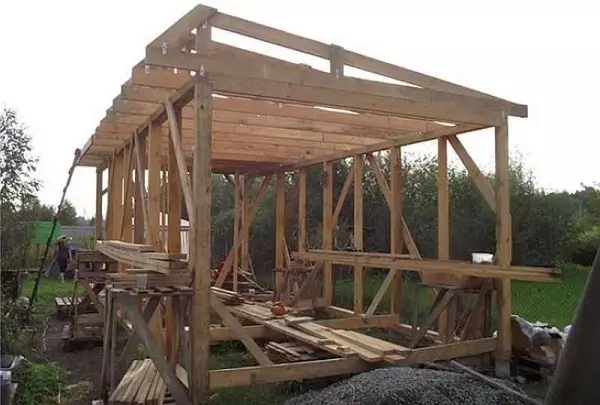
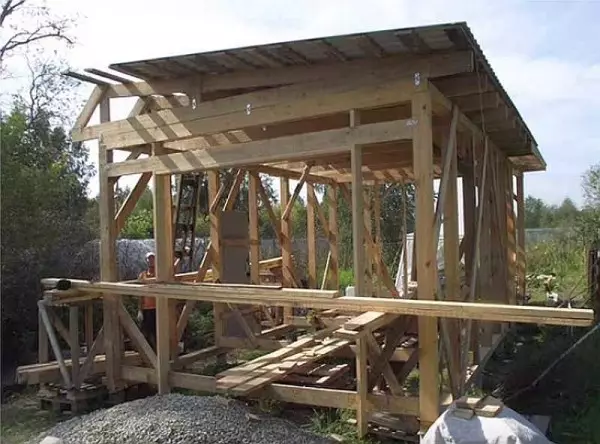
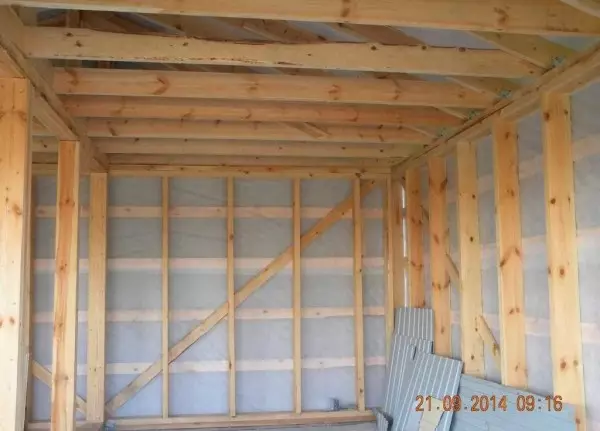
The height of the screed is 10 cm. Left for 2 weeks to grab. Then began to put the framework. At the framework of the frame itself and the rafter system, the boards 50 * 150 mm, the struts and drives are made of 100 * 25 mm.
Garage framework
In the corners, additional boards are delivered - for amplification. Also reinforced racks in places of fitting of doors and windows. Installation step! Walks "- the dimensions are small, and it is necessary to put the door block, then put the window. The rest divided as it turns out, but no more than 60 cm did.
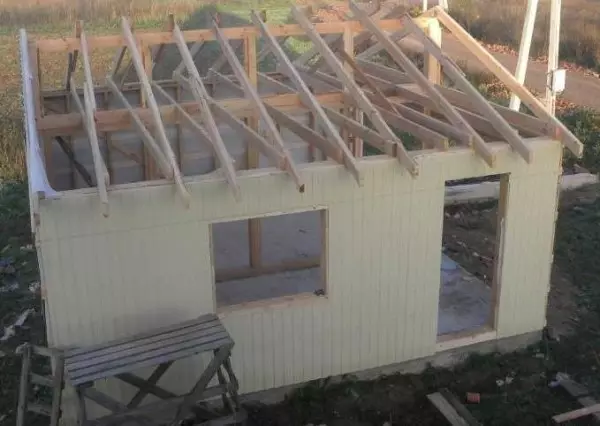
Immediately assembled and the rafter system. Since the beams were held in the middle, and relied the rafter legs on them. They were put on a distance of about 50 cm. To enhance in places of attachment, assembly metallic plates and corners are used. They were sitting on the self-tapping screw, combined the frame elements with a long nail.
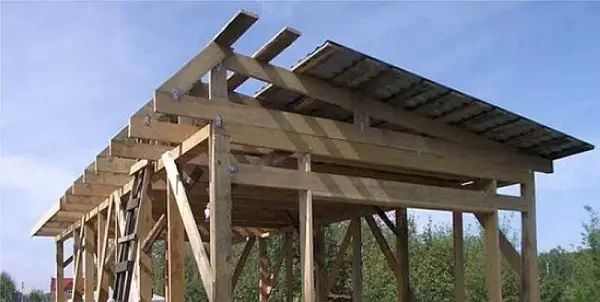
From above on the frame packed windproof membrane. On it - a doomlet of an inch board, the shap shave is about 50 cm.
Windscarette membrane on frame
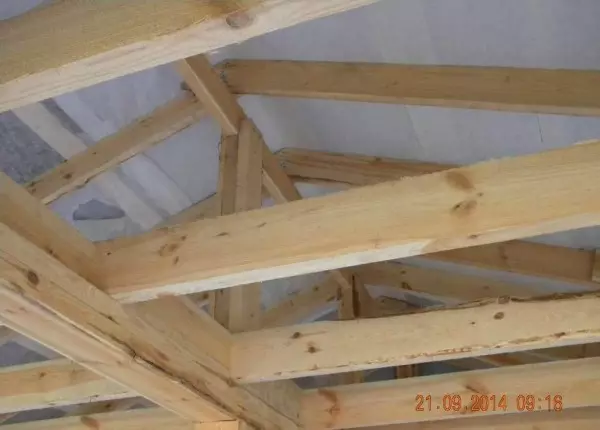
Nodes of the rafter system
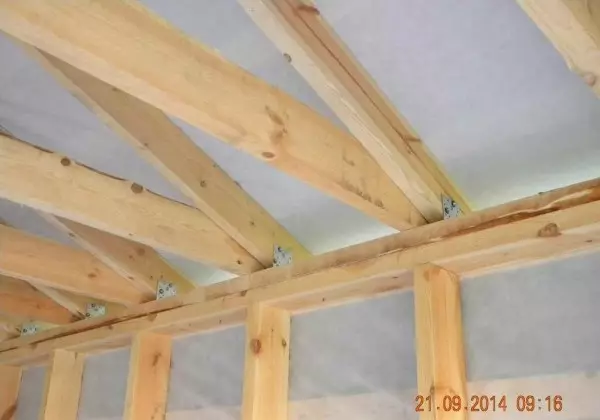
Fastening of the rafter feet to the upper strapping of the frame
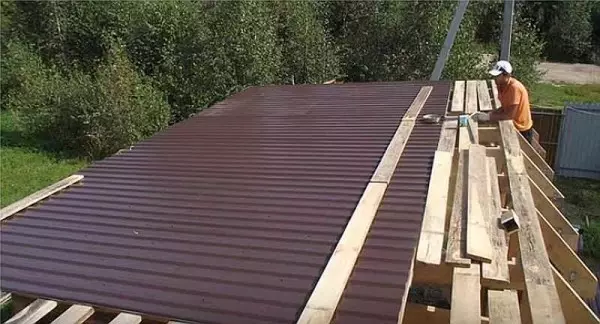
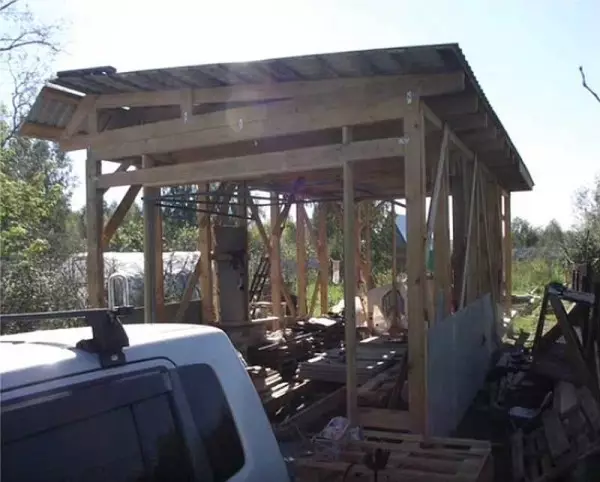
After stuffing the membrane and the crates began the installation of the outdoor sheatting of the garage. This is metal profile on walls and ondulin on the roof. No difficulties. Cut in size, attach to the screws.
The trimming of a professional wall on a wooden crate is simple
Walls are ready, put the membrane on the roof
Disseminating the membrane to the roof (starting from below, sick joints) and killing the crate, mount ondulin. His put it should be from below, moving up.
Ondulin is also mounted without any problems
Longer have to mess with the switches of the soles. They were stirred by perforated siding (residues from the construction of the house). The wind board is installed from dry wood 145 * 20 mm, painted in white.
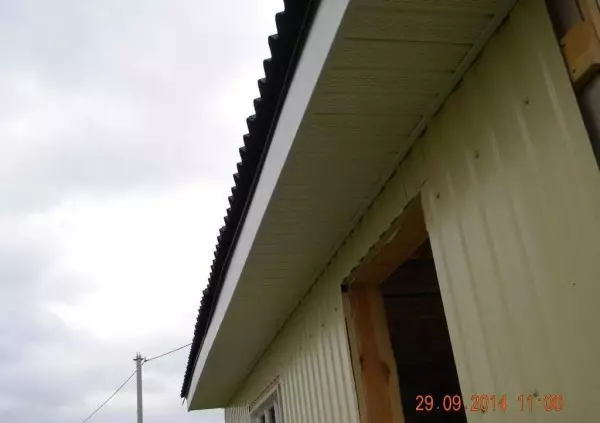
Much time went to the swing of the soles
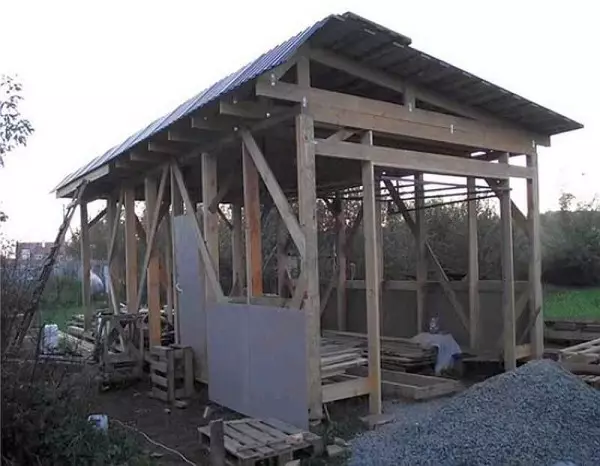
The wooden windows are installed, painted white and cheap Chinese door, which after will be replaced and delivered to the barn. The corners are trimmed with a wooden board 145 * 20 mm, painted into the tone of the roofing material.
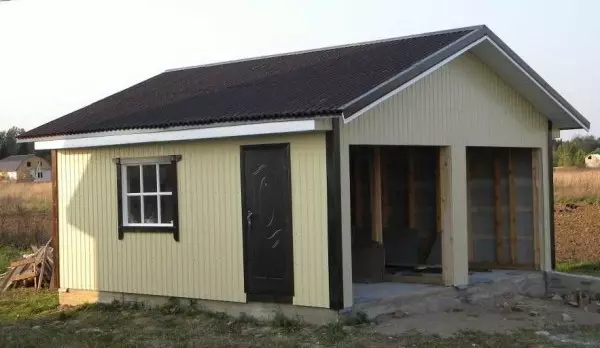
Almost the result: another gate and insulation
An entry was prepared: on the one hand, an extended tape was filled with the fill with the foundation (height difference). On the other hand, they poured the board. Fucking asleep, tamped. Check out ready.
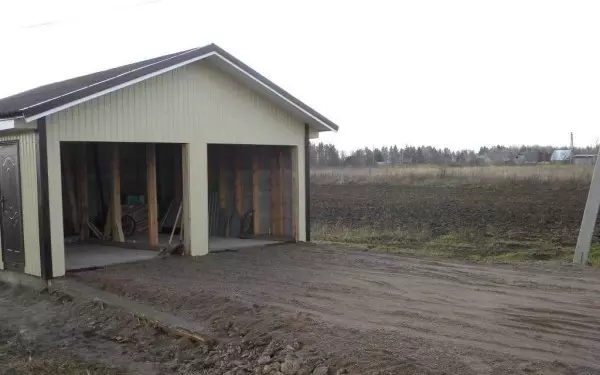
Entry is ready
Checked, swinging normal
Recently installed rollers. At first, the rotary doors were planned, but the price of them became a lot of comparison, because a cheaper option was installed.
Garage ready