
The sound of dripping water is not only annoying, but also increases utility bills. The reason for this sound is the fault of the mixer. To repair the kitchen mixer, you do not always need to invite plumbers for this. Some breakdowns can be completely eliminated by their own hands, saving money and getting a good experience.
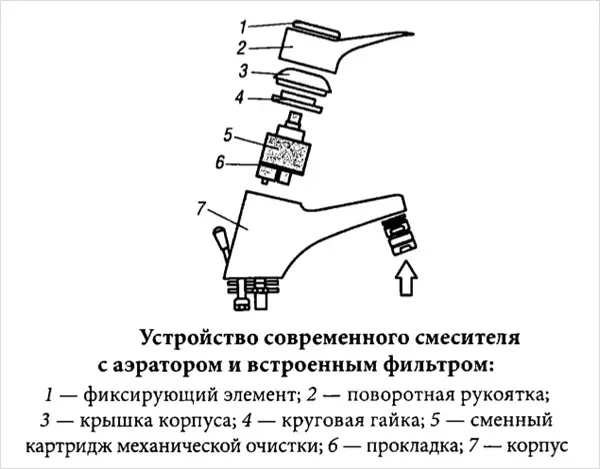
Circuit diagram of the kitchen mixer.
Repair of kitchen crane: When do you need?
Any faucets can break. This is especially true for the kitchen mixer, since it is used more often than the mixer in the bathroom.
To repair the mixer in the kitchen is not very difficult, you only need to reveal the cause of the breakdown.
Repair of the kitchen crane is necessary in cases where:
- flowing from the flywheel;
- flowing through the yield nut;
- flows between the valve head and external thread.
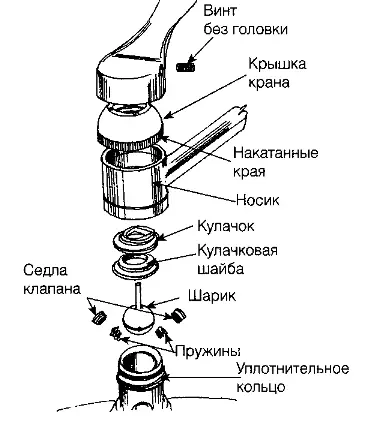
Mixer assembly scheme.
Most often, the design of the kitchen mixer has a high emission. The hostess do not just consider such a kitchen mixer to be the most convenient of all: it allows you to fill with water even deep containers. Such a mixer may be a single-art ball or twin-type type. The convenience of the ball faucet for the kitchen is that water can be turned on and off with one hand. In such mixers less details, so make their repair with your own hands is much easier. Most often, the need to repair a ball mixer for the kitchen occurs due to the short-life of the shut-off valve.
Repair of the mixer in the kitchen requires the presence of appropriate tools and materials, the list of which can vary depending on the nature of the malfunction. A full set that will allow you to quickly and efficiently repair the mixer in your kitchen with your own hands, includes the following tools:
- Hexagons.
- Gas keys.
- Screwdriver Set.
- Large passatia.
- Normal wrench.
- FUM tape for sealing threaded connections.
- Vinyl tape (she will need to wind the keys in 2-3 layers to prevent scratches on the surface of the mixer).
Article on the topic: Proper fastening rafted to a cut
The order of repair of the ball mixer for the kitchen with their own hands
Installation of the kitchen mixer (useful tips).You can prevent the appearance of an irritating sound of dripping water in the process of installing the mixer in the kitchen, or rather, before installing it. The probability of fast failure of the ball mixer will significantly decrease if you install on cold and hot water pipes for cleaning filters. After all, during repair work, as a rule, it is necessary to change the entire ball module, and this work is more expensive and time-consuming than installing filters. The ball mixer can give a flow for a variety of reasons. The most common of them is the wear of the inner gasket and the mechanical damage to the mixer body, which entails the appearance of a chip or crack.
As already mentioned, the repair of the mixer in the kitchen can be performed with your own hands. Before starting work, it is necessary to turn off the water supply and prepare a shallow container for flowing the water remaining in the kitchen crane. If the product was purchased in a good store, you must have a manufacturer's instruction with a description of the technical characteristics of this model, perhaps this information will be useful for you.
A small chip or crack can be smeared with a sealant. In the case, if the size of the crack is large enough, it is better to replace the crane completely. If no visible damage is detected, and the crane still flows, then the reason is most likely in the wear of the gasket. To replace it, you must first remove the crane.
We disassemble the mixer
Repair the mixer with your own hands.
It is necessary to gently unscrew the nuts on the main body of the product. In many models, the nuts are hidden under an additional case for a more beautiful appearance. The case can be shifted by slightly efforts, getting access to fasteners. It is because of the additional hull that the ball mixer at first glance looks unintended. However, in its handle there is a hole under the hex key. With it, the crane disassembly begins. If you do not have a special key, tap the hammer gently through the screwdriver. The top seal is located straight under the nut. Inspect the gasket and ball. Special attention should be paid to its upper part, because It is there that the holes of the valves are located. The surface of the ball must be shiny and monochrome.
Article on the topic: How to install butterfly loops for interroom doors
The body body has 3 holes with rubber seals. The opening data is supported by the springs to be removed using a screwdriver. The output of the data springs may also cause leakage. In this case, the springs need to be replaced.
Replacing ball mixer gasket
If you disassemble the product in order to replace the gasket, be sure to buy a new one. Gaskets are sold in all building stores. The crane gasket is a rubber ring, the main function of which is the compaction seal. The ring diameter should slightly exceed the diameter of the socket in which you detected leakage.After replacing the gasket, it is necessary to very carefully tighten the nuts, because the reasons for wear of the gasket includes not only long-term use, but also an excessive hauling of the connection. For rubbing parts, you need to use a small amount of silicone non-toxic lubricant. With her, the mixer will last 1.5-2 times longer than without it.
In the models embedded in the sink, the cause of the leakage can be the wear of the ceramic cartridge built into the crane. The procedure for its replacement is not more difficult than replacing the gasket. You just need to get the cartridge from the housing and install a new one instead.
Repair of a two-fledged mixer with your own hands
Twentyl mixers are no less common. The weak place of such products is a rubber gasket. In particular, this moment concerns the hot water crane: due to the constant heating, the gasket is destroyed much faster.
Buy a new gasket. Discharge water supply, then unscrew the valve flywheel to be repaired, and leave it in the open position to protect the parts of the crane from overpressure. Remove the decorative caps (red and blue) from the valves, remove the screw, holding the flywheel, with a screwdriver. After that, using the filtering key, you need to turn the fastener nut. After the head is removed, you can see a malfunction - a deformed head on the valve. Remove the contents and install a new gasket. There are such models of cranes in which gaskets are fixed using special nuts. If such is and on your crane, it needs to be removed, and after installing the new gasket, return to your place.
Article on the topic: The design of the plot of 8 acres. Photo
Leakage of the gland - a common problem
Another sufficiently common fault of the valve kitchen mixers is the leakage of the gland, which occurs because of the wear of the glands. To understand which repair work is to be performed, the mixer is necessary to disassemble the mixer described above. Sometimes it is enough to simply compact the surp packing, and in some cases it has to be completely changed.
After breaking the product, try tightening the gland sleeve stronger. If after that the flow stopped, you can collect the crane. In case, if flowing continues, you will have to replace the package. As a packing, an ordinary twine, impregnated with machine oil, trimming rubber tube, burlap threads. However, this is only if the old mixer of Soviet production is installed in your kitchen. If the tap is new, then just buy suitable spare parts in the plumbing store.
Downloading you need to lay clockwise. Each next layer compacted with a screwdriver. Here it is necessary to find a golden middle, avoiding gaps and overpower. The bushing must be twisted at 2-3 threads. After completing the repair of the kitchen mixer with their own hands, check its performance. Before you include the main water supply valve, both cranes need to be returned to the closed position.