
Table of contents: [Hide]
- How to make a chess table yourself?
- Laying cells in a checker order and creating a board for a table with your own hands
- Compounding chessboard with worktop, table decoration
Such a piece of carbon art, like a chess table, can be made independently. At the same time, it will not necessarily use it in direct intended, as this original chess table, with their own hands, will be perfectly decorating any of the rooms of your home. In the process of creating this decorative object of furniture, it will be possible to learn how to properly assemble the surface separated by uniform squares of different colors by using multi-colored veneer plates.
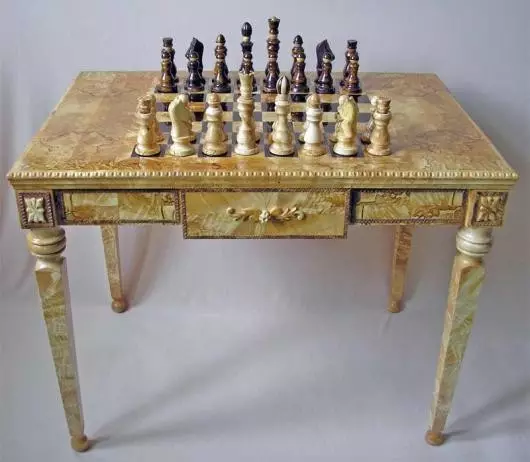
The original chess table will be an excellent interior decoration.
As a material, with which it will be possible to successfully build a table with your own hands, you should use:
Such a homemade sliding chess table, followed by simultaneously playing chess and drink tea, can be made independently according to the scheme.
- The plates of the near, the thickness of which will be about 3 mm. As for the sizes, they should be enough to obtain 32 squares with an area of 4 × 4 kV. cm;
- Plates of ebony, thick again, no more than 3 mm, in an amount sufficient to produce 32 squares, the area of each of which is 4 × 4 kV. cm;
- Plates of Erabl, the thickness of which is about 3 mm. Its size should be sufficient to obtain 4 rectangles, the area of which is 11.5 × 56 square meters. cm;
- The residual material is not thrown out, since its quantities will be enough to make molds from thin strips;
- The melamine plastic sheet is about 1 square. m;
- 4-strips 8 mm wide and 70 cm long, which will be needed for inlair;
- plywood sheet 3 mm thick;
- Board or sheet DVP, whose thickness is 19 mm,
- A pair of squares whose area is 52.2 square meters. cm;
- 4 rectangles whose area is equal to 10x56 cm;
- 4 pine brus, size 6.2 x1, 5x52, 2 cm, which will make the production of dilation;
- 6 pine plates, the dimensions of which are 3x0.8x80 cm;
- 4 parts of ebony, 4x4x7 cm sizes;
- the boards of this, from which you can make 2 boxes;
- 4 mm plywood sheets in the amount of 2 pieces, an area of 18.6 x26, 3 cm each. With their help, the bottoms of the boxes will be created;
- varnish.
How to make a chess table yourself?
In the process of designing such a furniture item, it is necessary to be guided by strict drawing data, so that you can avoid unnecessary errors in calculations and installation. The first step is to choose which outdoor surface you wish to get for your chess. Prepare 2 types of plates from which the surface of the chessboard is divided into squares. One of the plates must be made of dark wood of the near tree, and the other of a light tree.
The thickness of the plates is approximately equal to 3 mm, while it is important to draw attention to the fact that they do not have any defects on their surface.
The table shows the dimensions of the billets and the material for the manufacture of the table.
In order to obtain wide chess strips equal to 4 cm, it will be necessary to cut the corresponding plates with an iron saw taken from the plane and a ruler. As reliable guides, it will be possible to use a width of 4 cm wide. To accurately perform this operation, it is recommended to fix the plate and a ruler on the workbench with two carpentry clamps. After receiving the strips of both colors width 4 cm. It will remain cut from them squares with an area of 4x4 cm. For this you can use a sharp blade, without teeth, and the shape made of wood-chipboard, the cut-cut area in which will slightly exceed 4 square meters. cm.
This form is put on top of the bands, and it takes a cut of plates on squares with a blade and hammer. As a result, you quickly and relatively easily get the right squares for a chessboard with clean cuts and without any burrs and irregularities.
Back to the category
Laying cells in a checker order and creating a board for a table with your own hands
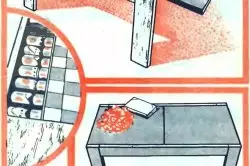
Places on the board, which should be blond, are stuck with painting scotch, and then paint is applied. After drying, the scotch can be removed.
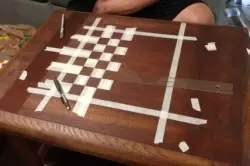
After receiving exactly 64 squares, 32 light and dark colors, you must arrange them, as required by the rules of the game, in a checkerboard order. To do this, it should take a melamine plastic panel as a support plate, on the surface of which the strips of adhesive paper are fixed, so that they can, in turn, can be alternately to fix the squares, photo 2. It is worth paying special attention to the fact that it is necessary to glue the squares So that there are no gaps between their parties and corners. Then go to the decoration of the edges of the chessboard created. It will be possible to do this with a strip of 8 mm wide, which are placed around the edges of the borders of the chessboard. They need to be fixed in the same way as they did with the cells of the chessboard.
Do not forget that cut the connecting points of the corners on the strips at an angle of 45 degrees. Before installing these boundaries, first try on the board to be confident in symmetry and uniformity of the design. After gluing these elements, you will receive the design shown in the photo, which will later be built into the table.
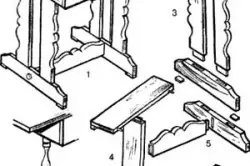
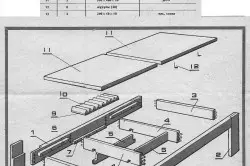
1 - general view of the table with house legs; 2 - accurate legs; 3 - fitting board female legs; 4 - fastening of the longitudinal king; 5 - fastening the lower longitudinal king; 6 - Retractable Box
The main part of the table will be the support panel with a thickness of 10 cm, 4 end surfaces, for which the feet of the table, 2 legs and one connecting part will be relying. They will be convenient to perform from the fiberboard, the thickness of which is 19 mm. In order to cut the items for the table with their own hands as smooth and beautiful as possible, it is better to pre-create templates for which the legs and other parts of the table will be cut. Since the legs and transverse parts of the table are symmetrical, the templates can be taken half to which there is a markup on the clean material, and then they are cut on the workbench using an electrical belt saw. Then go to the creation of a platform, the thickness of which is 10 cm. Make it possible, taking 2 chipboard panels with a thickness of 19 mm and an area of 52.5x52, 5 cm, which will become composite parts of the support. To increase its thickness up to 10 cm, it will be necessary to use another 4 pine bar with dimensions of 6.2 x1.5 cm and 52.2 cm long, which are installed between 2 panels, connecting them with nails. The edges of the resulting drawer are closed with cut plates cut out of the fiberboard.
Back to the category
Compounding chessboard with worktop, table decoration
After all the elements with which the countertop is compiled, fully assembled, the entire surface must be treated with mastic. To secure a chessboard on the table top you need to use the contact glue that provides the most uniform gluing elements over the entire surface. They should be lubricated both the surface of the table top and the surface of the board. After this procedure, you will get a chess countertop.
The legs for the table with their own hands are also made according to the previously created sketch. They must be perfectly symmetrical. When they are carved, in the upper edges that they will be attached to the table top, the holes under the dowels are dried, through which the panel with a chessboard will be connected to the legs. Previously need to build a connecting element that will fasten the feet of the table at the proper level with maximum strength. They will serve a wooden bar. The connection of the table legs with a tabletop must be carried out so that the countertop lay horizontally on a flat surface, and the remaining parts would be strengthened. In order for the design to be strong, dowels and holes in the table top, in which they will be inserted, treat with carpentry glue and press the connecting parts tightly. On this table can be read ready for decorative finishes.
The final processing of the chess table with their own hands is its lacquer coating, which allows you to get furnished furniture. Moreover, with a varnish, you can add contrast between dark and light chessboard cells. The whole table will need to be covered at least two layers of varnish. Some carpeurs offer before applying a varnish to cover the support panel under the tabletop and directly its legs of paint, whose color should be chosen at the discretion of the hosts of the house. When the whole table is ready, it must be left for a while, about two days so that he can completely dry.
Article on the topic: How to fix the mixer in the shower, without causing plumbing?