
Table of contents: [Hide]
- Bunk bed do it yourself: manufacturing technology
- Necessary materials
- Order of work
- Nuances who need to take into account
- How to make a durable frame?
- Bed installation technology
- Bunk bed for children from laminated chipboard
- Fixing and finishing bed
To date, people often make furniture with their own hands. If in the family two children, in order to save space in the children's room, you can make or purchase a children's bunk bed.
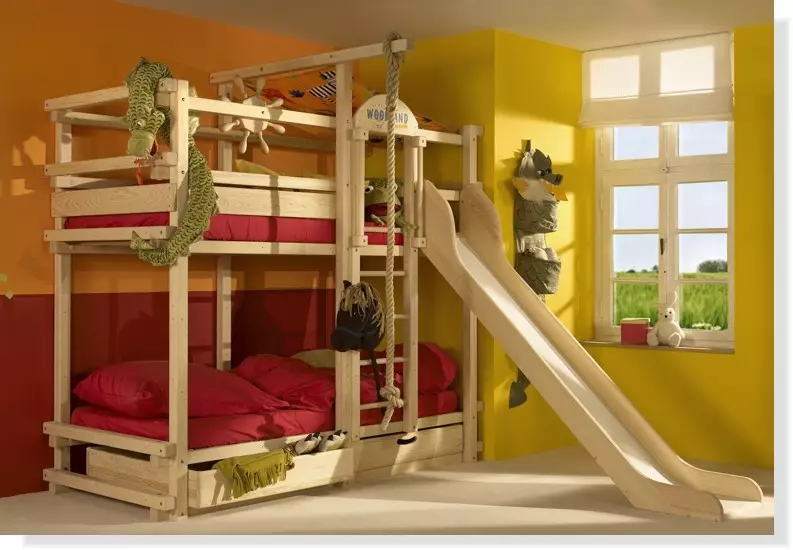
A two-tier children's bed can be issued as a pirate ship. To do this, you can add such elements such as durable rope, slide and steering wheel.
Bunk bed do it yourself: manufacturing technology
If you plan to purchase a high-quality two-story bed for children, you should know what it costs quite expensive. Budget structures are not always high quality. The two-story design should be able to withstand both children and parents. Stability of the product has important importance.In some cases, three-core beds are made, but the builders do not recommend this.
Back to the category
Necessary materials
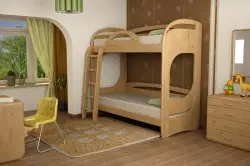
A bunk bed, decorated in one style with other furniture elements, perfectly complements the interior.
To independently make a crib for children who will have two floors, the following tools are needed:
- Pliers.
- A hammer.
- Screwdriver.
- Electric drill or screwdriver.
- Building level.
- Roulette.
- Corolnic
- Hacksaw.
- Clamps.
- Electric jigsaw.
To make the bed perfectly fit into the interior of the room for children, you will need to think in advance over where it is best to place. It will take to take into account the size of the beds so that it is possible to understand how much material it will be necessary to purchase. The following materials will be needed for work:
- Wooden bars with a length of 2.5 m - 4 pcs.
- Brux of wood 3 m long - 4 pcs.
- Three-meter boards - 4 pcs.
- 2 plywood sheets, chipboard or racks with a thickness of 12 mm.
- Screws with a length of 75 mm.
- Screws with a diameter of 6 mm, which have a hex head - 8 pcs.
- Bolts with a diameter of 6 mm and a length of 75 mm - 10 pcs.
- Nuts and washers.
- Putty, which is designed to work with the tree.
- Saws.
- Bolts with a length of 150 mm - 2 pcs.
- Polyurethane.
- Grinding paper.
Tree can be replaced by laminated chipboard. If it is still planned to use boards, then before performing all the work they will need to withstand in the room for about 1 week so that the temperature and humidity are approximately as in the room where the design will be manufactured. It will take to do so that the material does not breed.
Bed assembly with your own hands must be taken carefully, because the design will be an important component of the children's room.
Back to the category
Order of work

Good harmonizes with the interior bunk bed, decorated in a classic style.
The process of manufacture is as follows:
- First of all, it will be needed to determine the location of the wooden boxes on the bearing design of the bed, which are intended for mattresses.
- It is necessary to make a hole on both sides of the longitudinal bars for each of the screws.
- Next is pressed the lower longitudinal bar to the first wall, after which it is fastened with the screw. The same needs to be done with the second wall.
- In the same way, the upper longitudinal bars are installed, which are intended for mattresses. At this stage, the supporting design of a children's bed will be made.
- It is necessary to fasten the transverse bars under the children's bed. It should be done like the bottom, so with the top tier. They must be rigidly fix with screws to the bars at a distance of 30 cm apart.
- Next, the case of a frame of a box of boards in the side part is performed. For the trim, it is recommended to use screws with invisible heads.
- Further onboard shields are attached, capable of excluding a random drop in children who will sleep.
- The staircase on the top tier is rigidly fixed with screws.
Back to the category
Nuances who need to take into account
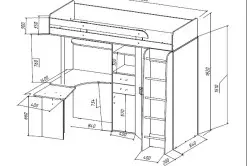
Bunk Bed Scheme with Built-in Table and Shelves.
Be sure to be sure which sizes should take place for sleep and which side is best to install a vertical staircase. The size of a children's bed should be more space for sleep in a length of approximately 8 cm, and in width - by 10 cm. The staircase will increase the size of the bed approximately 4.5 cm.
In order to determine the appropriate bed height, it is necessary to take into account the height of the ceiling indoor. The distance between the lower and the upper floors should be taken into account. It will take to leave such a number of space to be the ability to gather mom to a child if necessary.
For the stairs and racks, a bars and a plan for solid wood are needed. Panels on the ends are the same for the whole design, this moment will simplify their workpiece. The side panels have the same width with the end. If it is differently connected to each other, then you can make the original design.
If you proceed from the sizes of mattresses that need to lay on the bed, it is necessary to increase the size of the design by 2 cm with each of the sides. It is necessary to have the opportunity to easily refill underwear for bed. The most important landmark in this work is the convenience of a crib that is manufactured.
The lower position of the first tier can be determined if you take the height of the calculations as the basis of the calculation, which is easily overcome by the child. In most cases, the height is 35 cm for a child by age up to 3 years. The frame for placing the mattress should be lower on its thickness. For the second tier, the upper position must be installed, taking into account the adult child who sleeps at the top, could sit at any time on the first floor without touching the head of the top floor.
Back to the category
How to make a durable frame?
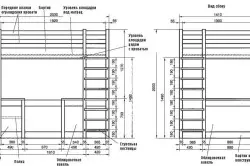
Bunk bed drawing
Children's bunk bed must be reliable, the aesthetic side is secondary. Bruks need to firmly connect with screws. The result is 2 frames that have almost the same dimensions. In aesthetically, they are capable of complementing each other.
To one of the sides and the end, it will be necessary to secure the boards with screws, the importance of this fastener should be taken into account. Self-tapping screws are advised to firm from the inside, you will need to take care that they do not pass the board through. For samphs of small length, large holes can be drilled. To do this, it is recommended to apply the depth limiter on the electric drill.
The side is installed on another frame. Holes for fasteners are recommended to hide with a putty. After it dries, it is necessary to handle the putty with grinding paper. The length of the legs must correspond to the height of the fence. Take care that the leg can withstand the load that will have to have it.
In the leg, you will need to do a hole in the place of attachment of the upper tier. The same hole is made in the frame with a side. In the leg, it will be necessary to make a deepening that will help to easily hide the hex head of the screw and washer. The hole must be made of such a depth so that the screw, passing through the side and the leg, could be securely fastened in the bar.
Children's bunk bed has one advantage: Under the first tier, you can place a box of small sizes in which you can store a bed or a small amount of necessary things. For example, a child will be able to place his toys in such a box. The front panel of the box should be done not as long as the bed. The height must match the first floor panel, which can supplement the room design for children.
Back to the category
Bed installation technology
The lower tier of the bed can be equipped for the child's game, equipping the design with additional elements.
The base of the bunk cots should be made of wood. High-quality preparation of this material requires some efforts: it will be necessary to perform alignment using a planer, grinding using emery paper, in the end you will need to cover with varnish so that it is possible to extend the period of its service.
If the walls are made of drywall, then determine the location of the racks is simple enough. It is very important to do holes in the necessary places. For this purpose, it is recommended to find an assistant that can keep the frame at the bottom, tightly pressing it to the wall.
Guide holes will be needed to do, drill the profile of racks, drywall sheet and frame ramp. It is necessary to prepare space for screwing the screws that have hexagon heads. For such an operation, the long-length drill should be used. Screws need to screw in such a way that they connect all the elements and fixed in the racks. In the same way, the first tier must be installed, that is, a frame with a board.
Special attention should be paid to the installation of the fence, because it will be able to create some security guarantees for children. The fence can be made of strong boards, which are secured on racks placed in a vertical position. In this case, the self-tapping screws are screwed from the inside. It should be borne in mind that the staircase should remain in the fence, which leads to the top tier.
The vertical staircase is made simply enough, it will take less space if compared with a staircase that is located under the tilt. First of all, two bars are fixed, which will be able to direct the movement of children in the process of lifting or descent. Steps must be securely fixed by bolts that have a length of 6 mm. Long bolts are used to secure the upper step and simultaneously fix the staircase to the bed.
Back to the category
Bunk bed for children from laminated chipboard
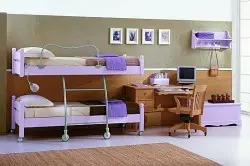
Upper tier can be fixed on the wall. Lower bed can be equipped with wheels.
If the laminated chipboard will be used for the production of a bunk bed for children, it is not necessary to perform alignment, grinding and coating of material. Instead, you only need to handle and glue the edge along the edges of the chipboard. Thanks to the use of a similar chipboard, you can make a beautiful bed with your own hands in a short period of time. It should be known that the laminated chipboard has good strength and wear resistance.
Cutting laminated chipboard is needed on the street. This material has its own specifics, in connection with which it will be needed to make some changes in the production technology of the structure. A bunk bed for children from laminated chipboard will have a much greater weight compared to a wooden structure, so that the bed will be more stable.
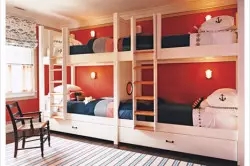
Bunk beds can be arranged to a friend to a friend. At the same time there is a large space in the room.
In the case of the use of chipboard, you should purchase the following tools:
- Portable manual circular stove.
- Iron, which will be needed to stick the safety edge.
- Screwdriver.
- Bits and drills for a screwdriver.
- Knife.
- Protective gloves or mittens.
- Line.
- Simple pencil.
- Roulette.
To have the opportunity to make a two-story bed with your own hands of good quality, from the materials it is necessary to use not only chipboard, but also the edge, glue, grinding paper. It will be necessary to purchase a tree that is used for the staircase leading to the second floor.
Bed Production Stages:
- Creating a project.
- Glit edge to chipboard.
- Cutting material.
- The connection of all elements with each other with self-tapping screws.
Back to the category
Fixing and finishing bed

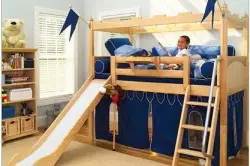
A bunk bed can be purchased for one child. If you remove the bottom bed and install a tent instead, you can get a great place to play.
It is quite important to securely secure all the elements of a two-storey baby cot. First of all, the racks and side panels should be made. Next, the end and side panels are fixed. Thus, you can get a reliable supporting structure. The frame used to accommodate the mattress will rely on the bars that are attached in the middle to the side panels.
The second floor will result in several boxes: with narrow and end panels having a large width. At the first tier, the end panels that have a small width will be located outside the box. This is due to the fact that they have a special purpose. They are fixed with spikes and bolts at the bottom of the bed with racks, thereby panels overlap the joints of all tiers and are strut. This makes it possible to completely exclude the movement of the racks of the first tier. From movement towards the longitudinal axis in the docking area will be protected inserted spikes.
All panels will be additionally fixed together. Fixation is due to the inserted spike with glue. You can attach them to the racks using bolts that are intended for furniture. Such fasteners have decorative heads. In the same way, it is necessary to consider the fixing of the stairs, which leads to the second tier. From fasteners will depend on the sustainability of the entire design as a whole.
The decoration of the bunk bed for children has not only aesthetic, but also practical importance. It will be needed to perform high-quality polishing of all items before they are collected in a full-fledged two-storey construction. This allows furniture to fit into the existing design and increase your own period of service. The same applies to the painting enamel in several layers. It is beautiful and useful for wood.
Children's bunk bed is made very simple. To do this, you only need to have certain knowledge.
Article on the topic: Mounting washbasin with a table