
Many people faced the lack of furniture in the apartment. However, not everyone has the opportunity to visit the furniture store and acquire or make an order for the manufacture of a new cabinet. For financially independent people, this is a big cash savings. Making a closet with your own hands is available to almost every person. After reading the instructions for the manufacture of the cabinet with your own hands, it appears the ability to independently make a wardrobe.

Collect the cabinet with your own hands you can save a rather large amount of money.
Almost all furniture production can be divided into a number of stages.
- Elementary.
- Production.
- Installation when furniture is embedded in the wall.
What works are performed at the initial stage?
First of all, you need to prepare a tool. It:
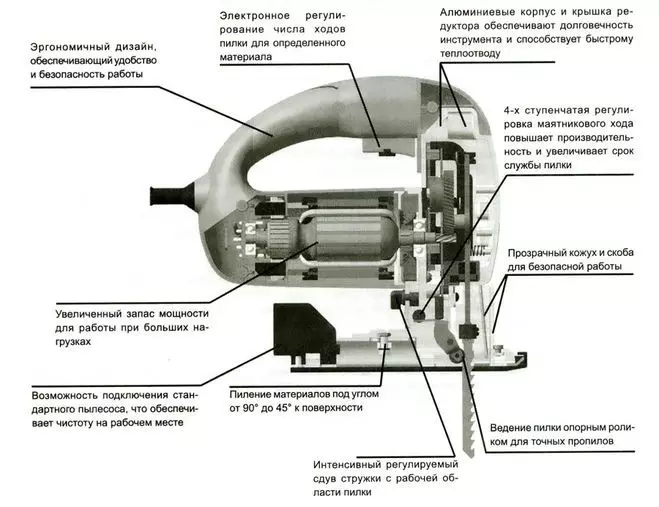
The structure of a typical elktrolobzik.
- Lobzik;
- roulette (ruler);
- pencil (marker);
- Screwdriver (you can and screwdriver, but then it will not be possible to drill - you will have to look for a drill);
- ratchet key;
- glue.
Also consider that at the very beginning of work it is necessary to make a sketch or drawing of the planned product. Due to the fact that the wardrobe must serve for many years, then its design needs to be treated with special care. First you need to determine where it will be located.
The next step is the calculation of the dimensions. We are talking about width, height and length of the cabinet. In addition, you need to determine the gap between the shelves, their number. During the definition of dimensions, the drawing is best to perform on Watman A4 format, it will help more clearly see the future model.
Be sure to think about color. Today it is known a huge number of most different colors and shades. The "oak" and "alder" won great popularity. If the desired colors is not in the store, you can make an order of the desired chipboard.
After determining the design and color gamma, you can start making the cabinet with your own hands.
Some features
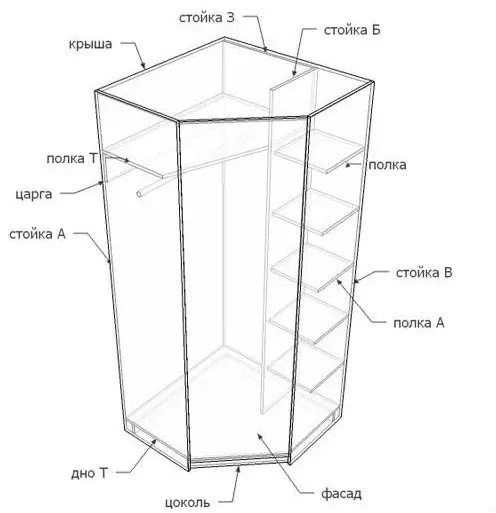
Scheme of a typical corner cabinet.
When designing furniture, you need to make a cabinet breakdown into several parts. So it will be better visible, from what details it will be collected. For an experienced designer, such a work will not be a lot of work, but if it still causes great difficulties, this drawing can be done using a special computer program.
Article on the topic: Convenient wardrobe on the loggia: Ergonomics and compactness
On ready-made drawings, you can start sawing parts. This work can, of course, do it yourself, but much better turn to professionals. This is due to the fact that such sawing is a difficult case, get accurate dimensions and good quality is quite difficult. The sawing machine is expensive, and for the manufacture of the cabinet, it is simply meaningless to acquire it. Of course, you can use the jigsaw at home, but the chips are formed after it. Split chipboard and get the appropriate items where the chipboard is sold.
For details of the cabinet, accessories will be required. Before you buy it, you need to determine how the doors will open. There are a lot of opening mechanisms today. For example, opening in different directions, movement on the principle of the coupe, opening up and so on.
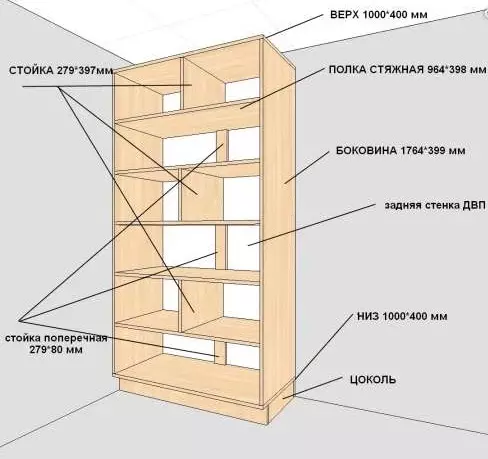
Scheme of an ordinary cabinet.
Whatever it was, but if uneven floors are in the room, then gaps will definitely appear between the cabinet doors. They can be removed when adjusting the installation canopies intended for ordinary doors, or the selection of the height of the wheels, which are used for the wardrobe.
Depending on the number of parts, you can accurately define the desired number of confirmates. They help assemble the walls and various cabinet partitions. By the number of confirmates, the number of rivets required by the guides, how many muster holders are. In addition, the dimensions of the edge of the chipboard are determined.
The confirmates are made by a certain drill diameter. The location of the holes should be strictly symmetric. The appearance of the collected cabinet depends on this.
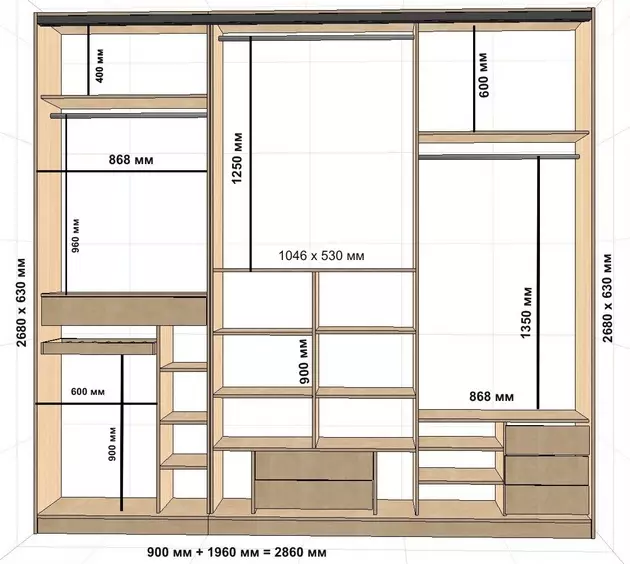
Scheme of a wardrobe.
A screwdriver, directly to the confirmates, the frame of the cabinet is attached. The standard door system is strengthened by canopies, guides are screwed for a wardrobe mechanism. The layout of the holes in the location of the shelves is made, places for guides are scheduled for fixing the police. Such an operation must be performed very precisely, otherwise the shelves will be mounted crooked.
Guides must have strict parallelism. Warming up, you need to drill holes and secure the guides.
Production of details
All work begins with the section of chipboard sheets. You need to cut the sheets to the desired items. When dimensions are affixed during the design, it is necessarily taken into account the width of the saw itself (usually 3 mm). If you ignore this additive, the details will have a smaller size.Article on the topic: How to attach automobile blinds on cars
Cut the sheet as mentioned above can be in a special workshop. Chipboard will be sliced very precisely, the edges will be without jams. Get such a quality at home using a hand tool is quite difficult. But this is your choice and experience.
Edge details
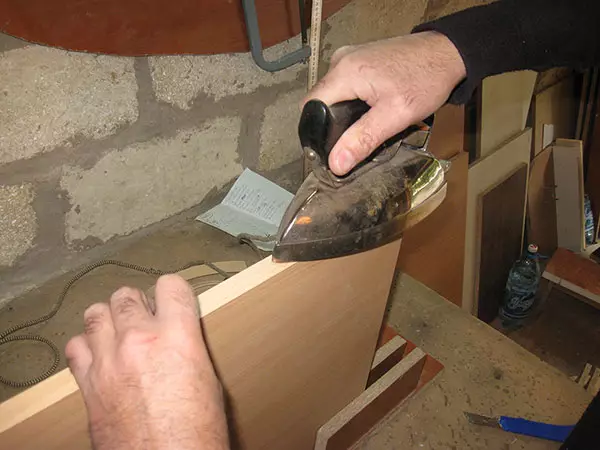
The edge of the parts can be made using a conventional iron.
After cutting sheet, the edge is made. Under this term means an ordinary PVC tape (2 mm). Very subtle tape, in which the thickness is less than 1 mm, is used mainly to finish invisible ribs, everything visible closes the first.
The edges in domestic conditions are very convenient to glue a heavy iron, heating it to the desired temperature. It is selected depending on the material used. On this preparatory work end, it remains only to collect the cabinet with their own hands.
Cabinet assembly with your own hands
Pre-mark the holes where the mounting screws will be inserted. Such work must be performed very precisely. The fact is that the fixing of the confirmates is quite often performed to the ends. In this regard, the hole must be strictly in the middle.
Pre-install the installation to the desired bottom of the product, then install the walls themselves. Thus, the correctness of the dimensions is determined.
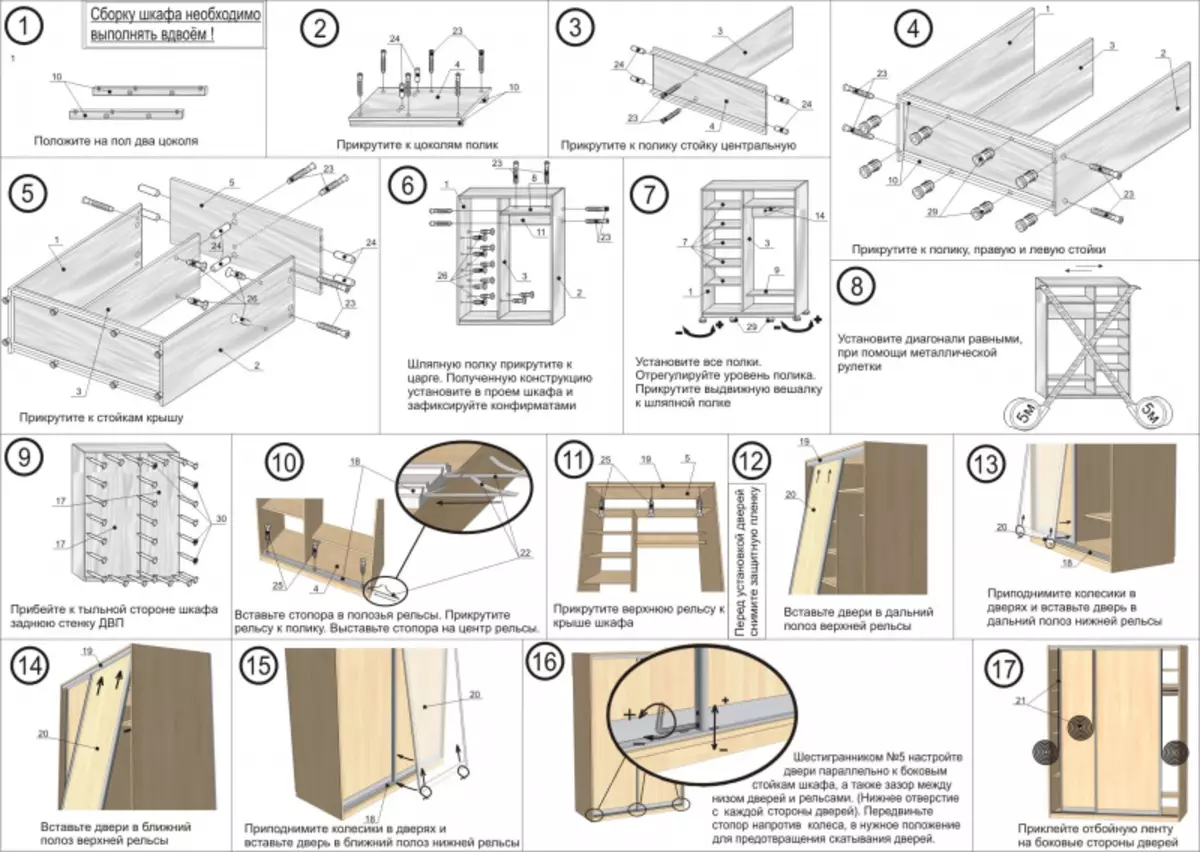
Build a wardrobe with your own hands.
For mounting the base in the central partition, holes are made. Then the mount is performed. The side walls are connected to the bottom with the same confirmates. The edges are closed by a special waterproof profile to protect the parts from the water that relate to the floor.
At the next stage, the upper shelves are mounted. Thus, the frame receives additional spatial rigidity. It becomes even stronger after mounting the rear wall.
Install the roof of the cabinet. If the height of the product is quite high, you need to leave a gap (usually 7 cm) between the ceiling and roof. This is necessary for mounting fasteners confirm.
To secure the lid, it is impossible to use the screwdriver. Fasteners have to be output manually, and then the "ratchet with the head" is performed by the final tightening.
Article on the topic: Basic interior design styles
The mounting of the side shelves is done using 4 confirmates (2 pieces per face). However, the side shelf, located flush with the bottom, cannot be consolidated using confirmants. To do this, you will need the seasons - small wooden cylinders. They are inserted into the deepening walls, then run into the holes in the shelf.
If a wardrobe is assembled, then you need to take much responsibility to the door opening mechanism.
Its correct installation is the future appearance and beauty of the product as a whole. This part of the work must be made with great accuracy and accuracy, otherwise the cabinet will lose its attractiveness.
Additional recommendations
Assembly works begin with mounting the rear door. At first, using the level, the installation of the cabinet is checked. Then the supports of both profiles are attached.
Before installing the mirror, you need to install pieces of seal around the perimeter. They must be evenly distributed over the entire length of the profile.
When inserts from the chipboard are installed, there is no need to install the sealer.
Inserts must be for the profile, the size of the protrusion should be the same. When the door is mounted, the inserts are placed on the foam, be sure to avoid scratches.
The mirror is mounted in fixed horizontal profiles. When the installation of 2 mirrors is performed, the seal must be on both sides of the dividing profile.
The assembly of the universal door is carried out using the separating profiles. Before fixing the main vertical profile, you need to install the seal in the connecting places.
The main profile must be attached to the door on both sides. Moreover, one element is mounted strictly horizontally. Another can be mounted if the cabinet has vertical doors. It is necessary to ensure that the profile is set to the front surface outside.
A profile knob is mounted on the cabinet door. At the same time, the bending of the handle should look at the outer side. It is necessary to check how closely the shakes of the profile are adjacent to each other. If necessary, it is necessary to align the connection along the entire length.
Everything is simple enough. Good luck in work!