
If the old chair has lost its own type and functional qualities, you can try to restore it instead of recycling. It is necessary to remake the chair with their own hands until the degree of its worn will reach its limit.
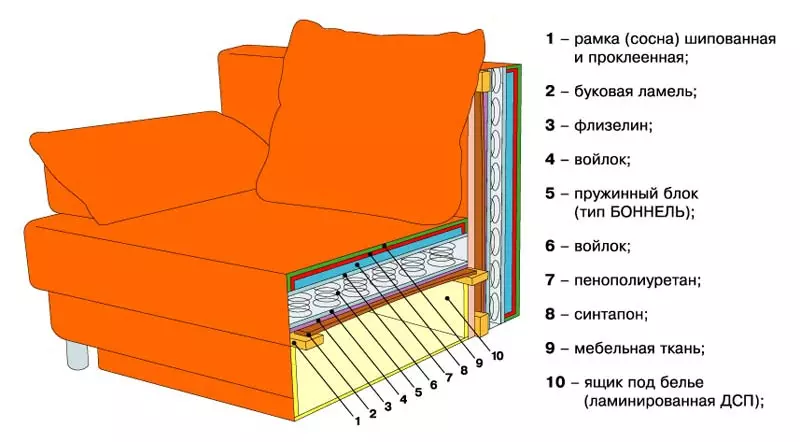
Scheme of chairs
Restore the furniture is a fascinating occupation, not too complicated, but a taking weight of time.
Types of alteration of the chair
Since the degrees of damage to the furniture are different, the types of its restoration and alterations are also distinguished by the degree of their complexity. If the chair, except for the loss of the appearance, has become stagged with time, it means that they will need to change the thickening connections ever disengaged. It is necessary to inspect the chair: if the contacts of the grooves and spikes are weakened, they are easily removed from the sockets, therefore, the sizes of the spike will be needed to be replaced with power jumpers. In this case, the chair will need a bulkhead completely.
If the frame keeps well, and the problem is only in appearance, it may be necessary to replace the coating. Wooden details of the armchairs are always covered with varnish so that the tree is better preserved. To replace the lacquer layer, you first need to carefully remove the old one, and you can additionally apply to the part or cover them with patterns.

Tools required for work: screwdriver, wrench, English pins, pliers, screwdriver.
Carved and stucco elements are often well complemented by chairs after restoration and alterations. Work on the replacement of coating takes time, patience and accuracy. In order not to spoil the upholstery fabric, the chair is sometimes completely disassembled.
The easiest view of the restoration is the prettier upholstery on the chair. Upholstered furniture is transformed to unrecognizable when the loss old tissue is replaced by a new one, and the upholstery no longer sends and keeps the shape well. You can drag the chair with your own hands in the presence of tools in the day, an experienced person copes even faster.
Preparation of the chair: Tools and materials
For the full bulkhead of the time chair and the tool, it will take a lot. All items need to be good to open, removing the layers of dirt and fat on them, sometimes it is pre-needed to wash in warm soapy water and dry. Old varnish and paint with washing partially will disappear. Taking the iron brush, you can speed up this process and even remove the coating completely, but the further grinding of the parts will still be needed. In order to redo the chair, the following items are needed:- Porolon, Sinytec, Latex for a new filler;
- Tight upholstery of good quality;
- scissors;
- Screwdriver Set;
- a hammer;
- Screwdriver and screws;
- furniture stapler and special brackets for it;
- sandpaper or bulgaria with grinding circle;
- clamps;
- Metal clamps;
- carpentry glue;
- Paint, simulator, solvent, nitrolac and suitable painting brushes.
If all operations are required for alteration of the chair, some of the tools responsible for them can be excluded.
How to disassemble a chair?
The tool for disassembling the chair on the details is practically no needed, as the back and armrests need to be praised even more and remove, putting some effort and trying not to break the wooden spikes. Even if they sit in the nests weakly, the debris is always harder than the whole part. Disconnect the articulation will help the hammer wrapped with a soft cloth, or a special rubber cynica. Durable joints disassemble with extreme caution, as it is that it is easier to break the fasteners.
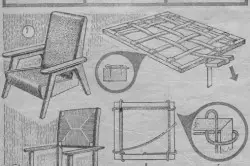
The repair scheme of an old chair.
Some connections in chairs are mounted with screws with torn or stuck. Related screws can be softened by drunk on them with technical oils, and the torn threads have to remove the pliers with the use of force. In order not to be confused, all extracted parts and fasteners immediately mark.
Clean connections helps disbab hot water. In it wacting a rag and put on a relevant place of gluing, repeating the process until the glue is spinning and the details are not disconnected. You can help disconnect with a thin knife, gradually pushed into the gap. If the remnants of the glue and the unreliable element are in a hard-to-reach place, you can enter cunning. A rubber hose is put on the kettle spout, the couple's jet is heading on the seam. It softens even the most dense joints, after 1-2 minutes, parts can be disconnected.
Inspection and restoration of wooden parts
All elements of the chair after parsing, removing upholstery, washing and squeaking need to be carefully examined. The existing cracks glue, tightly tightening the clamps. Smaller defects after gluing keeps well paper tape. If the details are round and large, metal clamps will come to the rescue. Unnecessary holes and chips are filled with a mixture of glue and sawdust. The restoration and alteration of the chair will not pass successfully if the glue does not dry and does not grab properly. Therefore, at least 2 days allocate drying.Then the final grinding of the details of the chair using sandpaper of various fractions is occurring. The surface must be perfect smooth.
Skinning and assembly of parts
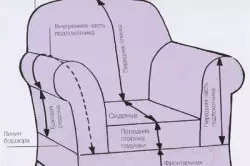
Scheme cover for chair.
The places of gluing and connections are carefully examined again. Specked parts to give them the desired volume are wrapped with a bandage, tightwood with blasting with glue on each turn. If the legs do not sit more in their nests, it is required to describe them. To do this, the slot is drilled in the face, a wooden wedge is driven into it, thin, but wide. Thus, the shaft diameter will be increased and the legs of the chair will become firmly sitting in their nests. This is suitable for those models of chairs, where the legs are inserted directly into the seat board.
But if the chair is altered the chair of another model, in which there are kings under the seat and crossbars between the legs, the process occurs differently. The most difficult version is a rocking chair. These parts are connected by spikes between themselves and are additionally reinforced with glue. In weakened seams of this kind, glue is injected with a syringe through a thin hole drilled from the inside. And if the sinks of the spike himself, the thin wedges are added when assembly, thin wedges are added in the form of specially distinct chips or matches. They are fooled into glue and together with a spike are clogged into the nest. The outside seat can be further consolidated using special metal corners to give a frame of special strength and durability.
Fully disassembled and sicking such complex compounds, trapezoidal bars are screwed on the inner corners of the frame with screws. In this design, even small inconsistencies squeeze the chair even worse than before, so the frame and ends of the bars must match perfectly. The glue during assembly is better settled under pressure, therefore the frame is tightened with clamps and clamps with mandatory observance of the strict correlation of angles. Speaking from compounds glue is cleaned with a cloth, wiping the details dry. Frame costs 2 days, after which you can start the final finish of the chair.
Exterior Framework: Upholstery Replacement
The framework of the product is ground or covered with a verse, you can manually paint, burn out or apply decoupage. Must be sure to put several layers of varnish on top of the selected method, giving each time to dry. The more thin layers of the varnish laid on the tree, the better it looks like if there are no bubbles and other irregularities. To achieve good laying of the layers, the lacquer is put fine and dry well, sometimes using for this hair dryer.
Then proceed to securing on the chair of the new upholstery. The foam rubber is cut along the contour of the seat, backs and armrests with a sharp knife. The upholstery fabric is also cutting into the form of seating, backs and armrests, but at the same time they add to the seams (bending) and the thickness of the filler. The outlet fabric is placed on the table or half the face down, the filler is placed on it. Move the fabric inside, fix with multiple stitches and transfer to the frame frame, starting with the seat. The edges are attached by a stapler, pulling and equalizing the surface of the fabric.
If there is no furniture stapler at hand, you can use the hammer and special upholstered nails with a wide decorative hat.
The same operations are repeated with the back and armrests, trying to fasten the fabric as close as possible to each other. Some models with an exhaust filler require first to fix the upholstery on the details, and then engage in assembly. But at home this option is better not to choose, since the strength of the compounds will inevitably suffer.
Article on the topic: Little bedroom design, how to furnish a small bedroom