
The chair is a good place for work, and for rest. Before making a chair with your own hands, you need to get acquainted with his models, since the chairs there are a large number. For some models, the chairs need a dormantian vine or rattan, as being presented in other materials, they lose their charm. Maybe this piece of furniture to be made from metal - wrought-iron rocking chairs look in the interior, like jewelry.
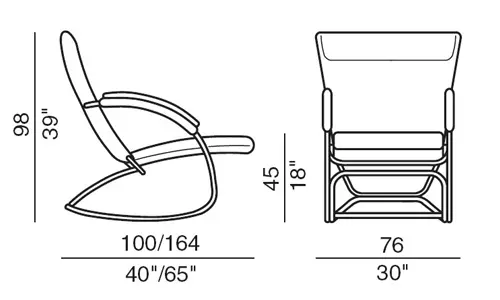
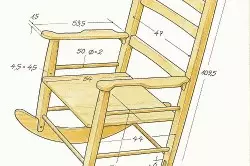
Drawing of the chair.
Wooden chair - Wooden chair
Furniture from the wood array is a symbol of solidity and reliability, even if it is a lattice model. Making a chair from a bar does not take much time, but to live, without needing for restoration, it will be able to live for many years. For the manufacture you will need:
- medium thickness timber;
- plywood;
- carpentry glue;
- primer;
- Morilka;
- varnish;
- furniture wanking;
- self-tapping screw;
- sandpaper 3 species;
- Bulgarian;
- screwdriver;
- manual drill;
- plane;
- clamps;
- sponge or foam;
- brushes;
- pencil or marker;
- Corolnic;
- paint.
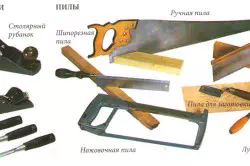
Tools for making a chair.
The thickness of a large value of a large value does not have, but when buying, you need to pay attention to a single section that simplifies the work and shows the quality of the billets.
Ideally, all the blanks should be one thickness and with a good linearity.
If one of the details are twisted, it will greatly affect the integrity of the product, it can shift or crack during operation.
How to make a chair - manufacturing process
The timber is poured on the required number of transverse slats and carrier of additional cross-seats. Well and quickly work allows the disk saw. The edges of the obtained bars are placed, and through holes are drilled at the same distance. The distance from these future mounts to the edge of the bar should be at least 25 mm, otherwise the chair, with their own hands done, will not be durable enough. To withstand exactly all parameters for a plurality of holes will help the drilling rack on which you can specify parameters such as perpendicular holes, their size and distance.
Before making a chair, another safety concern is required - process ends and surface planks to eliminate the appearance of the head of operation.
In this case, all existing ribs curve with a grinder or a planer. When the longitudinal planks are ready, the remains of the bar are divided using a disk saw into the squares, which will be separated from each other from each other.
Article on the topic: How to make an openwork lambrequin from the cord: stages of the technological process
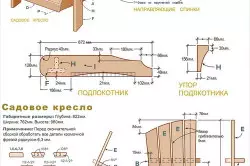
Scheme assembling garden chairs.
They also drill holes that coincide with the already available on the finished bars, they are required to polish and smooth the ribs. The number of long bars and squares each wizard will determine for itself, pushing out from the size of the chair and the thickness of the bar.
Fastening-shots are inserted into the holes, several drops of glue are added, after which each bar on both sides is connected to a pair of cubes. Billets are aligned at the edges, putting the rail, then leave for drying, tightening the clamps. After drying, the wood is processed by a verse. In the holes on the items you can turn the rope and hang painted parts for drying. In the same way, the coating varnish.
To make a chair with your own hands, the backrest and seat for the chair are peeling out of plywood. They are twisted with each other using the on the right and on the left. Additional strength can be given the sewage, if they drill holes for them and glue them before use. All parts are painted in the desired color and after drying are covered with varnish. It remains only to produce a final assembly of the body using bushings and fasten the seat. This unusual shape is bright and catchy chair complements the interior well.
Garden light chair do it yourself
Not everyone likes plastic chairs, which are currently used for registration in the country or in the garden of the recreation area. Garden light chairs made of wood look at the plot more appropriate, and their manufacture does not take much time. Before making a chair, it is necessary to consider that it should be easy and comfortable, it is best to prefer a foldable chair. This will allow for rain to quickly transfer furniture under the roof, because even a well-treated tree should not be exposed to moisture.
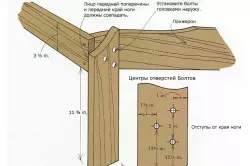
Scheme connecting the legs of the chair.
Article on the topic: Repair ourselves: Options for sealing holes and slots in the walls
Wood, in order to make a chair, you need to choose from solid rocks, such as beech, nut or oak. Pine, cedar, larch or aspen are also little susceptible to rotting, but the pine is unstable to mechanical effects, large dents remain on the surface. Boards should choose well dried or dry them under a canopy before the start of work. Materials and tools are required as follows:
- Circular Saw;
- mill;
- hacksaw;
- plane;
- screwdriver;
- drill;
- clamps;
- Schlifmashinka;
- roulette;
- Corolnic;
- pencil;
- sandpaper;
- screws or screws;
- carpentry glue;
- Olife or lacquer furniture;
- Morida.
Preparation and assembly of parts
For garden chairs, two rear and two front legs will be required, and the rear must be longer. You need to cut 2 supports for armrests, back and jumper. For the posterior pair of legs, armrests, backs and seats, the colors selected and the texture of the board are glued until the width is obtained. To glue the tree to high quality, the grooves are chosen under the knaps. Paired parts can be pitched simultaneously by pulling two boards with clamps.
Drawing armchair rocking.
Details Then with a milling mill or a planer are customized in size. When drinking the back of the glue seam, if it is present, it is necessary to have a middle of the part. The upper edge curves, and then you can start assembling a garden chair, customizing other elements as needed.
The rear legs are attached to the back of screws with a strength of strength with glue. In order to assemble the blanks, the holes under the fasteners can be drilled in advance. The strength of the assembled seat will depend on the correct location of the boards on it. They should lie in the direction of one leg to another. The front legs will also be screwed on screws or screws reinforced with glue.
The reliability and stability of the chair gives the pride - a jumper located between the front legs. Fasten it similarly to everything else using glue and screws. Then the armrests are mounted and passing behind the backrest of the support for them.
Hats of all screws used when fastened, you should drown a flush with the surface, and then close with special traffic jams. The wood of the finished chairs impregnate the hot olifa or the veil, dry, be covered with varnish in several layers. You can stop the choice on a special furniture varnish, but the strongest coverage of parquet or yacht varieties.
Article on the topic: Methods How to beautifully lengthen the curtains from below
Design for rocking chair
Such an armchair can be used both in the garden and at home. By expanding the seat, it is possible to make a non-chair, but a whole bench on which several people will fit. For manufacture will be needed:
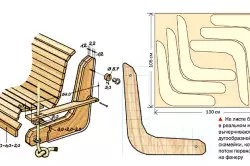
Seat assembly circuit seat.
- electric jigsaw;
- Schlifmashinka;
- drill on a tree of different diameter;
- screwdriver;
- Corolnic;
- roulette;
- pencil;
- plywood;
- self-tapping screw;
- confirmates;
- Rake.
If the rocking chair is done with their own hands from beginning to end, the materials are better to use high-quality, so as not to spoil the work.
Making rocking chair
The sidewalls of the armchair with rounded bottoms are peeling on the developed lecture on the first place. They must be completely identical, and on the lower part there should not be protruding corners. Then the beam for the seat and backs, the number and length of which must be calculated separately for each model are cut. The surface of each bar is echoed and polished, the angles are smoothed. If you plan to use the chair on the street, the ends of the boards need to pay special attention. They are lacquered at least 3 times, since it is there that the wood is particularly loose and needs to protect against atmospheric influences. To secure out the destruction of street and garden furniture, the ends are soaked several times with hot olifa, and the fibers are flattened with a hammer.
The sidewalls are tightened to the desired magnitude with several kings, drilling the sidewalls through. Then in the ends, the holes for the fastening of bars are drilled. Brous themselves are also drilled in advance to avoid cracks when working. It is more convenient to mount bars not between sidewalls, but on top, a few leaving the contour. In such a rocking chair, more space, and it looks careful. Each screw should then be covered with an antiseptic and put the plug on top. After that, the finishing treatment of the product with waterproof species of varnishes is made, with a drying of each layer at least 12 hours. The layers are placed at least 3, the thick layer is missing, trying not to leave the passes. Only after this, the rocking chair can be considered ready.