
If the chair has deteriorated, for example, its upholstery is damaged, then do not hurry to throw it into the trash container. You can independently update this item, and it will serve many more years. A chair will not fit for the restoration, whose wood has already become poured. Therefore, first it is necessary to check all its parts for strength and proceed to updating the chair with their own hands. First you need to get acquainted with the existing methods of restoration of such furniture. It is divided into the following types:
- restoration of shaking compounds;
- replacement of varnish and paint;
- Work on the drawing chair.
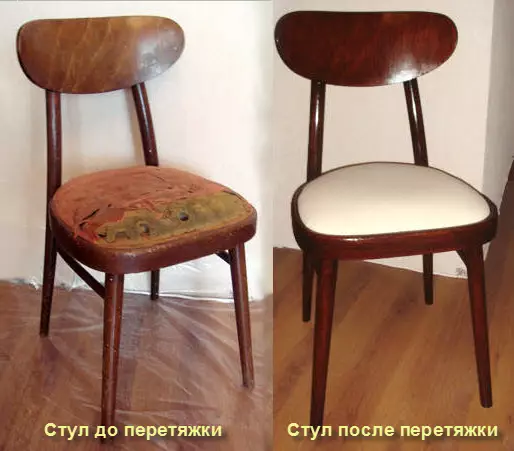
Old chair can be dragged with more wear-resistant materials, such as leather.
To eliminate damage to the first type, it is necessary to increase the size of the spikes, make the CARG seals and replace all power jumpers. The whole chair in this case should be completely overdid.
When the lacquer and paints are heated, the sweat coverage is first removed. The wooden surface of the chair must be treated with a skin, covered with primer and paint. Then, after a complete drying of the coating, the product is varnished.
Before these operations, you need to disassemble the chair and remove the upholstery.
The drawdler of the product implies a replacement of an old, upholstery for a new one.
It is best to update the chair to make it a comprehensive restoration. For this, you must first prepare updated furniture for processing and stock the necessary materials. It will also be a tool.
Preparatory stage of work to update stool

Kitchen assembly scheme.
In the construction market or in the store we buy acrylic paint, varnish with solvent, foam rubber sheets and dense matter for a new upholstery. There will also be a clamp from metal and screws. Start work and spend it in that order:
- It is necessary to clean the product from fat, dirt and other layers - this is achieved by a sink of a chair with a gel for dishes with a soft brush, water should be warm;
- After that, it is necessary to remove the old coating from the veil and varnish - this operation is performed by a skin and steel brush; You can use a special liquid for flushing paint coatings from wooden surfaces.
Article on the topic: how to make a door jamb: work features
After that, it is necessary to disassemble the chair for individual details and prepare purchased materials and tools to further work.
How to make disassembly chairs
The fabric to the seat of the chair can be secured by a construction staple.
Initially, you need to remove the back of the product and the seat - this operation does not require the use of workers. Carefully examine the chair and evaluate the degree of loosening it. All revealed weak connections are swing and disconnected. It is impossible to allow damage to any, even the smallest, details. If there is a need, you need to beat them very carefully. Durable compounds do not need to touch - their weakening can reduce all the work and require additional costs.
We must take into account the fact that the vintage chairs were going on screws or screws. Therefore, they need a screwdriver for their disassembly. If the carving rusted, then the machine oil can be dripped.
When disassembly, all parts are numbered - it will be easier to install them in place upon subsequent assembly of the product. Most of the chairs of the USSR period were collected using epoxy glue. To disassemble such a chair, rags and hot water are used. Mocked rack is installed on the location of the details. This operation must be repeated until the adhesive layer softens. It is removed using a knife. And the wooden part must be left for a few hours for drying.
If the resin is not filmed when applying such a method, you can apply a more "modern" method. The kettle is adjusted to a boil and, putting on his spout of the hose, on the second end of which the tip made of metal with a small hole, the ferry is treated with glue seam. After 2-3 minutes, carefully try to disassemble the items, if it did not work, then processing should be continued. After disassembling the connection, the tree is dried several hours.
Article on the topic: Use of wallpaper in the interior
Updating the parts of the chair and the elimination of defects
We must once again carefully examine all the items of the subject. If cracks manifested themselves, they are sampled and tightened with clamps. Small defects are poured with adhesive makeup and tighten with scotch. Clamps are needed to process the parts of a round profile (for example, legs). Prepared a mixture of sawdust and glue. It is used to close all chips and holes that will no longer be needed. All elements of the chair dried 48 hours. After that, the surface is treated with an eye. This operation applies to all the details.Grinding paper should be applied to different graininess - it is necessary to obtain a very smooth structure of all elements.
Stool Update - Cleaning Connections and Assembly
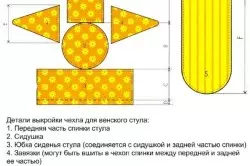
Pattern pattern circuit for chair.
The upper (narrow) parts of the legs should be wrapped with a bandage. Each applied layer is wedged with glue. If the item is walking at the junction site, then it is crushed. In the end, the legs make a groove and clog wedge out of wood - while the item should be firmly in place. The deepening walls should be missed in advance with glue. Such operations are best carried out if the legs have the legs directly enter the seating plane.
The products of the old type, there is a kard in this place and there are crossbars. Each item is glued and equipped with a spike. If you need to strengthen such a place, then from the inside it drills the hole with a thin drill and the syringe shaft glue. If the spike is damaged, then thin wedges are clogged into the socket, after saving them in the glue.
If the chair is completely loosened, then it is necessary to disassemble it and proof. In order to enhance the compounds insert bars in the form of a trapezoid in the corners of the frame. Their ends should be accurately connected with the kings, since the gap can lead to the skewers of the structure.
Article on the topic: how to perform the design of heating
The chair of the chair is collected by setting each detail. After the installation is filled with the product with clamps or cords. It is necessary to strictly observe the correct angles of the chair. If the glue with the assembly, it is cleaned with a damp cloth. Drying the assembled object is made within 48 hours.
Stool Update - Padding
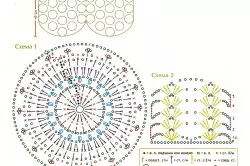
Circuit round cape on chairs.
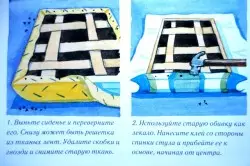
The dried frame is painted and begin to replace the upholstery of the seating. This is done on the following technology:
- An old fabric and stuffing is removed. If any defects are detected, then they must be eliminated.
- Put the old seat on the foam rubber and rub the felt-tip pen.
- A knife for the resulting circuit cut a piece and the upholstery material is cut according to it. It leaves allowances for flexion.
- Watch the seat in the matter, pre-put the foam rubber on him.
- The edges are raised and shoot the stapler with brackets or furniture nails to the tree. The resulting part must be attached to the frame of the stool with screws on metal corners. If the product has a soft upholstery on the back, then it is changed according to the method specified above.
For all these works, materials, fixtures and tools are used:
- Tree bars. Paint.
- Porolon.
- Upholstery.
- Glue.
- Metal clamps.
- Sandpaper.
- Clamps.
- Tree cius.
- Knife and scissors.
- Stapler and brackets.
- Screws.
- Screwdriver.
- A hammer.
- Paint brush.
- Roulette and marker.
The stool update is possible with the strict consequence of the process technology and fulfill all the recommendations. If not to do this, then the product can turn. With the correct assembly, the chair will serve for many more years.