
Independent hauling of upholstered furniture - the task is not so simple, as it may seem at first glance. So that the updated chair looked modernly, stylishly and appropriate, it is necessary to study the technology and strictly follow the instructions.
If the upholstery came into disrepair on the old chair, do not hurry to throw it away, it is enough just to drag it with a new cloth.
In order for the restoration to be successful, it is necessary to take into account all the subtleties, only with a thorough approach to the case, the updated furniture will look good. Such a scheme of work can be used to update any upholstered furniture. But if the worn sofa or a challenge of a complex shape, it is better to turn to professionals (Fig. 1).
Preparatory work
For drying chairs, not only materials and tools will need, it is also necessary to have sufficient sewing skills and preferably. You should not ignore the preparatory stage, otherwise difficulties may arise at the most inopportune moment.
For successful halves you will need:
- screwdriver;
- pliers;
- antistepler;
- furniture fabric;
- foam;
- Sintepon;
- durable threads;
- scissors, needles, pins;
- sewing machine;
- Stapler with brackets.

Figure 1. Chair diagram.
If there are details of the tree on the chair, you will additionally need sandpaper, simulator or furniture lacquer.
First of all, you need to take pictures of furniture from different angles. This will significantly simplify the assembly process and will avoid the incident. After the subject of rework is captured, you can move to the next step.
The chair must be disassembled. Remove all decorative elements and pillows. If you produce a surface drawing and leave wooden parts in a worn form, the overall impression will be hopelessly spoiled.
Next, it is necessary to extremely carefully remove the old upholstery. It is important not to damage the fabric, as it will act as patterns. You can use an anti-stripler, screwdriver and any other tools with a flat edge for these works. After the web will be removed, it needs to be measured and calculated how many fabric will be needed for sewing a new upholstery. It is important to take into account the stock of the material on the podgiba and the extract.
Article on the topic: Septic Tver: Description, Disadvantages, Negative Reviews
It is necessary to estimate the condition of the soft part of the chair. If traces of pollution and wear are visible on the foam rubber, it is worth replaced. It is better to do it right away that in a few years the updated chair did not surprise the change in the form.
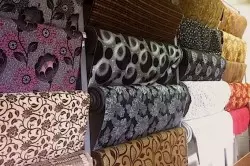
Figure 2. For the upholstery of the chair, such fabrics are suitable like tapestry, jacquard, rogozer, velor, shenill.
After that, you can go to the store for consumables. It will take a thickness of 3-5 cm thick, standard or high rigidity. Such a seal is used for the production of furniture, and you can buy it in specialized stores. It will take the material for upholstery, it is better to choose a fabric with marking "furniture". For decoration of upholstered furniture, tapestry, jacquard, cargo, velor, shenill (Fig.2) suitable. When buying, we need to take stock material. The presence of drawing on the fabric will increase the flow rate of about 1-2 steps of repeating image elements. And, of course, threads of the appropriate shade need to take durable, designed to work with furniture. Reinforced threads 45-70 LL (LoveVan is an analogue of polyester).
Intermediate stage of restoration
After all the tools and materials are prepared, you can proceed to restoration.
First of all, you need to upgrade armrests, legs and all wooden elements. They must be carefully processed using sandpaper, coat with a mourn or varnish and leave to dry.
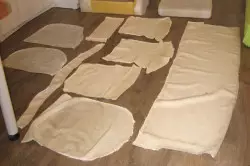
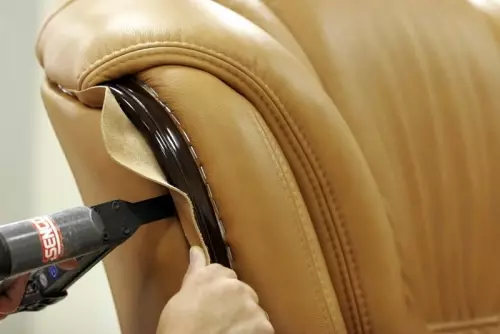
Figure 3. Carefully remove the old upholstery from the chair and disconnect all parts for further creating a new pattern.
Next, you can move to the manufacture of a new upholstery. Old, if it was not done earlier, you need to relax, trying to not be damaged. Every detail needs to numbered and postpone. After that, it is necessary to place and cut a new upholstery (Fig. 3).
It is most convenient to do it on the floor. Tags are applied using a special marker, chalk or simple pencil. Circling more comfortable with big sharp scissors. After all the details are cut, you need to process sections so that the fabric does not bloom. The easiest way to be used by double podium or slightly fall out on an open fire. When choosing the second method, you need to be extremely careful, checking the reaction of the material on an unnecessary trimming.
Article on the topic: Porcelain tile for the floor: dimensions, weight, thickness and laying; What is the difference between porcelain tiles from ceramic tiles?
After that, you need to sew all the details of the new upholstery on the sewing machine. It is better to "try on" a new case several times than to redo everything.
After the upholstery is ready, you can move to the main part of the restoration of the chair.
Padding and assembly
Throwing the chair should be stages in a disassembled form. For example, first cover the seat, then the back and small details.
Put the framework of the part in front of you, place the foam rubber on it. The edges of the softening layer can perform a little outside the framework: it will soften the ribs and makes a comfortable operation of the renewed furniture. If a thick and dense foam rubber is purchased, the corners can be cut off, making transitions rounded.
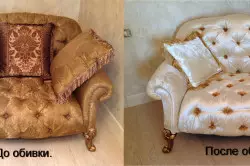
Figure 4. Example before chairs and after.
A layer of synthet tube will protect the foam on the offset and will significantly simplify the process of installing a new upholstery. This nonwoven material must be put on top of the foam rubber and fasten on the basis with a stapler.
Next, you can move directly to the upholstery. Tissue item needs to be based on the basis, to straighten carefully. It should be fixed according to the scheme, it will avoid displacement and skew material. First, using 4 brackets, fasten the fabric on the ribs, in about the middle. Next, in proportion, pulling the fabric, secure brackets. For example, 2 - on the one hand, 2 - with the opposite and so on.
It is important that the material does not resist, but did not stretch over. Permanent control will allow to cover the chair qualitatively.
After the last bracket is fixed, you can proceed to the next part. So that the updated chair looks presentable from all sides, the rear can be closed with a lining cloth, also consolidating it with a bracket.
After the latter, the last soft details can be used to the assembly. It is at this stage that a detailed photo of furniture is useful. Remember how the chair disassembled, and repeat all the actions in the reverse order. All screws and attachments need to tighten. If the chair on the wheels, it makes sense to replace them with modern bearings.
Article on the topic: Connecting an electromagnetic lock
If all the steps were carried out correctly, you should appear a beautiful updated chair (Fig. 4).
The ability to cover the chair with your own hands is a very useful skill. It should be time to spend time and effort to study technology, and tomorrow you can independently and without significant spending to update the interior of the house or cottage.