
In almost every house, you can find several old chairs, the appearance of which leaves much to be desired. Do not hurry to throw them out. Inspo in the second life in the old, but the favorite object of the furniture will help the restoration.
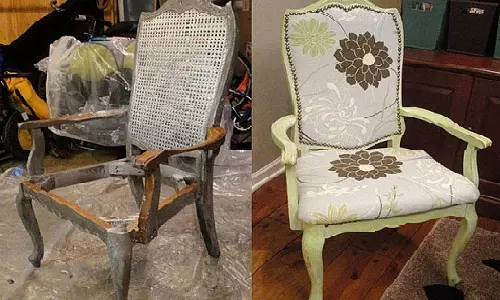
Restoration gives a chair to the second life and creates unique furniture.
It is quite a bit effort, and old chairs or chairs will turn into real works of art and will delight their owners for many years.
Give a second life
Restoration of chairs with their own hands - the process is not so much complex as painting.
Before proceeding with the case, it is necessary to carefully inspect the product. According to the results of the inspection, it becomes clear what to do: just drag the seat of the chair, update the paintwork or to carry out more serious repairs.
If the chair is loosened, then the reason should be sought in thickening connections. Over time, wood sneezes, the binding elements begin to hang out in their nests. To eliminate this and strengthen the design, you need to increase the size of the spike, compact the kings and replace the power jumpers.
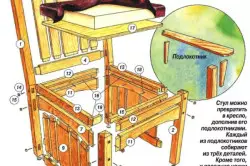
Scheme of assembly and chalk chairs.
Smaller effort will require restoration of paintwork. Old paint will have to remove, pollute the surface of the parts and cover them with paint or varnish. For high-quality performance, the chair must be disassembled: remove the seat, unscrew the back and legs. If the design of the product is complex and has a lot of small parts, then during disassembly, the location scheme of each part must be compiled. This will facilitate the assembly of the chair after the end of the restoration.
The easiest way to update the old stool is to replace the upholstery. Replacing the old and lured fabric is able to change the appearance of the furniture beyond recognition. If necessary, updating chairs with your own hands can be performed in any one way or include all the types of work.
Preparation for recovery
Before proceeding with work, you need to prepare tools and materials. If the chair needs serious repair, then you will need:
Article on the topic: Titanium wallpaper brand, general information
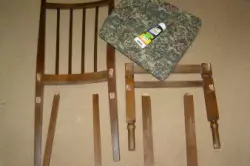
Before restoration, the old chair must be disassembled.
- Screwdriver.
- Screwdrivers.
- A hammer.
- Kiyanka.
- Clamps.
- Metal clamps.
- Paper emery varying grain.
- Building stapler and brackets.
- Acrylic paint and brushes.
- Varnish.
- Scissors, pencil or felt-tip pen, cardboard, tailoring centimeter.
- Porolon.
- Dense fabric for upholstery.
- Bucket, rag and dishwashing liquid.
The first step towards the restoration of the chair is to clean it from dust and dirt. To wash it well, you will need warm water, soft cloth and a little dishwashing fluid. This solution will help to quickly clean the chair not only from dirt, but also from the part of the old varnish. The washing procedure should be carried out promptly so that the wood will not in contact with water, and after it is necessary to dry everything.
The next stage of restoration is dismantling. First you need to replace the back and rear legs. Here the main thing is to adhere to the rule: the assembly of the chair should be carried out in the reverse order. Only so all the holes will coincide with each other. In addition, all the details and fasteners need to be labeled. This will also facilitate the assembly.
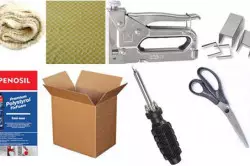
Tools for restoration of chairs: batting, upholstery fabric, stapler, brackets, mounting glue-foam, cardboard, screwdriver, scissors.
If the screws are screws that fasten the parts, hidden in the sockets and the wooden plugs are closed, they can be removed using the chisel. If it does not work, then you need to use the drill, the diameter of which is equal to the diameter of the plug, and drill it. The opened screw is turned screwdriver. A drop of technical oil, applied to the screw, will facilitate work.
If the chair was fastened with epoxy resin, hot water will help remove it. Water or napkin wet and put on a gluing place. Repeat the procedure until the glue is completely softened. Then it is necessary to scrape it with a knife and dry the items. Soften glue in dense joints will help hot couples. To do this, the rubber hose is put on the kettle spout, the steam jet is sent to the connection.
Article on the topic: Forced ventilation cellar in the garage
Processing and assembly of parts
To renovate the chair to high quality, it must be carefully examined. All items must be processed by sandpaper. Detected large cracks glue and strip using clamps. Smallest smoke and secure with paper scotch. Extane holes and chips on the details should be filled with cashie from glue and small sawdust. You can continue only after the glue is completely dry.To facilitate work with sandpaper, it needs to be cut into narrow strips and stick them to wooden bars width of 20-40 mm and a length of 300-350 mm. Paper need to use different graininess. The surface after processing should turn out to be smooth and smooth. Easy work and significantly reduce processing time will help the grinding machine.
Be sure to check all the locations of the connections. If the chair has legs inserted right in the seat and eventually began to sit in the nests, then to strengthen them enough. At the ends of the upper singles, the legs are made propyl and the wedge is driven into it. Due to this reception, the end diameter will become more and it will be more densely into the nest, which must be preassed with glue.
It will be more difficult to leaving the restoration of chairs with crossbars between the legs and the kings under the seat. In such structures for fastening parts, a joint groove and sizing connection is used. When the seam weakens, you need to drill an opening with a small diameter and a syringe to drop there a few drops of glue. With a weakening of the spike, it must be enhanced by thin clins. For this purpose, matches or wooden sins are suitable, which are dipped into glue. Score in the nest they need to be together with the spike.
If the chair is very strong, then besides the sizing compounds, it is necessary to strengthen the design with wooden bars. They should be attached with screws to the distances, which are used to connect the inner corners of the frame. Bruks and kings should be perfectly adjusted to each other. Even the smallest gap between them will cause skewing the entire design.
Article on the topic: How to independently change the shower hose?
Now you can start collecting the chapel frame. All items must be installed in place. So that the glue grabbed, it is necessary to ensure sufficient pressure. Bled elements to pull with clamps or cords. On the seat can be supplied with water bucket. This will provide the necessary pressure. With such a cargo, the chair should stand at least 24 hours. Surplus glue immediately need to remove the wet cloth.
Replacing soft seats
Before restaving the chair, then it is necessary to wait for the complete drying of the glue. Then the product can be painted, cover with varnish, make a decoupage or decorate painting. Everything will depend on the desire and fantasy of the owner.
If the chair has a soft seat requiring replacement, it's time to proceed to it. Initially, it is necessary to remove the old fabric and packing. If there are defects on the wooden surface, they need to be eliminated.
On the new foam should be marked. The old seat is applied to the foam rubber and will be burned with a marker. To cut exactly, you need to take a sharp knife. Then make the pattern on the fabric, taking into account the allowances for the podgib and foam rubber. Next, decompose the pattern on a flat surface down face. Top puts foam rubber, and then the seat. Items must be wrapped on the wrong side, stretch and align the front side. In the corners to align the folds, adjust the edges and attach the material using a stapler. If it is not at hand, you can use small carnations, which have wide hats. The updated seat is fixed on the frame of metal corners and self-drawing. If the stool has a soft back, then it is restored in the same order as the seat.
Fully restored and transfigured chair will serve its owners for many years.