
Large cabinet always requires additional backlight. Otherwise, find the right things on deep shelves is quite difficult. You can make such a lighting of the closet coupe with your own hands. This work will not require you serious financial costs. The whole system is mounted literally in one evening. And in order to make not only efficient, but also beautiful backlight, do not need special knowledge and skills.
Fluorescent lamps always remain cold, even if the owners forget turn off the lighting.
Preparatory stage of mounting
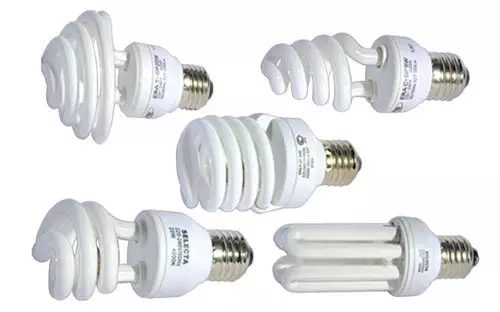
Previously, halogen lamps were often used to illuminate the cabinet. But their main disadvantage was that when working, they were strongly heated. Therefore, it was possible not only to burn about such a lamp, but also damage the clothes stored in the closet. In addition, using them is unsafe, as modern furniture is made of flammable materials.
Therefore, now use fluorescent lamps or LED backlight. Such lamps remain cold, even if the owners forget turn off the lighting.
You can only set the backlight inside the compartment cabinet.
But the furniture can be lit both outside by molding a lamp, for example, to the upper eaves.
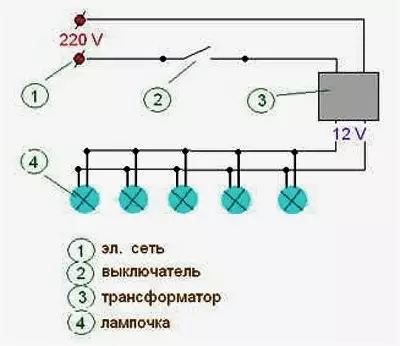
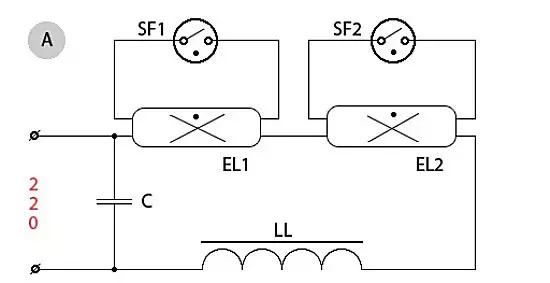
Image 1. Illumination connection scheme.
Then this subject of the interior will also become a real decoration of the room.
Before starting the backlight installation, you must compile a detailed connection scheme.
If you are not sure about your knowledge, then to this stage it is wiser to attract a specialist. An example of such a scheme is shown in the image 1.
In modern stores, you can buy ready-made kits designed to illuminate furniture.
Usually, the set includes from 3 to 5 lamps. But sometimes the standard set may not approach some parameters to a specific cabinet. Then you have to assemble the system yourself.
Article on the topic: Filling the floor in the garage
Necessary materials and tools
If you decide to use halogen lamps to illuminate, then you must purchase a transformer. When choosing, you must consider the following parameters:
- Nominal power. With it, you can calculate the overall power of the lamps that can be connected to this instrument. So, you can determine the number and personal characteristics of the lamps. But remember that the power of the transformer itself should 5% exceed the amount of the power of the entire plug-in.
- Output voltage. It should be equal to the operating voltage of the lamps that you want to use for the wardrobe.
- Type of transformer (winding or electronic). When installing lighting for furniture, it is preferable to use 2 options.
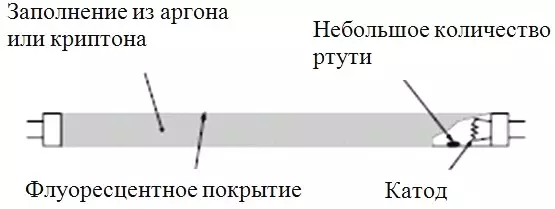
Luminescent lamp device.
In addition to the transformer, you will need the following components of the backlight:
- electrical plug;
- wire (two-housing cross section 0.75);
- household switch;
- Connecting terminals.
Planning the lighting for the cabinet, remember that you should not use the wire longer than 3 m. Otherwise, the power will be lost. Choosing a place for the transformer, do not forget that he, unlike lamps, heats up when working. Therefore, it must be attached at least 15-20 cm from the heat source. When calculating, it is necessary to take into account the central heating batteries, which are often located close to the walls of the cabinet coupe. Do not put the transformer and in too narrow cavities.
For mounting the backlight you will need the following tools:
- tester screwdriver;
- a set of screwdrivers (it is wiser to prepare tools with flat and crusades of different caliber);
- drill;
- Special nozzle-mill (crown).
The diameter of the cutter must coincide with the inner diameter of the lamps. Otherwise, you will have to expand the holes manually.
Installation of furniture lighting
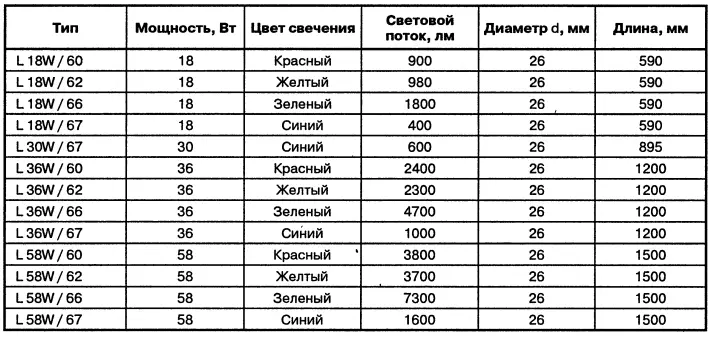
Table of characteristics of fluorescent lamps.
First you need to prepare nests for lamps. To do this, it is wiser to remove the panel to which the lamps will be attached. Before forming holes, you must definitely place their location. Moreover, both with one and the other side of the furniture shield.
Article on the topic: Visor-canopy over the porch of polycarbonate with their own hands
The nest is drilled at a depth of 7-10 mm. Next, the panel must be flipped over and finished the formation of the opening on the other side. If this is not done and immediately drive through, then it is likely to damage the detail of the cabinet compartment. Especially in the event that your furniture is made of chipboard.
Luminaires are installed in the nests intended for them and connect to each other. At the same time, it is wiser to use the parallel compound. Then one lamp incommunicate will not fail all the lighting. The latter is connected to the transformer.
All illumination elements are connected to terminals or terminal blocks. Modern pads are an aluminum plate with contacts. Such features allow to connect wires with aluminum and copper veins.
This cabinet backlight is controlled by a switch. It can be located outside the cabinet coupe or inside it. Sometimes the chains that give the furniture are used as a switch.
Installation of LED lighting
Installation work of LED lighting.
To illuminate the cabinet coupe with the help of LED tape you need to purchase:
- power supply (it can be replaced by an open-type transformer);
- tape with LEDs (if you buy RGB ribbon, then you will have the opportunity to customize the color of the lighting at your own way);
- Controller (now you can find cheap models that are included with the control unit);
- connecting terminals or pads;
- electrical wire;
- fork
By purchasing a tape controller, pay attention to the models with infrared sensors. They can be controlled not only with the help of a special unit, but also from a regular console intended for the TV. If you prefer one-color diodes, the closet control panel will not need.
At the first stage of installation work, you must consistently connect all the elements into a single chain. For this, the feed wire is connected to the power supply. The following is connected by the controller.
Article on the topic: What to do if the shower is flowing
As a rule, wires intended for connecting this element are quite thin and short. This complicates work with them. Therefore, it is wiser first to clean them from the insulating coating, freeing the ends at about 1 cm. For the thickening of contacts, solder are applied. Thanks to such a simple manipulation, the contact becomes much more reliable.
Tape to the controller is very easy to connect due to the fact that manufacturers label the corresponding compounds in different color. That is, you just need to connect together the wires of the same color. You can connect them using terminals or bypacing contacts. If you use a soldering, do not forget to isolate the connection location. If you decide to use the terminals, then add solder. Otherwise, contact may not be reliable enough.
Before the backlight of the furniture is finally mounted, check the LED tape by connecting it to the network. If you used RGB diodes, then test them to work in different lights. If the result is fully satisfied with you, then the tape can stick inside the compartment cabinet. Usually it is fixed on the ceiling of the compartment and on the rear walls. But part of the tape can be brought to the front panel. Then your furniture will be the original interior decoration.