
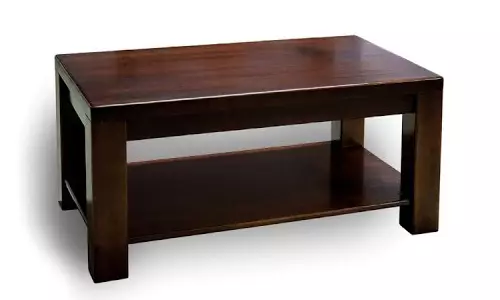
The coffee table is, undoubtedly, useful and comfortable thing. The furniture market today is full of proposals of such tables from chipboard, metal, glass and plastic. However, very often the consumer is looking for something special and exclusive, refusing standard options.
Zhrnalny tables have quite high prices, but, unlike other furniture, they are quite simple to make themselves.
For such consumers there is also a solution: make a coffee table with your own hands. This is not only an entertaining and interesting process, but also the savings, because the furniture collected from the chipboard will no longer be much cheaper than the store product.
Preparatory work
Before proceeding with the process of manufacturing the table, it is necessary to determine its type. After that, make drawings of each item and cut patterns. The present parameters are indicated on the presented scheme. Create a coffee table will help the next set of tools:
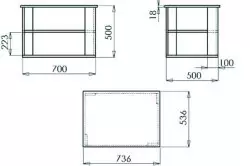
Scheme 1. Sizes of the coffee table.
- pencil and ruler;
- roulette;
- screws;
- a hammer;
- screwdriver;
- Chipboard, you can use laminated plates 16 mm thick;
- hacksaw or electrolybiz;
- drill;
- Furniture pipe with a diameter of 30 mm;
- flanges under the pipe;
- insulating tape;
- sandpaper;
- wash;
- invoice profile;
- glue;
- Rubber wheels.
It is necessary to impose patterns on the chipboard, to circle a pencil along the contour and scratch the nail to the subsequent canvas will not split. At the bottom of the tabletop patterns cut out the contour of the legs to be transferred to the details. Conducting a central line, 3 holes in 1.2 cm depth should be placed, and the drill (8 mm) is cut. To control this procedure, it is recommended to use the isolent. On the outside of the canvas, it is also necessary to place the locations of the holes that will be required to support the shelves. To do this, measure 8 mm from the plane of the parts and the same distance from the beginning of the bend. The drawing will show clearly how to do it.
Article on the topic: Mold on the ceiling of plasterboard
The ends are separated by the P-shaped profile, the texture of which must match the plate. To work with a chipboard, it is recommended to use an overhead profile that can cover every part from both sides without fastening grooves. The profile also needs to be glued onto the legs. After that, every end must be treated with sandpaper. The last parts are connected using a shelf with a shelf, which is after the profile is worn and cut on the other side.
Table Assembly Instructions

Scheme 2. Building a coffee table.
The sheets and the lower shelf are cut out of the sheets of sheets, after which the flanges are screwed to the first part. It is necessary to retreat from the smaller side of 7 cm and spend a parallel line. Similarly, you need to do with 2-sides countertops and shelves. This will allow you to get 4 points of intersection to which the flanges need to be screwed. After that, we should put rubber wheels and insert pipes on the prepared places, consolidating them with bolts. Scheme 2 shows detail the purpose of each design element.
In order for the coffee table to be stable, you need neighboring supports to combine with a pipe and joker. The shelf is installed to give an attractive appearance.
For such purposes, regular pipes are replaced by special details where appropriate mounts are provided. After that, cut the desired glass size and paste it into the mount.
The final step is to apply to the design of the finishing matter, but before you need to eliminate the "old" coating to the sandpaper and wash. If the plates were painted, varnish or paint should be removed by a mechanical, thermal or chemical method.
Stamp decoration and decoration
Methods for decorating countertops are very different. The simplest decoration of the table is the finish of wallpaper, border or printout of any image. The selected way implies the selection of the decor and configure it in size from the table top.
Article on the topic: Cascading Waterfall Mixer: Beauty and Comfort
Carefully the surface of the table is covered with varnish in 1 layer, and the decor is superhalled to the other countertop. Each lacquer layer is recommended to dry at least 24 hours, and the number of such layers depends on the wishes of the wizard. However, the more layers of varnish will be applied, the more effectively the picture will be.
The drawing on the chipboard sheets may look quite original if it is originally not painted. For decoration it is recommended to clean the surface with emery paper in advance, while first is large, and after shallow, so that the paint and the soil have a good clutch. If the soil is used in the finish, it is better to use an artistic or acrylic, while the latter can also be drawn. Ready drawing is covered with varnish in 3 layers.