
Arch as an element of the architecture of the building is intended to divide the room on the zone without the use of the door. Recent years marked the active use of these structural elements. Such an elegant device can be created and decorate any dwelling, save living space, which is especially relevant for small areas. Often they can be seen in the hallways, in the kitchens and between other rooms. How to make the arch at home? To do this, it is necessary to study the features of installation work.
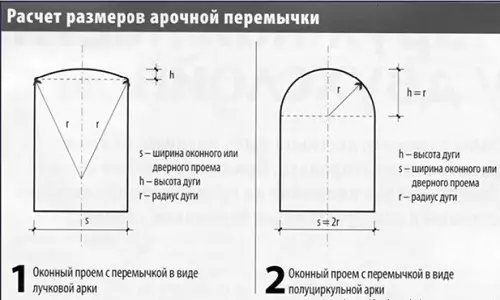
Scheme calculations of arched jumper sizes.
Such overlap can be purchased at a finished form or make it yourself. The form of such consists is also different: ranging from classic options and ending with modernist samples. In the process of their production, various building materials are taken: brick, stone, metal, wood, PVC, DVP, chipboard, Glk, plywood. Sheets of gypsumocarton are the greatest popularity. They are plastic and feature installation.
Preparatory work
To understand how to make an arch, it is important to install alternately. First, the designated space is measured: its width and height is determined.
Getting Started with the construction of an arc, it is worth considering the fact that the door plane will decrease by 10-15 cm. These indicators touch the height. Later this space can be fed by decorating inserts from ordinary foam.
It is measured and divided into two. These figures will be needed in order for the traditional semicircle to be smooth and symmetrical.
These data are equalized by the internal distance corresponding to the opposite sides of the space. At the beginning of the work should decide on the form of the structure.
Sequence schemes and product installation schemes.
Traditionally, samples of a semicircular view or sheets of GLCs are installed, as will be discussed below. How to make the arch correctly, just below. First you should focus on the vertical surface, otherwise the design will look ugly and one-sided.
Article on the topic: Chandelier do it yourself - the best instruction and master class (100 photos)
If there is a need, the inner plane should be aligned with plaster or putty, focusing on the lighthouses installed.
Necessary attributes for work
The listed list of devices will make installation on its own:- Profile of guide type.
- Stretch profile.
- Dowel with screw for fastening a profile frame for concrete, brick walls.
- Self-tapping screws for wooden surfaces and fastening of sheets of GKL.
- Glkl sheets.
- Saws with a press washer.
- Roller with needles.
- Special corner with perforations.
- Latex putty for GLK.
- Electrolzik.
- Stationery knife.
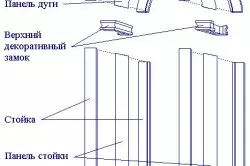
Installing facial components Arch
Diagram of calculations of the size of the doorway and the height of the arch.
Get an answer to the question of how to make the arch, it is possible, starting with cutting out the front elements of the design. The main problem in this period is that it is necessary to obtain two identical elements, regardless of the material from which the arch is made. Marking and cutting for each of them are carried out in one scheme.
Smooth semicircle can be made in different ways. For example, by applying any fixtures. As such samples, you can take a strong and elastic twine and a simple pencil.
- The rope is tied to the rod.
- There is a center of the circle. To properly determine the radius, you need to recall the number that turned out in the process of previous measurements.
- So, if the width indicators are 1 m, the desired figure will correspond to 50 cm.
- With one of the edges of the sheet, 60 cm is postponed and a trait is drawn. The distance from the top of the opening to the top of the future arch corresponds to 10-15 cm.
- GLC cuts, focusing on the width of the door plane. So, in this embodiment it is 100 cm.
- Then the boundary corresponding to the designated straight line marks the border corresponding to 50 cm, with each of the sides. These indicators denote the boundaries of the hemisphere.
- With the help of pencil and the twine, it is indicated by 0.5 m rope lengths and the last half-heartfesters are held. It turned out an analogue of the homemade circulation. As a result of the use of such a device, a circle is formed with smooth edges.
- On the marking of the jigsaw or the stationery knife, the semicircular was carried out. Its width corresponds to 1 m, and the height is 60 cm.
Article on the topic: Decor's idea: How to use the things you hate, but you can't remove

The profile for opening Arches is cut to get the necessary bending.
The arch is manufactured in another way with a long and flexible element. To do this, you can take a plastic panel, flexible plinth.
- Cut a rectangular base in size in 100 × 60 (65) cm. After each side, 50 cm is measured and 2 lines are conducted. The location of their intersections is indicated by the point.
- Sheet of drywall is bent on both sides according to the width of the future opening. It turns out a semicircle. The bulk part corresponds to the points designated earlier, the ends should be in contact with the seats of the rectangular base at the bottom.
- Ready arch is watched and cut out.
The second method of manufacturing the arches requires attraction of an additional person. Perform accurate measurements alone will not be easy.
Arch framework
Make this important element in the house can be prepared a metal profile. Marking guides with orientation on the width of the opening. Here these indicators correspond 1000 mm. They are fixed on any side. They are fixed on concrete and bricks, they use special tapping screws for wooden surfaces.
In order for the design to be in the same plane with the wall, the frame should be fixed inside the opening by 12 mm.

Arch diagram from drywall.
As soon as the GLC sheets will be fixed and put a putty, the base will acquire even indicators.
Fastening produced from either side of both side parts of the frame. The length of such elements corresponds to 600 mm.
The bottom of the profile is cut at an angle. Fixation on the framework of parts of the arch screws for metal bases.
Finishing stage of installation
Next is the closure of the end of the arch:
- The frame is mounted, a curved part will be fixed on it.
- To carry out such a cut, the scissors are taken for metal surfaces and denotes an arc.
- The profile has a configuration of the letter "P". It turns over the side of the clock mechanism. This part will be located from the inside of the fixed front element on the right side of the arc. The second item is fixed on the other side of the first element.
- Cuts are made at the top and in the middle of the profile, making equal indents in 40-50 cm. Such a snake-shaped design is attached over the edge of the hemisphere.
Article on the topic: Mesh for forests: Features and scope
A strong break requires the installation of the outbreak on the profile.
- Strengthening the device. A transverse part is made and fixed into the frame of the curved shape. Self-tapping screws with a press washer taken as fasteners.
- A small part of the GLC leaf is cut, its width is equalized by the thickness of the wall opening.
The length of such bands need to be done a little more of the desired size, during the work it is necessary to cut off the unnecessary part.
Gypsum wake strip bends:
- The strip is wetted with water.
- The surface is processed by a needle roller.
- This item leans to the support under the tilt.
- Bending leaf is firmly screwed to the frame.
At the end of all works, the arch is brought to a logical completion: it is given the correct form, all the flaws are masked, the corner with sparkles is put on the winding part. Then priming the base of the composition of deep action is carried out. In half an hour, it can be sharpened, then paint or stick wallpaper. Give the device complete view will allow arched corners installed on any side. To make a wooden arch in the house, you should pass the same stages, only instead of the sheets of GLC takes the plywood and chipboard. A small sheet of fiberboard is taken as the bending element.