
To transform the interior of housing and build beautiful doorways, it is not necessary to break the walls and mess with brick and clay. For example, you can familiarize yourself with the question of how to make the arch do it yourself, and perform this operation in your interior. Dirt and hard work can be avoided if you use such materials such as plasterboard, DVP, chipboard. They will help in the installation of multi-level ceilings and partitions, and doorways using such materials can be decorated with columns or turn into arches.
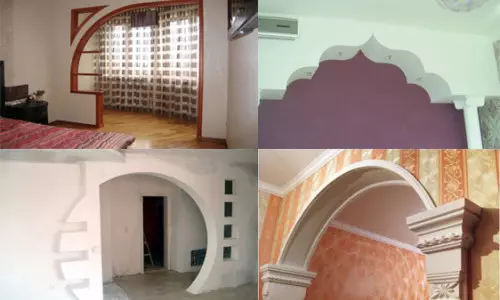
Arch design options in the apartment.
What needs to be prepared for the manufacture of arches
You can choose the arch of several species - it can be oblique, dome, multi-level, openwork, etc. Most of the masters believe that it is more convenient to work with plasterboard sheets, although you can make an arch from the fiberboard or chipboard. For the construction of arched construction, you will need:
Wheel pattern circuit.
- Plasterboard with a thickness of 6.5 mm;
- metal profiles;
- Self-tapping screws and dowels;
- Scissors for cutting metal;
- Lobzik and knife for cutting plasterboard sheets;
- Drill and perforator;
- screwdriver;
- Passatia;
- pencil, roulette, level;
- needle roller;
- Gypsum putty;
- primer;
- skar;
- Perforated corner with which the edge edge will be issued.
Preparation of opening for arches
Before making the arch do it yourself from the Fiberboard or other materials, it is necessary to prepare a working plot. Doorflower must be removed, clean the surface from dust, contaminants, the remains of the previous finish.
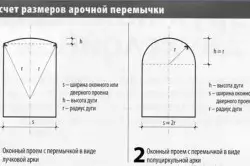
Scheme calculations of arched jumper sizes.
The most common classic arch will be composed of two identical lateral parts and one curved element, which will be located on top. It is possible to consider this particular variety, since all the rest are its slightly modified variants and are performed on the same principle. For the manufacture of lateral parts it is necessary to make the following actions: to measure the width of the opening with the help of a roulette, then calculate the radius of the future arch.
Article on the topic: Contemporary windowsill countertop do it yourself
Next, you should take a kapron thread, the length corresponding to the calculated radius. At its ends, we tie two loops, one you need to insert a pencil, to another - awl. It must be plugged into a sheet of drywall, evenly stretch the thread and pencil to drag the arc. With the help of a jigsaw or a building knife on a drawn arc, it is necessary to cut one of the side parts for the arch. It is applied to a new sheet of GLC, outline the contour, cut - it turns out the second lateral part.
Framework and mounting side elements
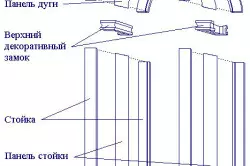
Sequence schemes and product installation schemes.
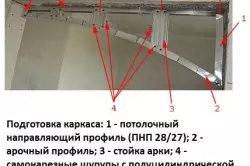
To make a good arch, you need to take care of a reliable frame. For its construction in the upper part of the opening on the dowels, a guide, made of metal-produce, is fastened. Guides should be fixed on the wall with both sides - from the top angle to the point where the rounding of the arch ends. It is necessary to carefully measure the lateral guides: if they are not the same, the arch will be released.
From metal products it is necessary to make an arc - with scissors, both side walls are cut in several places, after which they turn up and flex with half-tub. For the template you can use the prepared side parts. The profile to the vertical guide must be attached to the dowels, to the sheets of drywall - self-drawing. You will need two more such arcuate details. For greater reliability of the frame in space between arcs, additional profile segments can be fixed.
The next step is to consolidate arcuate side elements on the frame using self-tapping screws. Next comes a turn of the upper curved element.
How to set a curved element
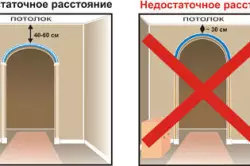
Diagram of calculations of the size of the doorway and the height of the arch.
For registration of the lower end part of the arch, it is necessary to cut off a smooth strip of material, carefully calculated in size. For measurements it is convenient to use a flexible measuring tape. To the length of the strip must be added another 10 cm.
Article on the topic: How to replace the boards of laminate, without disassembled Gender: Replacement procedure
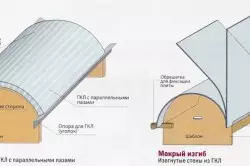
To make an arc from drywall for the manufacture of an end element, the lower part of the strip must be wet and rolled with a needle roller. Let him lie for a while. Wetting Carefully, without any abundance, so that the material does not risks. After that, the element carefully place in the arch in the right place, secure on the tape. Wait for it completely dry.
Now fasten the strip using self-stems to the frame on both sides - it is better to start screwing them from the middle of the arch. Next, it is necessary for about 12 hours to wait until the plasterboard dries.
The element can be bent both already described with a wet method and dry, cutting the material in certain places. But this method is suitable for performing not very large bends.
The production of arc is carried out by dry way:
Frame preparation.
- On one side of the band prepared for creating an element, transverse cuts are performed - almost all the depth of the gypsum layer;
- According to completed slots, the detail is reduced, it must be traced that the gypsum layer remains on intact paper;
- Take the slopes with a putty, if there is a need, you can sickly with a sickle ribbon;
- Curved, the part is attached to the frame with the help of self-tapping screws, do not screw them over the edge itself, otherwise the gypsum layer may be damaged; Self-tapping caps are slightly drowned into the surface;
- Shasplight sections need to be cleaned with the skin, so that the surface turns out perfectly smooth.
Thus, the arch prepares to apply the decorative layer - staining or sticking wallpaper.
When all design elements are prepared and installed in place, it's time to switch to its finishing.
Device arched opening.
All mounted part of the plasterboard arch should be treated with sandpaper fine-grained paper. So it is possible to remove unevenness and get good rounded protrusions. Mounting seams should be embedded with putty, and the joints should be punished with sickle ribbon.
Article on the topic: putty of walls in the bathroom - from varieties of putty to the process of alignment of walls with their own hands
Before starting putty, fasten the perforated corner profiles as follows - they must be used to ensure that the arches are preserved the form. The fastening of profiles is carried out on the putty, they are closed later by a layer of putty.
After complete drying of the swept layer, it is necessary to clean it all the irregularities of sandpaper. Now we apply a layer of primer and wait full drying. The arch put off the finish line and grind the last time. The next step will be decorative coating.
Selection of decorative coating
Mount the design of the arch is not so difficult. A little more attentive should be taken to the execution of the finish. The task is not easy to reflect the design. Do not everyone know how to make the arch so that she looks good in the interior, and also turned out to be practical. Periodically, the arch will be subjected to contacts with people passing through it, or carrying items, which can lead to damage.
Therefore, you should think about which of the decorative covers will be more practical in your conditions.
Wallpapers are chosen more often than other finish methods. Thanks to the extensive choice, the difference in textures, drawings, the color palette decor is obtained original, interesting. Vinyl wallpaper is considered better and more durable. Beautiful and wallpapers with a bulk pattern.
From a practical point of view, the best option is considered to be staining with water-emulsion paint. The surface is resistant to damage, and in the case of contaminants it can be washed. Many owners try not to just paint the wall, but also to supply the arch on her contour with beautiful painting.
It looks very noble, covered with decorative cloth. Here you can use the atlas or flax, pass, jute, viscose, jacquard, etc. It should be understood that far from every interior such a finish will be appropriate - it depends on the style chosen for the room.
The most reliable and surprisingly beautiful is a stone finish. Of course, such a cladding will be more expensive, but the result is worth it. And the service life of such a finish is very long.