
A rather complicated process is to install interroom doors from MDF with their own hands. The final result largely depends on the exact compliance with all operations. So that such work was completed successfully, it is necessary to strictly perform the sequence of all technological procedures.
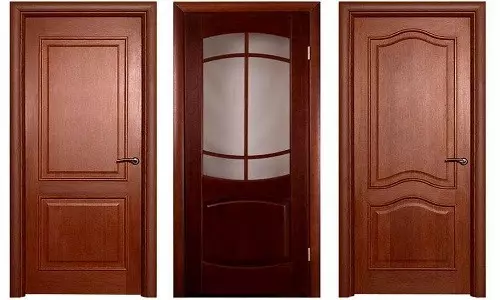
Doors from MDF are much cheaper than wooden, which is why they are popular with the consumer.
How should the room look like
In order for the installation of interroom doors to be successful, it is necessary to preliminarize the premises. For this, the following operations are performed:
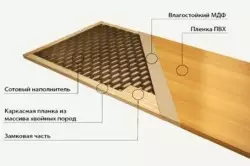
"Pie" MDF panels.
- Alignment of walls;
- shp clashing;
- Apply plaster.
After the end of wet works, the room is carefully dried. Drying must be done necessarily. Otherwise, the door can "stories". There must be exactly the future thickness of the main floor. The installation of interior doors will be made with their own hands, taking into account the dimensions of the threshold, its height. If only the replacement of doors is performed, then work can be performed immediately, since these conditions will not have any influence on the installation of the door. Mostly, the design is divided according to the principle of operation:
- swing;
- sliding;
- Folding.
Most often swing doors are used. They are very easy to install, but some of the useful area is lost. Today, several varieties of sliding doors are known:

The doors from MDF can be both single-handed and duplex.
- single one;
- bivalve;
- right-sided;
- left-sided;
- directed along the wall;
- Wall-directed walls.
These models are saved as much as possible. The disadvantage is the need to install the door frame, the doors have bad sound insulation. The presence of several flaps is typical for the folding door, which moves along the guides. Such doors are divided into several types:
- harmonica;
- books.
The harmonica can be replaced with shirma. The book is distinguished from the harmonica two sections, higher strength. A characteristic disadvantage is the fast breakdown of fastening fittings at large loads. There are a lot of different proposals for interior doors on the modern construction market. Each model has individual specifications, is distinguished by its form and dimensions. The main materials from which interior doors produce are:
Article on the topic: Tulle with flax and organza embroidery

The loops must be embedded to the depth in one plane with the end surface of the web and the door frame.
- wood;
- plastic;
- metal;
- glass;
- MDF panels;
- Various combinations of materials.
When choosing a model, it is advisable to consider the interior of the room and the functionality of the door. To make the right choice, you must first measure the dimensions of the doorway. Relying on this data, you can find the right door, but you need to know several nuances. Installing interroom doors is performed so that the gap between the door block and the base of the opening is preserved. It is usually 10 mm. So that the door does not occur, especially when the moisture change occurs, you need to create an additional gap between the door and block items. The clearance must be no more than 5 mm. The future door should not create obstacles with finishing workshops. Be sure to choose the interroom door, you need to make sure of its quality. Must not be:
- cracks;
- scratches;
- SCOL;
- other defects.
Required tools
How to install interroom door without a tool? This is physically impossible. For independent work it will be necessary:

Tools for mounting doors.
- hacksaw;
- level;
- chisel;
- drill;
- Perforator;
- mounting foam;
- roulette;
- dowels;
- self-tapping screw;
- a hammer;
- Waterpas;
- rectangle;
- screws;
- wedges;
- Finish nails;
- knife.
Self-installation technology
- First one is going to a wooden box.
- The top bar is bonded with screws with boxes.
- Mounted canopies.
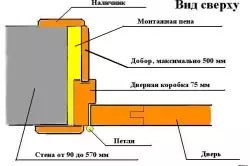
Installing the door frame in the opening.
Installation of the door frame in the opening is performed. Already fully assembled the frame insert into the opening. Wedges customize its position in all planes. Work should be monitored by the level. Wedges must have a length exceeding the thickness of the door frame profile, approximately 20 mm. The lower part of the box stand should coincide with the floor plane, and when the door block is installed, it is required that the floor has already lay an outdoor coating. At the next stage, the doorway is hosted. The pre-loop rack is screwed to the wall, then the canvas hang on them.
The rack on which the lock plank is attached, screw to the wall by self-draws.
With the help of the rails, check the correctness of all sizes of the door block. Then with force fix the box with screws. In the case of the presence of a threshold, it is fixed to the floor. All holes in the block are closed with plastic traffic jams. Next are installed platbands. Reinforced door fittings. The door performance is finally checked.
Article on the topic: The bathroom appeared scales: how to get rid of it?
How to install interroom doors from MDF panels yourself
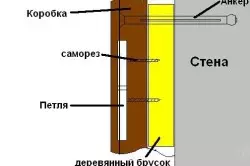
Fastening the door box on the anchor.
Such work by the forces to perform any home craftsman. You can do without the help of professionals. It will save both money and time.
First, the box is assembled. This work must be performed on the horizontal surface. Under the door canvas below and on top it is necessary to install two vehicles, they usually enter the components.
The bar must have a gap separating it from the door leaf, about 3 mm. From above, the timber is spilled at a right angle, then configure the top bar. Its length will be measured, there are grooves from the ends, in which the side bar is fixed with self-drawing.
Then the installation of interroom doors does with their own hands requires the attachment of the lower threshold, and its length must match the length that the top bar of the unit has. The mounting of the threshold is performed similarly to the fixation of the upper bar.
The next step is the mark of places where the door loops will be recorded. Professionals advise to install a loop, retreating from the threshold vertically 200 mm. Similarly, the upper loop is installed. The indent from the top of the box should also be equal to 200 mm. The chisel is prepared by niches, where the loops will be attached. The threshold is fixed by self-drawing. In the bars should be drilled in advance by screws under the screws. Then the door loops are installed. The design of the loop has some differences. They can be:
- bilateral;
- right;
- left.
When the installation is done, you need to take into account the direction of opening the door. When installing such interroom doors, two loops are usually installed. Before starting to embed the loops, it is required to make the markup of their location. It is performed by a well-sharpened knife, the pencil is not suitable here.
The chisel is cut down the grooves for the loop. The mounting of the loop together with the door block is carried out by self-draws. First, the holes are drilled for them, otherwise the doorway split can occur. The fully assembled box is installed in the door niche and fix. For mounting, wedges are used, which are inserted every 500 mm.
Article on the topic: Armrests for the sofa: making with your own hands
The door canvas is installed, while the vertical is checked by a construction plumb. After complete adjustment of the door with the mounting foam, all the gaps and gaps appeared. After drying, the residues of the foam are removed with a knife, then plated platbands.
At the last stage, if, of course, there is a desire, you can cover the door with colorless varnish. This work requires accuracy. A thin layer is applied and the time is given to dry out. Otherwise, the door along with the box can wake up. If one layer is not enough, several more layers are applied. Installation of the door on this is completely complete.