
Choosing one or another interior design, each person unwitting faces the choice, which prefer: a classic or a novelty. What kind of highlight add? Install the usual door or make an arch? If you choose on the last, but do not know where to start, on the question of how to make an arch in the wall, you will help to answer the following.
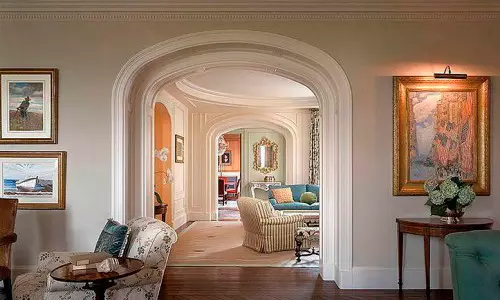
The arch in the wall will help make the interior of the room more interesting.
In order to make aesthetic and neat arches, you should use drywall. First, because the material itself meets all modern quality standards. And secondly, working with it will not deliver difficulties. The wall on which the arch should usually perform a connecting function with adjacent room.
Of course, those who are first faced with repair, it may seem that this is a very complex and time-consuming process.
So, what do you need to know about the arches? Standard arch in width is 2 m. These are ideal parameters. They are suitable for an ordinary doorway, which can be found in every home, panel type. No less common such openings in private houses.
Tools and materials
To make a frame that will be required for the Arch, you need to prepare the following set of tools and materials:
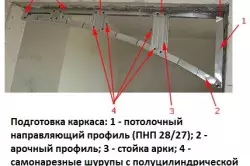
Device frame arch.
- Plasterboard. It is sold in a sheet form. The thickness of each sheet necessary for this type of work should be 1.25 cm. There is also another type of drywall - it is arched. They are used to make the desired design. And for its manufacture you should purchase one sheet of this type. By the way, the thickness of the arched plasterboard is 0.65 cm.
- Aluminum profiles. They are also divided into types, and you need a rack type, 60 * 27, and a guide type profile, the size of 27 * 28. The first should be prepared in an amount of 1 pc. And the profiles of the second type will be needed in the amount of 4 pcs.
- Do not forget the arched corner. It must be reinforced. And they will need 2 pcs.
- Drill.
- Screwdriver.
- Saws.
- Knife for cutting drywall.
- Building level.
- Scissors for metal.
- Pencil.
- Construction line.
Article on the topic: Device and installation of a soiled toilet bowl
After you have prepared the necessary set, you can proceed to the manufacture of the arch.
How to make the arc from drywall: features
First you need to decide on the radius of the arch. It is selected individually. There is no single magnitude.
Mounting plate of plasterboard to the frame of the arch.
Before starting work, you need to imagine how future arch will look like. How harmonious it will fit into the interior. Do not make it edges highly rounded, as you not only reduce its volume, but also looks like this design will be too easy.
Some people prefer the arch in the form of the right circle, but they eventually facilitate such a problem as inappropriate for large-sized items. You will not be able to put a massive cabinet to the room without damaging the edges of the arch or wall.
The optimal variant of the radius is slightly rounded. Ideally, he must coincide with the width with the opening wall.
After you decide on this value, on a sheet of plasterboard with a conventional rope and pencil, you should make markup. In this case, the rope is used as a self-made circular. The center of the sheet is the point on which the axis will pass.
How is the markup of the future arch?
In the center of the leaf you put a mark. At this point you need to screw the screws. On his base under the Hat, tie a lace or a thin rope. At the end of the cord, tie a pencil. After that, pull the cord and drive the leaf of plasterboard. At the end you get the outline.
After you made a markup, surplus drywall you need to cut off. It is enough to apply a regular knife. Some people prefer to use hacksaw.
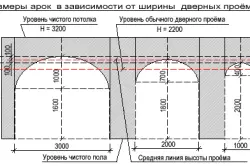
Arch dimensions depending on the width of doorways.
Cut the plasterboard must be carefully. First, it is put on the floor. You can use the table, but not all at home there are suitable tables.
Article on the topic: Black White wallpapers: Photo in the interior, black background, white with black pattern, black with white pattern, golden with flowers, black friday, video
Before you start cutting, the floor should be displayed with paper. This will save it from extra dust and dirt.
Cutting plasterboard, you will receive two elements, one of which will perform the function pattern, and the second will be a mirror reflecting part.
After completing the production of blanks, you can start the frame assembly. It is made of metal profiles. Frame size, these are values measured by lecture.
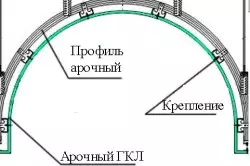
A guide type profile You must attach both to the ceiling and to the walls, in the form of parallel strips. The thickness of the arch is the distance between profiles laid parallel to each other. Ideally, it should not exceed 20 cm.
Be sure to consider the thickness of sheets of plasterboard. Attaching it to sheets is performed using self-samples. The distance between them should be respected within 25 cm.
The next step is to measure the length of bending. After you have done measurements, a copy of the arched bend is made from the profile of the guide type. To do this, on the profile with the help of metal scissors, cuts are made.
The manufactured bend frame is attached to the arch screws.
They can be screwed up with a small interval.
Then you need to make jumpers. They are needed so that the arch has become tough and durable. To do this, the profile of the rack type is cut into the strip, the length of which coincides with the arch thickness. Running frequency - 1 unit. for every 10 cm.
After making the frame and its installation, you can begin to sneak it with arched plasterboard. It is thinner than the previously used material. Therefore, it is necessary to work with it.
To break the drywall when creating bending, it is pre-wetted with water and installed in the slope to any surface. To this end, you can use a regular chair.
After completing this technique, after a while, you will get the plasterboard lane. To give it the desired angle, you should use a needle type roller.
Article on the topic: How to combine wallpaper correctly: features, correctly and beautifully choose the wallpaper
Do not strongly wet the sheet. It can boil with water and break.
The final stage of the arc manufacturing is the attachment of arched corners at the edges. They are needed in order to accurately apply putty and customize it under the plane of the walls. To do this, the joints are glued, and then put it.
How do the arch work after the manufacture?
After the design of the arch is ready and attached to the wall, it is trimmed with plasterboard. Then it will be necessary to perform work on the extraction of the surface.
First, it is covered with a layer of primer. Immediately after its application should be suspended. It is necessary that the primer is completely dry.
The next step is putty. It is needed to remove irregularities and small holes arising in the process of work. When putty dried, the arch is cleaned and start finishing work.
By the way, if you want to make the built-in backlight in the arch, then the holes for point lights should be done in advance.
In order to make the arch in the room, do not make much effort and lose a large amount of money. But despite this, many people often appeal to professionals. How to make an arch without resorting to the help of builders, the question that worries many people. To save on construction work, you will need to prepare a minimum set of materials and tools and for some time on the manufacture of the arches in the wall. You will always succeed.