
Typically, the door structures are purchased with hinges mounted in them. However, there are often collapsible options that require self-assembly. How to install the loop correctly, in order not to see the distortion of the whole design? Studying the sequence of installation of these elements will significantly help in solving the problem.
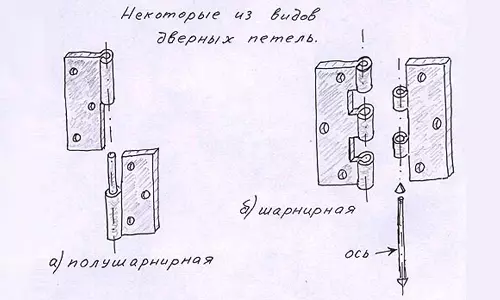
Types of door loops.
List of necessary devices for work:
- Loops.
- Chisel and hammer.
- Screws and screwdriver.
- Pencil.
- Wooden wedges.
- Level.
Fundamentals of door loops
Any canvas has door loops. Their quality affects the process of opening and closing the sash. These small parts in size carry a tremendous load. The correct installation will determine the further operation of the door.
The basis of the manufacture of such structures contains such materials as steel and brass. The first version of the raw material is characterized by nobility of the coating, but it is inherent in some softness of the base. Over time, such substances easily lose form. Brass door hinges are suitable for installing interroom designs.
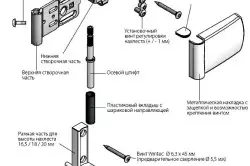
Diagram of the loop device.
Steel options are distinguished by an incredibly strong coating, the details of such a plan characterizes the highest quality and reliability.
Such elements can be seen on the input structures. Intermediate samples of door loops can be considered door loops from zinc alloys. They are much stronger than brass elements and can withstand considerable weight.
Different options for loops
The samples under consideration differ in the materials of manufacturing and constructive capabilities:- Screws have the appearance of two wings that are fixed on the box and the door.
- Curlons allow you to prevent the penetration of unauthorized persons to the room. Such samples are not cut. Characterized by a long period of operation, equipped with a bearing mechanism.
- Overhead.
To properly install the door loops, it is necessary to clearly define their quantity. The dominant importance is the weight of the structure.
Article on the topic: Laying of laminate: types, types, instructions
So, if earlier, when installing doors, 2 elements were used, at present, 3 loops are installed to increase the reliability of the attachment. Massive samples of the canvas involve the use of four and more components.
Marking of the door frame under the loop.
To understand how to install door loops, you need to understand some important moments. Thus, the standard design involves the use of two such elements. 3 loops are installed on heavy metal and wooden forms. Before starting work, the cloth laid on the edge: in this way you can noticeably simplify the installation. And it is known that inconvenience in the work may not best affect its quality.
Not last in the process of installing loops occupy tools. On the eve of the work, the chisels should be well sharpened, and they should be of different sizes. They can carefully cut the grooves under the loop.
Cutting loops, main stages of mounting
Install door loops can be clearly holding certain rules.
So, focusing on the door leaf, it is worth noting that these small elements must be located at a distance of 20 or 25 cm from the boundaries of the canvas. Special attention should be paid to its surface: the presence of bitch, cracks and breakaway elements are not allowed. Screwd at such a base, the screw will finally destroy the box and lead to its distortion. In the deformed coating it is impossible to insert door hinges. The presence of such places on the surface makes them possible to fix in a slightly shifted plane, for which the standard distance is moving a little up or down.
So that the interroom door is installed securely, it is necessary to mount the loop according to the rules. Many professionals use an elevated or deep fit into the nest.
To properly install the loops, it is necessary to make a recess equal to the thickness of the element itself.
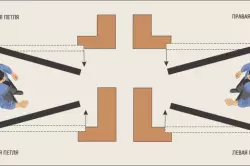
Scheme for determining the choice of loops.
Traditionally, the pockets begins with marking. As mentioned above, distance from the top and the bottom of the design corresponds to 20 cm. You should also set the arrows that determine the direction of the location of the loops. In this way, confusion can be avoided.
Article on the topic: Tile on the concrete wall: how to glue a tile, stick and put it right
The loop is applied to the marked points, aligned along the edge, with the help of a pencil its outlines will be shown. The exact markup of the contour will allow deep secure this item in the hole.
You can avoid sliding loops by attaching them for some time to the door canvase using two screws.
Sampling for installed loops
To carry out this stage will help the use of a milling and a conventional chisel and hammer. With the help of a wallpaper knife cuts the boundaries. Next, the chisel is given to the deepening of the specified sizes, it usually corresponds to 2-3 mm. According to the marked contours, the sample makes a similar depth.The use of a sharp knife involves cutting wood along the location of the fibers. The cross position involves capturing a thin layer of veneer. Based on the size of the scratch. It introduces the sharp edge edge and kick across the handle.
In the process of cutting the groove, door loops are applied to the finished place. Sille marked points for drilling. For this, drills with a diameter of 3 mm are taken. So you can preserve the integrity of the canvases. Then the loops in the finished hole are mounted with self-draws. Their caps must be a little over the surface.
Once the loops are in their place, the door lean to the base of the box. The outlines of the loops are dragged on the door leaf. Then the complex is repeated. As soon as the loop installation system is mastered, you can safely begin the installation of the closers.
Practical recommendations of specialists
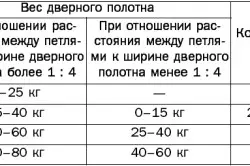
Table determination of the number of hinges for the door.
Door loops, as one of the most important elements of the design, must be installed correctly. Failure to comply with the main stages often leads to the emergence of problems such as creak, strain, poor opening and closing. Therefore, it is so important at the beginning to get acquainted with theoretical information, and then proceed to the implementation of practical actions.
Make a design as securely help some tips. After the door is installed in its place, the horizontality and verticality will be clearly designated, the average screw is twisted from the upper loop. Screwd long screw will provide reliable mount on the wall. The same is done from the bottom loop.
Article on the topic: Aluminum eaves: varieties, advantages and disadvantages
Separate modern designs are so strong that it is impossible to make a hole in them. In this case, you can knock the groove with a milling machine. In complete, the chisel can finally arrange this hole, after which the base is drilled, and the loops are fixed on it.
Setting the loops, it is important to consider that a space of 1-1.5 mm should remain between the door and the box, and from two sides. This will be the so-called temperature gap associated with the expansion and drying of the wood due to the influence of external factors. Regardless of these conditions, the functioning of the door should be stable.
The correct implementation of the main work concerning the installation of the loops on the door will be the key to the success of events. The elements of the modern sample, mounted in the door, are easily adjustable, the functioning of the structure will be well controlled. The cloth is hung in place, after which you can safely use the new design.