
If you decide to make repairs and found that the walls in your apartment are uneven, do not necessarily hire specialists and pay them big money for plaster. Now there is a simpler way - the alignment of the walls of plasterboard. Today we will tell about the nuances of the attachment of plasterboard on the walls and show the video, as is done in practice.
Here are two ways to attach plasterboard sheets:
- consolidate them on the frame of metal profiles;
- Glue the wall.
Sometimes to achieve a better result, you can combine these methods.
The most reliable option is to secure drywall on the frame, but there are devices here. The thickness of the profiles creates a basis for a minimum of 4 cm, and it is a lot for a small room.
Let's look at the alignment of the walls of plasterboard with a frame for more.
Preparation of walls
The minimum surface preparation is required. We recommend removing the old layers of plaster and drank, otherwise they will take an extra room area.The surface of the surface is not required, but desirable. Treat the wall by the antiseptic, since after mounting the plasterboard it will not be available.
Using the level you need to draw on the floor and the ceiling of the line, which will determine the border of the future wall.
Creating a carcass
If you have already dealt with the creation of a frame for plasterboard structures, then you should not have problems with this stage.
The framework of the framework is as follows.
- First, it is necessary to find out the zero plane from which the whole wall will be equal. Select the most protruding angle and take a nail there so that it is sticking to the length of the profile (4 cm). Now you need to take a plumb, leaning his cord to the edge of the nail in such a way that the Georgian hung over the floor without touching it. Having waited until the plumb will stop swing, measure the distance from the load from the roulette to the wall and take another nail with the desired departure. Repeat the procedure from the other edge. You must have a square, which must be denoted by pulling the line.
- On the perimeter of the new design (on the floor, walls and ceiling) the starting UD profile is mounted. It is fixed with dowels directly to the concrete, so you will definitely need a perforator. The edges of the profile should go outside to insert jumpers in them.
- Basic CD profiles are installed in the borders obtained. The sheet of drywall will be secured directly on the profiles, so they are installed with their edges to the wall.
- The first profile is located at the corner of the wall in a vertical position, and the following - with a step of 60 cm. The last profile is mounted similarly to the first, even if the distance from the penultimate jumper is less than 60 cm.
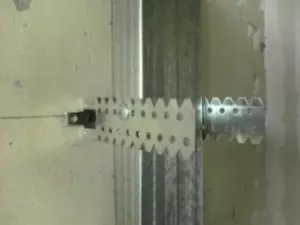
- To give the structure of stiffness, transverse profiles are additionally fixed to the wall on the suspension. After fastening the suspensions, the "letter P" bend and allow to consolidate the profile on the required width. Be sure to check the smooth design using the level. For convenience, first install the suspensions, and then mount the transverse profiles.
- If your walls are higher than the standard 250 cm of the height of the drywall, then it is necessary to cut on top and fix the strips from GCL. In this case, add a number of horizontal jumpers at a height of 250 cm. They will allow strips along the edge.
Note! It is necessary to retreat 60 cm from the center of the profile. Such a distance allows you to mount the drywall sheet 120 cm. At the edges and in the center.
On this video, the process of plastering walls by plasterboard on the frame of profiles is shown:
Installation of plasterboard
When the frame is ready, you can proceed to its trim.- For fastening sheets of GLCs to the profile, black screws of 35 mm are used. Self-tapping heads are slightly drowned in the gypsum so that you can close them with a putty. For this work you will need a screwdriver.
- The sheet is applied to the edge of the wall and with a step of 10-15 centimeters around the perimeter and fastened to the frame. To facilitate the process on many sheets of GLC, there is a special line in the middle.
- To cut off part of the required size, spend on the upper layer of cardboard with a knife-cutter and break it on the angle of the table. Then reserve the paper layer.
This can be considered the stage of alignment of the walls ended. It remains only to smell the seams and proceed to the finish finish.
Finish finish
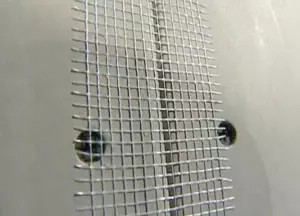
Before Spakly, apply a self-adhesive reinforcing ribbon to seal the seams in order to sharpen the seams of the drywall, along all locations of the sheets of sheets are glued with the reinforcing self-adhesive grid, for additional protection against cracks - glass cholester.
On top of the grid, apply a putty, which lines the deepening of the seams.
This will be enough if you decide to lay a tile or thick finishing material. For painting walls from drywall or bleaching wallpaper, it is necessary to cover the entire area with a thin layer of putty. The layer should be a thickness of no more than 2 mm.
After drying the putty, stick the surface to perfect smoothness. If necessary, apply additional layers of putty locally.
We also recommend reading our article about alignment of walls in the bathroom and kitchen.
Alignment of walls by glitting of drywall
The following method will allow the alignment of the walls with plasterboard by sticking it. For this you will not need to suffer with the creation of a frame and reduce the area of the room. In this case, at the preparation stage, it is extremely desirable to remove all protruding surfaces and bugs from the walls.
- To increase the adhesive (adhesion) properties of materials, be sure to treat the wall with the primer.
- In advance, do the sheets of the desired length in advance, while it is important to leave below and on top of the distance for the gap, which will help the adhesive to dry faster. This is usually 1 cm below and 0.5 cm on top. So that the sheets of GLCs have not slipped after sticking, find a stand for them suitable for them.
- On the entire surface of the wall, the holes are drilled for the dowels that will act as limiters. They are screwed into them in such a way that the hats are located at one level. So, the dowels will not allow you to go clinging to the wall of the drywall sheet is stronger than necessary.
- The alignment of the walls of the plasterboard without a frame is usually produced using a dry adhesive mixture KNAUF PERLFIX. It is divorced to the pasty consistency right before use, as it quickly freezes.
- The glue is applied to the rear layer of sheets with abundant slices and stripes around the edges to the center with a step of 20-30 cm. You can not spill them, the handhes should turn out to be volumetric so that when docking, fill the recesses. You can apply glue to the wall itself, and not on plasterboard, if you are more convenient.
- Apply a sheet with glue to the wall and press close to dowels. If necessary, knock on the plasterboard with a rubber hammer. In order not to break the sheet, put a piece of the board under the hammer.
- When the surface of the walls is strong uneven, you can first glue the intermediate layer of strips. When they are sacrificed, complete sheets are glued on top. The scheme of the alternative version of the plasterboard sticking is shown in the photo.
- When the glue is finally dry, you can start further work on the finish finish, as described above. The drying time of glue is written in the instructions on the package.
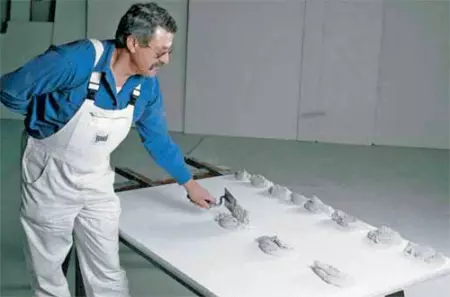
If you perform a small amount of work, you can make glitter for drywall with your own hands. This will require putty, water and PVA glue. In the capacitance of the required size, type water and add putty. The resulting mixture thoroughly stirrate the building mixer or a drill with a nozzle so that there are no clots and lumps. It should not be too thick or liquid, otherwise it will work uncomfortable.
In the mixed solution, add PVA glue, approximately 1 liter by 13-15 kg of putty. Stir it again and in a couple of minutes, proceed to sticking.
Such homemade glue is almost not inferior to purchased counterparts, but it dries longer, so it is recommended to fix the sheets of GLC after gluing so that they do not "slip".
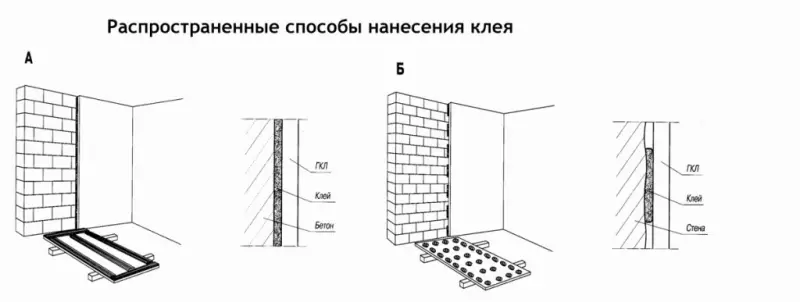
Popular Methods for applying glue
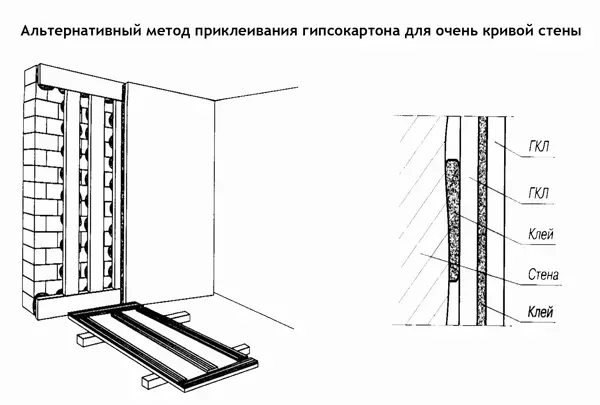
An alternative method of glitting of drywall is suitable for very curves of walls.
The process of mounting sheets of plasterboard on the walls is shown in the video:
Conclusion
What method of alignment of the walls you would choose - with the help of a frame or sticking, in the end you will get a perfectly smooth surface. These works will not take you a lot of time. You will not need to spend money and nerves in order to hire workers' brigade for plaster.
Article on the topic: Do you need a pump for warm water floor?