
Any construction work should begin with planning, and the construction of gardening altani or gazebo is by no means an exception. Of course, the easiest way to order a draft rectangular arbor by professional engineers, but in the presence of certain construction skills, you can cope with the task and on your own. Moreover, there is nothing particularly difficult in the design, which means that we will only have to accurately withstand the sizes.
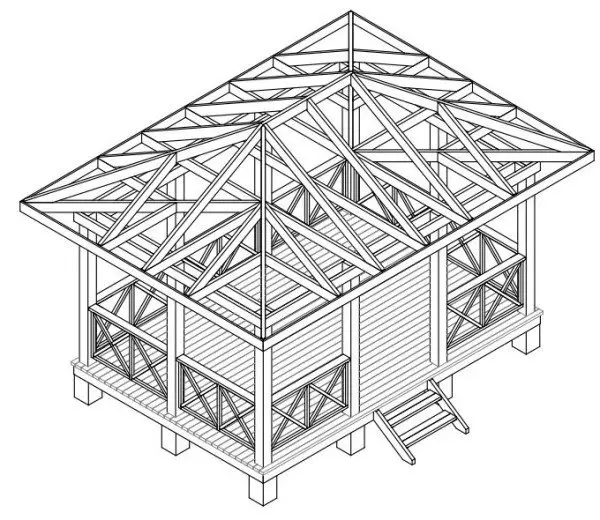
General design scheme
Design of arbor
Size definition
Before starting to build a drawing of a rectangular arbor, we need to determine its dimensions:
- Firstly The structure should be placed on our site, and at the same time do not interfere with movement. Ideally, the gazebo needs to be placed on removal from residential and economic buildings - this approach will provide optimal conditions for a comfortable stay.

Option with standard sizes
- Secondly , inside should be spacious enough. If we are talking about rectangular models, they are initially planned as canopies for a fairly large number of people. At a minimum, your whole family should be placed there with comfort.
- Ideally, the width of such a structure should be from 2.5 to 3.5 m, and the length is from 4.5 to 6 m. We will make less - it will be closely, and the design with large dimensions will look at cumbersome.
Note! If it is planned to install a focus or barbecue, then in this case it is necessary to lay in one of the ends of approximately 2x3 m. This stock is necessary for the smoke and heat from the coal interfere with rest.
The selected dimensions can be adjusted in the process of building a detailed plan. Naturally, it is necessary to do this so that the overall dimensions will not "get out" outside the area allotted for the construction site.
Project Gazebo Pagoda
When it was determined with sizes, you can take a line or for a special computer program. In any case, the principles for which we will maintain the construction remain unchanged.
Articles on the topic:
- Projects Arbor
- Drawings Gazons for giving with dimensions
- Projects Arbors for giving
Building a drawing of the base
Start the design is needed from building a base scheme.
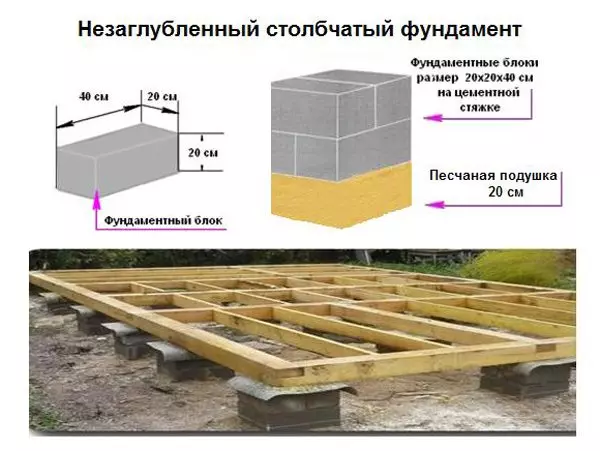
As an example, we will take a column foundation from concrete blocks 250x250 mm:
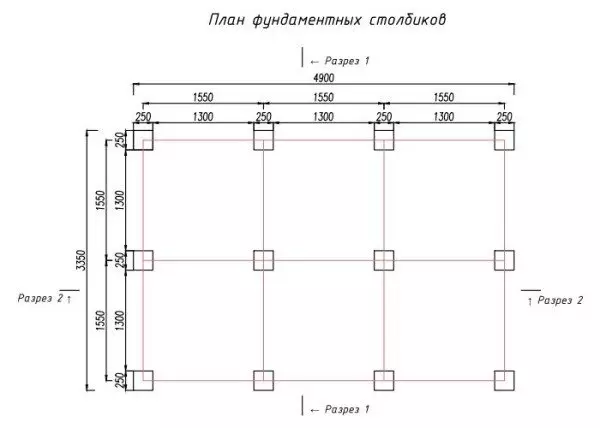
Foundation Plan
- On a sheet of paper (it is desirable to use a millimeter - so a newcomer will be much easier to avoid errors) we apply the structure of the structure in accordance with the selected dimensions.
- On the drawing we apply axial lines passing through the middle of the long and short side.
- Focusing on the position of axial lines, we note the places in which the installation of foundation elements will be carried out.
Article on the topic: Options for performing thresholds on the balcony door
Device and appearance of the base
- Supports need to be placed uniformly. For example, for an option with a 3,4 width and a length of 5 m, the optimal step between concrete columns will be 1.4 m, as shown in the diagram.
Note! Based on the fact that we will mount the supports of 250x250 mm, the step between the centers of their nests during installation will need to be made 1500-1550 mm.
- Next, we need to perform the drawing of the strapping. Using the previous scheme, and better - making it a copy, we apply the image of the BRUSEV on the paper. As a strapping, it is best to use a wooden timing with a cross section of 150x150 mm or a 50x150 mm board, which must be reflected in the drawing.
- It is also necessary to schematically depict the design of the string adjacencing node to the base, including the fastening elements and the waterproofing layer of the rubberoid or waterproof membrane.
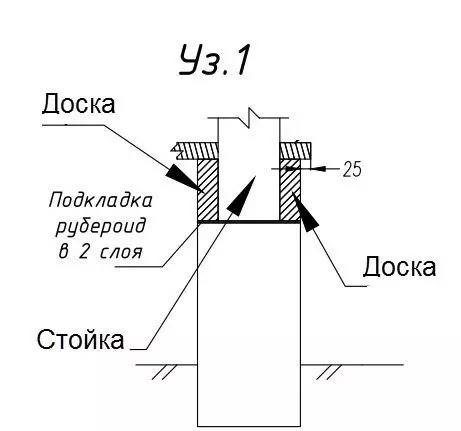
Stand mount assembly
- In completion, separately draw the flooring device. As a rule, in the arbors of this type there is enough single layer of a massive board laid on the lags.
Separately, the situation with the installation of a stationary furnace or mangala should be considered. If the mass of these devices is large, the floor, made by ordinary technology, may not withstand. That is why under the oven it is worth pouring a separate foundation, designating it in the drawing.
Articles on the topic:
- Project Arbor with Barbecue: Drawings with dimensions
- Gazebo 3x3 do it yourself: drawings and sizes
- Projects Arbor: drawings and photos
Development of carcass details
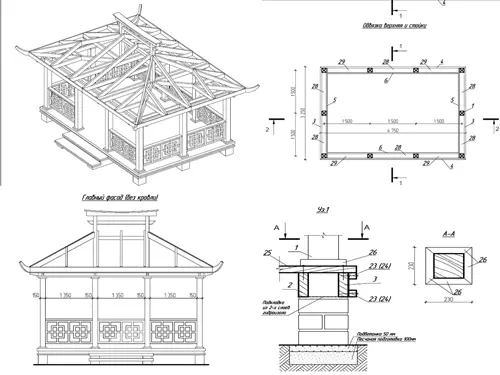
When the base scheme is ready, you can move to the construction of the frame. In most cases, the drawings of the rectangular gazebos are built in several projections (view long and short side view), which makes it possible to obtain an idea of the general form of the finished facility.
For a start, as in the case of the base, draw the general contours of the structure. Here it is necessary to choose the right height.
The optimal parameters are as follows:
- From the zero mark of the soil to the skate -4 - 4.5m.
- From the soil level to the ceiling - 2.8 - 3m.
- From floor to ceiling -2.3-2,5m.
- Base - up to 0.5 m.
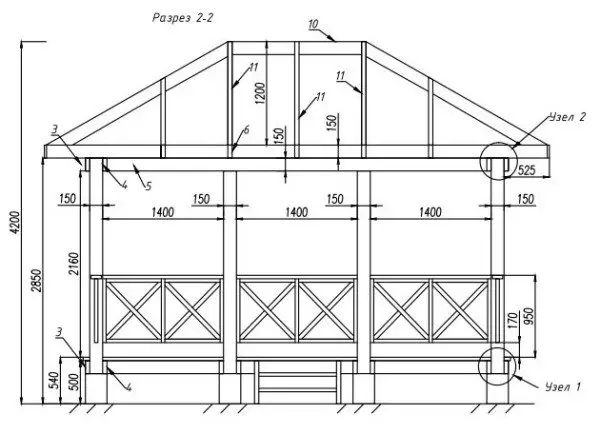
Lateral projection with heights
Article on the topic: How to make an arch in the apartment: Stages of work
Noting these heights in the diagram, proceed to the image of individual elements:
- First of all, we make the drawing of the racks, following the placement of their placement coincide with the placement of the supports of the foundation.
- Then connect the racks upper strapping, if necessary, portraying the ceiling flooring.
- Between racks we apply schematic images of fences. The fences themselves should be built on a separate sheet on a larger scale.
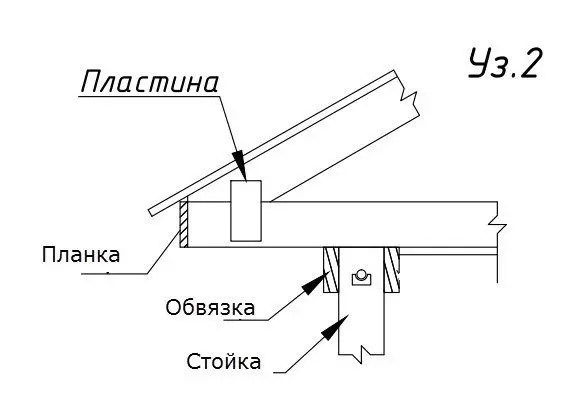
Scheme fastening rafal
- At the top of the scheme, the shafts of the rafter connected to the skate bar. To facilitate the design, it is also possible to make a drawing, showing the upper projection of the timing of rafters - so it will be easier for us to navigate when installing.
Tip! As in the case of the adjoining assembly to the foundation, the location of the rafter to the upper strapping is drawn separately.
- At the final stage of the work, we put the elements of the finish: handles, stairs, decorative parts IT.D. It is necessary to place them in such a way that they do not reduce the performance of the most structures.
As we noted above, this instruction can also be implemented through computer programs. Naturally, practice is needed to use them, but as a result, in addition to the drawing, we can get a three-dimensional model of future Altanka, and imagine how your plot with this new structure will look like.
Materials and technologies
What makes
By performing the construction of drawings with your own hands, you need to constantly keep in mind what materials for work we have in stock. And it is, based on this, and the scheme should be applied to the scheme.
For example, to build the arbor described in the example, we will need:
- Concrete supports 250x250 mm high of about 1 m.
- Racks from a bar 150x150 mm with a height of about 2.5m.
- Boards or bars for strapping (50x150 mm, from 3.5 to 6 m long).
- Ceiling beams (50x150 mm, length - 3.5 - 5.5m).
- Rafyled (40x120 mm).
- The ski bar (50x150 mm, 2000 mm long).
- Plaques for flooring (40x100 mm).
The nomenclature of the used sawn timber is quite extensive.
We will also need:
- Elements of fencing (polycarbonate sheets on the frame, lattice wooden shields IT.D.).
- Boards for crate and trim.
- Casual boxes for window structures (if any projects are provided).
- Fastening elements.
- Roofing material.
Decisive factors when choosing these parts are your preferences, as well as the availability and price of certain materials in your region.
Articles on the topic:
- Drawings Tree Arbors Size
- Metal arbors do it yourself: photos, drawings and schemes
- Corner gazebo
Article on the topic: Filling a warm floor with your own hands: Technology
Features of the process
The process of mounting the arbor does not occupy a lot of time.
Works in such a sequence:
- We carry out the geodesic survey of the area by defining its bias and choosing the most smooth area.
- Using the construction level and theodolite, perform the markup of the site according to the built-in baseline.
Tip! This stage is better to entrust professionals.
- By markup, dried holes for installing the foundation supports.
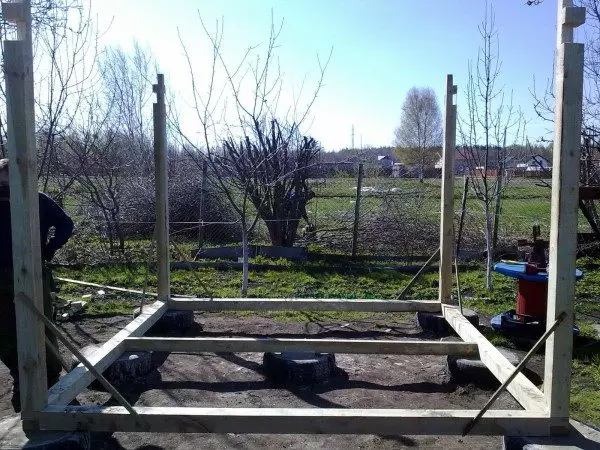
Works are carried out according to plan
- Having laid the gravel pillow in each hole, install and concrete supports.
- If wooden beams are used as supports, then they can be aligned by trimming. But the concrete pillars for the gazebo should be immediately installed extremely smoothly, controlling the compliance of the step of the step laid in the project indicators.
- On supports lay a layer of rubberoid for waterproofing. On top of the runneroid fasten the vertical racks connected by the strapping boards.
Note! The design of the connection node with a foundation with a foundation can be the most different, so it is worth studying the most affordable engineering solutions.
- We connect with the strapping of lags to which laying the gender. If a board is used from an expensive material, then at the time of construction can be replaced by its temporary flooring.
Then go to the assembly of the upper part:
- To the racks are dripping upper strapping.
- Focusing on the constructed schemes, cut out the grooves for fastening the rafter. We install rafters and offs, connecting them with a skate
- On the rafters fix the crate under the roofing material.
In principle, on this task of the built drawing can be considered completely performed.
Next, we have only a cosmetic finish:
- Between racks fix the details of the fence.
- Where it is provided for by the project, set the glazing.
- We put the finishing floor.
- We carry out the finishing treatment of all surfaces - grinding, dedusting, treatment with bactericidal agents.
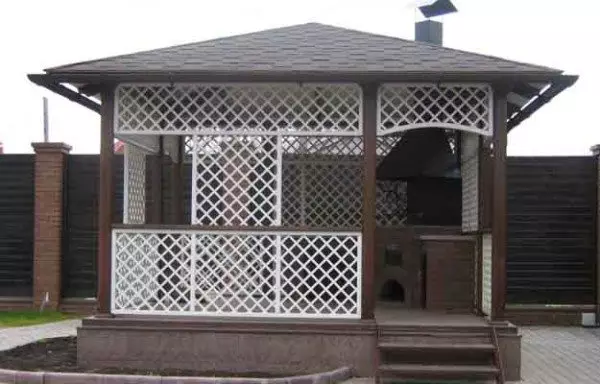
Photo of the finished facility
As a rule, the last touch is the attachment of the entrance staircase and the installation of interior items, including the brazier.
Output
Quite detailed drawings of rectangular arbors can be found online on our website. At the same time, the independent construction of the scheme is also quite able to anyone who has at least a minimum idea of engineering graphics.
Guided by the councils given, as well as viewing the video in this article, you can master this technology, and depict your future gazebo on paper or in the design program.