
If you want to quickly and cheap the walls of the arbor, and at the same time not to do it completely closed, then the best option will be the use of a wooden lattice. You can buy ready-made options, or make it yourself. In this article we will tell you how to make a lattice in the gazebo.
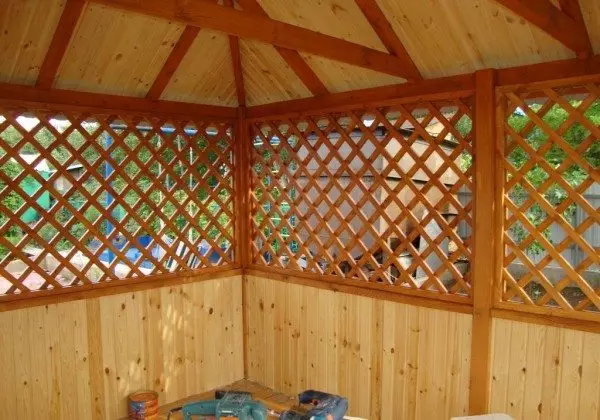
Closing windows in a gazebo with a wooden grid
Making a grid on your own
Wooden grilles can perform several functions:
- Fencing the walls, close and decorate an unsightly look.
- Used as a base for curly plants. These are the so-called trellis.
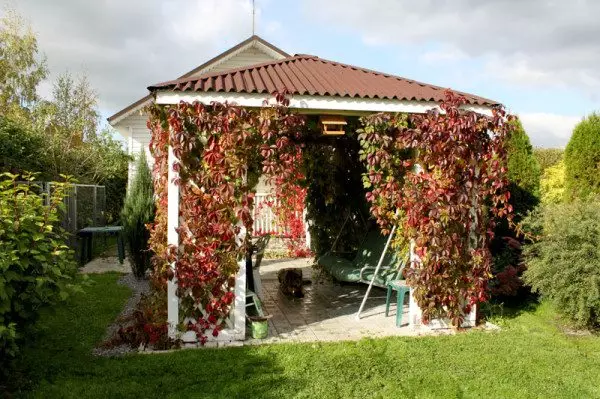
Curly plants on the walls of the arbor
Depending on this, the sizes of the cells and the installation method may vary. For example, a small cell size is made for the decorative lattice to maximize the overview. If you make a lattice for plants, then a larger lattice is made so that they can grow freely.
Articles on the topic:
- Decorative lattice
- Masking Mask for Arbor
- Curly plants for gazebo
Assembling lattice panels
The first way to make a lattice on the arbor is more complex, but is suitable for those who want to make them beautiful and carefully. You will make the finished panels, which can then be consolidated in any place.To do this, you will need a manual milling machine, a circular table and a reissue. If you do not have this tool, you can order ready-made rails in the joinery workshop.
If you say briefly, then at the beginning the board is grouped. It makes transverse grooves on half the depth along the entire length of the board. Then it is cut into thin rails, each of which is driven through the flight so that they are all the same thickness.
Article on the topic: How to calculate how many tiles need to be on the bathroom?
They join the groove in the groove at an angle of 45 degrees, and it turns out a smooth mesh.
- First of all, you need to achieve a uniform distance between the grooves made.
Homemade pattern for cutter
- To do this, a homemade pattern from plywood is screwed into the cutter. From the blade you need to retreat the distance that will be equal to the cutting of the grooves, and glue the guide to the template. The width of the guide must be equal to the cutter diameter. As a result, you can drive a cutter along this guide, and each new row will be the same.
- The board is fixed to the table with clamps and it makes transverse poses for the entire length of the template made.
Slowing groove
Note! The depth of milling must necessarily be equal to half the thickness of the board.
- Now you can cut the board on separate rails. To do this, set the limiter from the bar to the circular machine. It should be fixed from the saw blade by 1 mm more than the desired thickness of the allowance for the allowance.
Cut boards on separate rails
- We hold the board along the guide bar and cut it into thin rails. So that they turn out to be smooth, the bar must be fixed in parallel with the saw blade. Special attention in the work is given to the safety technique, do not put your hands next to the blade.
- Then each rail is passed through the reysmus so that their thickness is the same. If it is not, then you can get excavated them with your own hands.
Assembling lattice
- It remains only to collect ready-made rails perpendicular to the groove in the groove. Additionally, each groove must be glued with PVA glue. After that, you can consolidate it to the collected frame of the arbor on the nails, pre-winding the hole to avoid cracks.
You can clearly see how to make a grid for a gazebo on video in this article:
Articles on the topic:
- Wicker arbors
- Grid for gazebo
Article on the topic: Floor screed: What is better dry or wet
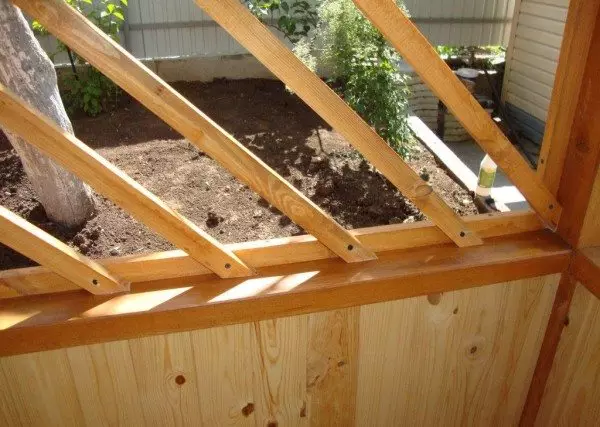
Assembling lattice on the finished frame
The second way is simpler and fast. To do this, thin rails 20 * 5 mm are written on a circular machine from the grilged board.
Instructions, how to make a crate on the gazebo looks like this:
Self-made grill of thin rails in the photo
- In the empty cells of the arbor, for example, under the railings, a doomer is nailed around the perimeter, to mount the rails. The angles of the docking frame are cut at an angle of 45 degrees.
- For mounting slats at an angle of 45 degrees, markup is made in the crate on the crate. To do this, you just need to postpone from the corners the same distance with the desired step.
Fastening
- Then the rails are nailed from the opposite side. So that the nails have not crackled thin boards, you can pre-drill them, or shut down the heads of the hammer with a blow.
- You can leave the lattice in this form, or add a second row of cross-planklocks.
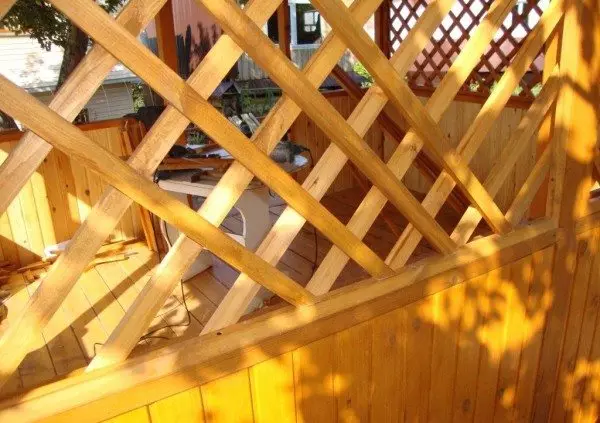
Cross rails
- After installing all the rails, they close the frame around the perimeter from the second side.
Lattice decoration
Give a wooden grid. A beautiful view can be placed a magnificent rigging plant. In our conditions of a short summer period, it is important to use unpretentious and fast-growing belts: maiden grapes, actinidium, rose plenty, hops, ivy.When landing, take into account that the snow does not fall on the plant and water from the roof, otherwise they will not live for a long time.
You can get an additional effect by painting the grille into a combined color with a plant.
- The win-win version is the color of natural wood, black, bronze or "under rzavchin".
- Bright yellow or pink roses will look beautifully on a blue lattice.
- Dark red will be good on a white background, and light flowers on the contrary - on the dark.
Tip! If you can fine girlish grapes, you need to pay special attention to the mounting of the lattice. This plant is not demanding about the care and sometimes growing even more necessary, the lattice may simply overtop the lattice.
Conclusion
Decorative lattices will allow you to quickly close the walls of the arbor, make the basis and plant the belts that will protect you from the bright sun. The price of ready-made options is approximately 1 thousand rubles per square meter. To increase their durability, cover the tree with impregnation or varnish in several layers.
Article on the topic: Step-by-step installation of the air conditioner with your own hands (17 photos)