
Before starting to install, it is necessary to carefully examine the surface. For room with high humidity, special moisture-resistant GKK and the corresponding fasteners are selected. Depending on the wall surface in the bathroom, the suspended fastener is mounted in the wall using a screw or a clogged dowel.
Before starting to install, it is necessary to carefully examine the surface. For room with high humidity, special moisture-resistant GKK and the corresponding fasteners are selected.
Installation of profiles and work sequence
In order to produce suspended fasteners on the wall in the bathroom, you will need the following tools:- screwdriver;
- hydroelectric or laser level;
- Scissors for metal;
- plane;
- roulette;
- Corolnic;
- a hammer;
- Knife designed for drywall cutting;
- shock perforator;
- aluminum level of different sizes;
- chalk or pencil;
- rule;
- tracer.
For this room there is a special moisture resistant plasterboard. If the material in the bathroom is mounted on a concrete or brick wall, you must use a dowel.
If we are talking about a wooden coating, special self-tapping screws will fit. When the walls of drywall in the bathroom is trimmed, you will need additionally longitudinal connections for the profile, "crab" (for one level), screws and screws for metal.
Compliance with the sequence of work
Before fastening the drywall on the walls in the bathroom, you must install the framework.
The phased course of work, which provides for moisture-resistant plasterboard during installation:
- Preparation of the surface in the bathroom. This includes a bevel of plaster, stripping.
- Wall markup, including shelves, if planned, labels for fastening the guide profiles (PPN), which will go around the perimeter. This type of work provides for the use of coarse-carved screws or dowel-nails.
- Marking of fixing direct suspension, rack profiles. Marking of places where shelves are planned.
- The fasteners of the racking profiles to the guide profiles (shelves, niches are provided), complete fixation on direct suspensions.
- Wall sheath material. Moisture-resistant material is attached using self-tapping screws.
- Primer and putty in the bathroom.
- The final stage on the finishing of the seams and places of recesses for screws with the help of a spike material.
Article on the topic: how to make a cape on the sofa do it yourself
Installation of the supporting structure, taking into account shelves and niche
Installation work in the bathroom is made from markup. First of all, with the help of a painting cord, markup on the floor is applied. The lines are made clearly and exactly why the guide profiles (PPN) will be mounted. Next, the same line is accurately copied to the ceiling coating. To properly carry out this procedure, the suspension is best.
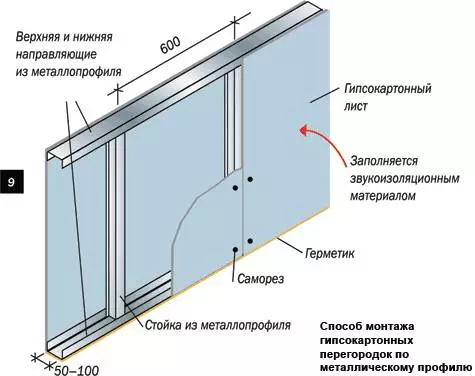
Scheme of plasterboard installation on the wall using a frame.
Installation of guide profiles in the bathroom is optimally produced with an assistant. One person holds the guide profiles strictly on the planned line, and the second drill holes in them under the dowel. The step between the holes should be from 60 to 100 cm. On one guide profile ranges from 3 to 5 and more dowel-nails, but no less, in order to reliability design.
Today, built-in niches, various decorative shelves made of plasterboard in the wall plane are used quite often. Also, niches are used to hide various pipes and communications. It is first recommended to draw a drawing with the appropriate dimensions. Built-in niche, regardless of size, also begins with the installation of guide profiles that create the perimeter of the shelf itself. Similarly, the niches are made by holes in PPNs for a dowel-nail.
Then, after the work performed, it is necessary to re-mark the markup for vertical profiles of PP and accurate places for fasteners. The distance between the vertical profiles will determine the moisture-resistant plasterboard (the width of the leaf itself). Typically, the distance ranges from 40 to 60 cm.
After all the works and holes, using a dowel-nail, screws, are attached straight plumbing. At the same time, a frame partition is mounted, where the built-in niche will be located. It is logical that the distance from the basic wall will be equal to the depth of the shelf. Partitions are made from the same profiles (PNP), then the base wall with a frame is mounted using special jumpers.
Article on the topic: Plastic ceiling with your own hands: Preparation and installation
Installation of parking profiles and installation of drywall
Then the parking or vertical profiles perpendicular to the guides are then mounted in the bathroom. They are pre-cut for a length, which is equated with the height of the room for a minus 10 mm. Then, with the help of the level, the lines should be placed, where the vertical profile will be located (the recommended step is every 60 cm). Along the lines are drilled by the holes under the dowel, where the suspensions (christmas tree) will be attached. The same preparation for parking profiles is made in places where shelves and niches will be located.
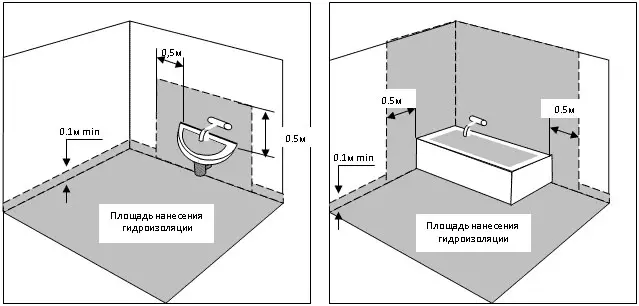
In order for moisture-proof material completely defended from moisture, it is necessary to leave a gap of 10 mm between sheets and floors.
After installing the suspensions, parking profiles are mounted. They are mounted in the guide profiles from above and below. The parking profile is fixed using suspensions, taking into account markup, where the future niche is located. In the same way, parking profiles are simultaneously mounted, where future shelves and niches will be located. Profiles and suspensions are fastened with "crabs". Thus, the carrying construction in the bathroom is ready. Then the moisture-resistant plasterboard is mounted on the supporting structure.
It is necessary to ensure that all electrical wiring and communications are installed before the material is placed. Each niche (if necessary) also provides backlighting. In some cases, the insulation is used, after which all shelves, wall, niches are shedding with material.
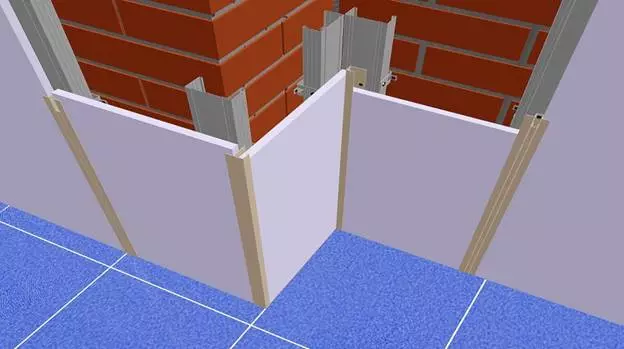
At this stage, the most difficult question in such a small room is the correct installation of the material in the corners. For this, vertical racks and overlap sheets should be carried out in such a way that one sheet of material rested into another.
It is important to remember: so that the moisture-resistant material completely protects against moisture, it is necessary to leave a gap of 10 mm between sheets and floors. To do this, it is necessary to prepare in advance special identical lining from the same material or tree. Moisture-proof GLC is cut in size, each niche in the wall requires a separate approach and sizes.
Article on the topic: Ventilation in the floor in a private wooden house
All sheets are attached to the supporting structure using self-tapping screws, including shelves and niches. The surface is then ground, the seams and recesses from the screws with a spacion material are carefully closed. Each finished niche and shelves are stained and facing the finishing material.
Decoration of plasterboard construction without using a metal frame
There is another option used - the use of the design without a frame. Moisture-resistant plasterboard is simply glued to the walls. But at the same time some conditions should be suppressed:
- The plane must be perfectly durable and smooth, without deformation and cracks.
- The wall should be dried and covered with reliable protection against humidity.
- The plane should not be wrapped.
If the wall suits these requirements, you will need a spatula, moisture resistant plasterboard and the mixture for installation. The glue is applied along the entire length of the leaf strips, then throughout the plane. There should be a gap between the material and the floor. The gasket that is substituted for the gap is removed only after setting the glue.
All technological holes should be thought out in advance, it also applies to pipes, to hide whose niche. If the bathroom additionally has decorative shelves and niches, then excellent ventilation is necessary.