
To date, the renovation in its apartment is not uncommon. But whatever interior is chosen, without decent lighting, it will not produce the desired impression. If we take into account that the presence of electrical appliances in apartments has increased significantly, the old wiring does not cope with the load. To achieve stability and safety requires the correct lighting scheme of the apartment. Do not need to be invited to specialists. If there is a desire, the replacement of old wiring can be performed independently.
Proper lighting in the apartment
For the correct distribution of light, they plan and think over the lighting of housing. It should not only correspond to the interior design, and still provide residents with convenience and comfort.
How to do it
There are two types of lighting: local and general type. According to names, it is clear that the general is used to illuminate the entire room, and the local - only in a certain zone. If we speak more about local lighting, it is subdivided into working and point. So, the lighting of the working type is provided for lighting the working area: a dining table in the kitchen, a place in the office and so on. Point illumination emphasizes the details: lighting paintings, mirrors, decor elements.
Planning the arrangement of light, you need to thoroughly think about what you want to achieve as a result. Focus not only for compliance with the interior, but also on personal preferences of the owners.
What do you need
To improve the correct lighting, it is necessary to remember the following facts:
- For each room, the light should be provided individually. If a bright light is suitable for the living room, then the bedroom needs to provide a soft light flux.
- The layout of lamps and other light sources is based on the location of functional zones requiring lighting.
- The correct presence of power and the number of lighting devices will allow you to create a comfortable setting.
Lighting plan
If you approach the provision of light in the apartment for all the rules, it is originally designing. The lighting scheme in the apartment is based on the design of the house itself and directly the rooms, the form of the ceiling, finishing materials, furniture placement. After evaluating all factors in the drawing of the plan's plan, you need to select the placement of instruments for light, as well as switches and sockets.Calculation of lighting (standards and number of lamps)
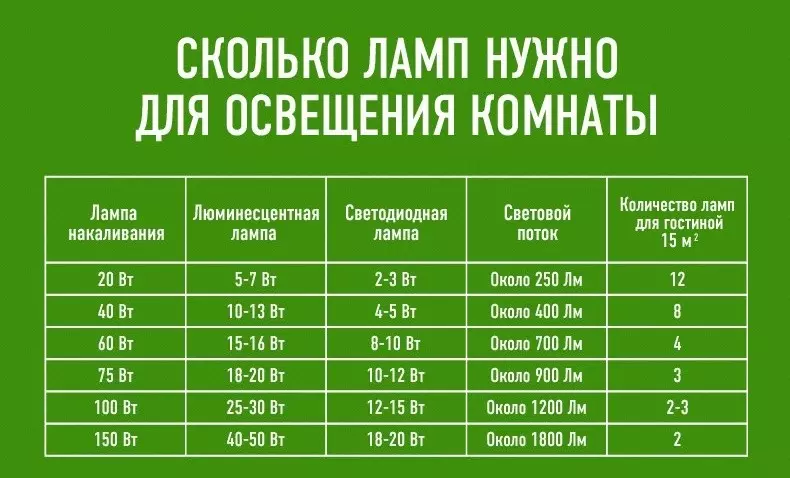
To ensure competent design of light, it is necessary to determine which power will be optimal for a certain dwelling. From here, such an indicator is calculated as the number of light sources and incandescent lamps fit for a specific area. About all rules, light power is distributed in the following way: every 5 m2 illuminates a lamp with a capacity of 60-65 kW. Based on these indicators, it will not be difficult to correctly calculate the number of light bulbs needed for a certain room.
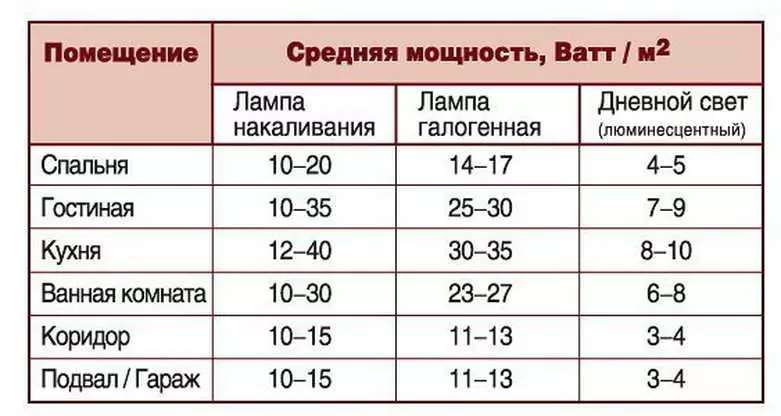
Consider an example, how many lamps need to be covered with a living room with an area of 15 m2. The table below shows the lamps of different types.
Connection scheme
After the number of devices to ensure light, proceed to the formation of the lighting plan in the apartment. It displays the location of lamps or lighting groups, as well as elements that serve to turn on and off light sources.
The type of switches used should also be noted. For example, you can put a color or twin-vector. Sometimes, if the room has a large area, use duplicate switches for light. They are intended to regulate the same lighting device, but are placed in different parts of the room.
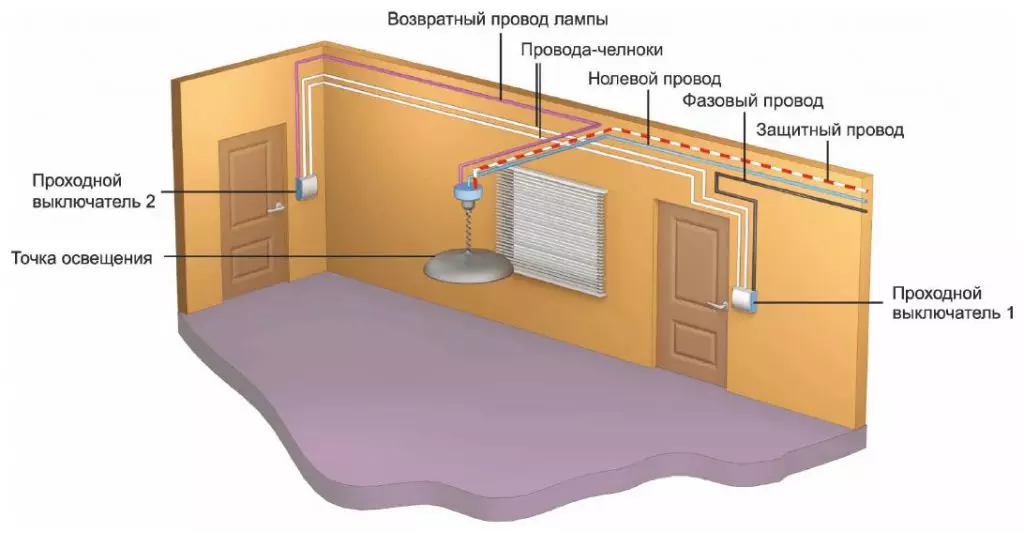
The drawing of the circuit also mark the type of lighting - ceiling or wall mounted. Must be noted in the scheme, which controlling the lighting point relates to which regulatory element.
Article on the topic: Lighting for the children's room: Organization Tips
Example scheme
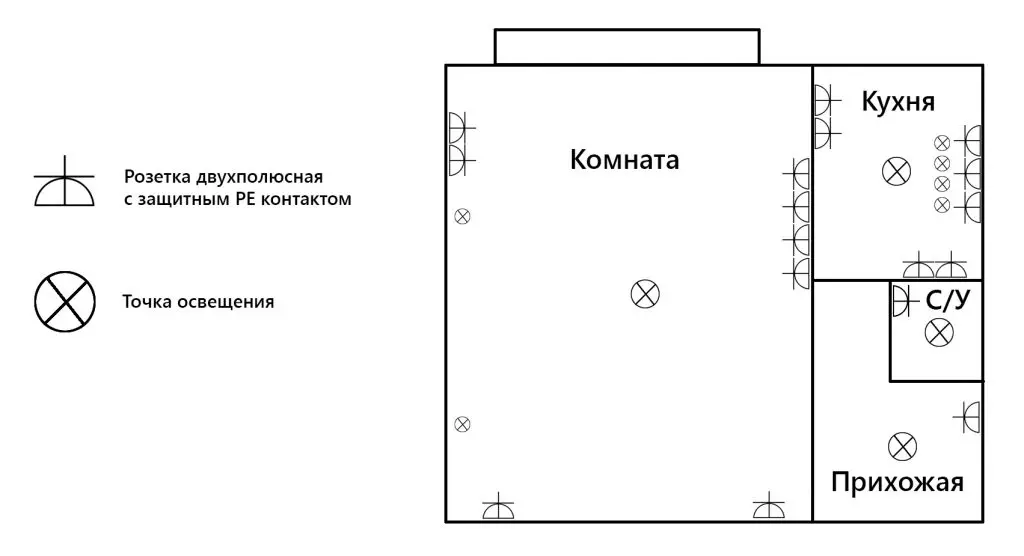
Let us give an example of the scheme of providing a one-room apartment with an area of about 40 m2. In accordance with the norms, no more than 8 lamps will need.
Lighting devices in one-room apartment can be carried out in the following way:
- 3 point luminaires on the ceiling;
- One chandelier;
- two sconces;
- one lamp;
- Lamp for lighting a written table.
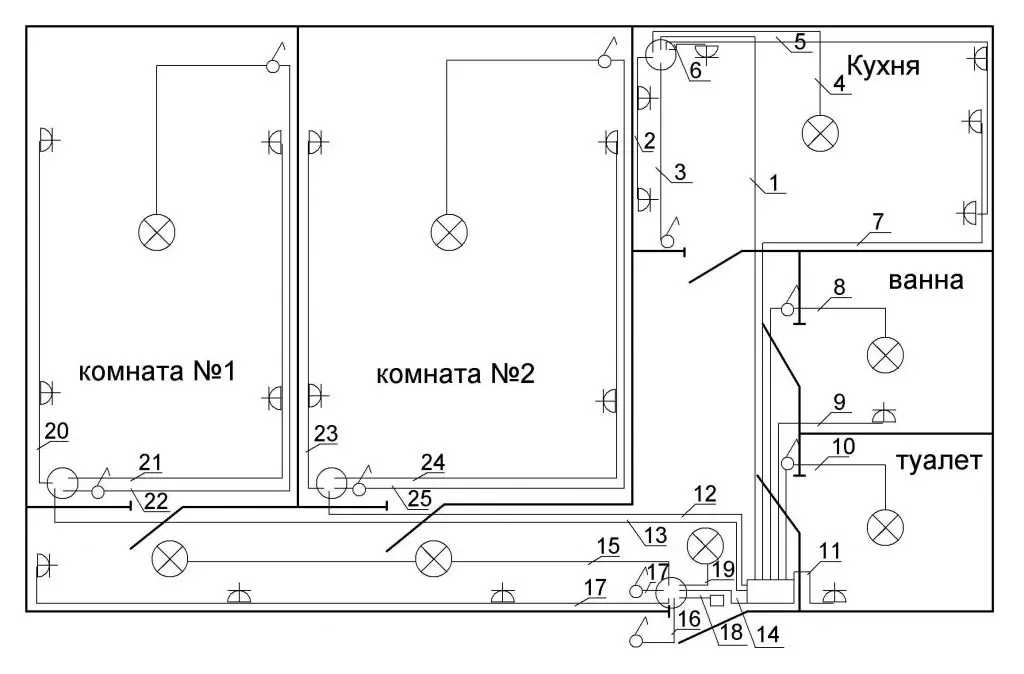
Installation of lighting in an apartment that has a similar area, but consisting of two rooms, is provided by:
- two chandeliers;
- 3-4 ceiling luminaires;
- desk lamp;
- Two sconce and lampsher.
Lighting laying
The lighting should be carried out by various types of light sources:
- Point luminaires are embedded in a suspended or stretch ceiling.
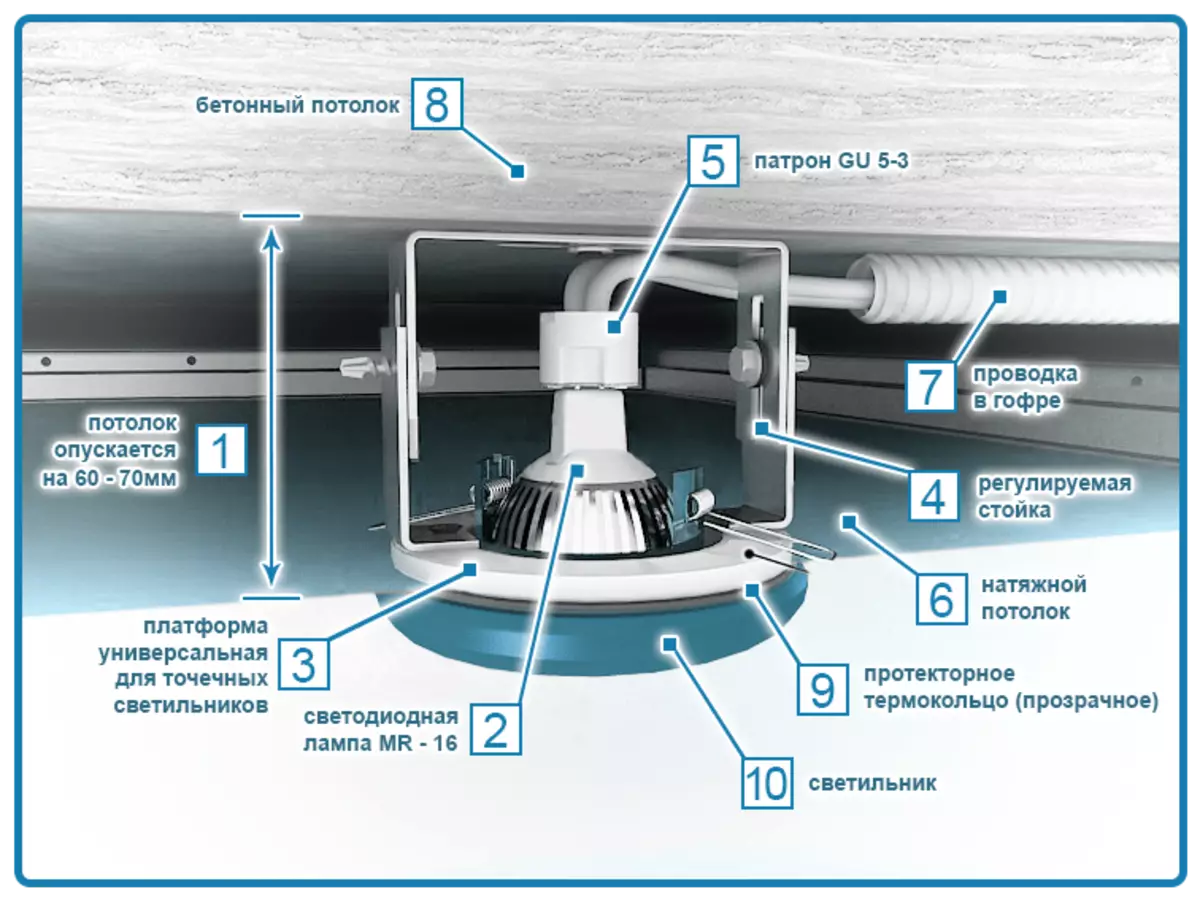
- Ordinary chandeliers are mounted in two ways: mount on the hook in the ceiling surface or with the help of dowels.
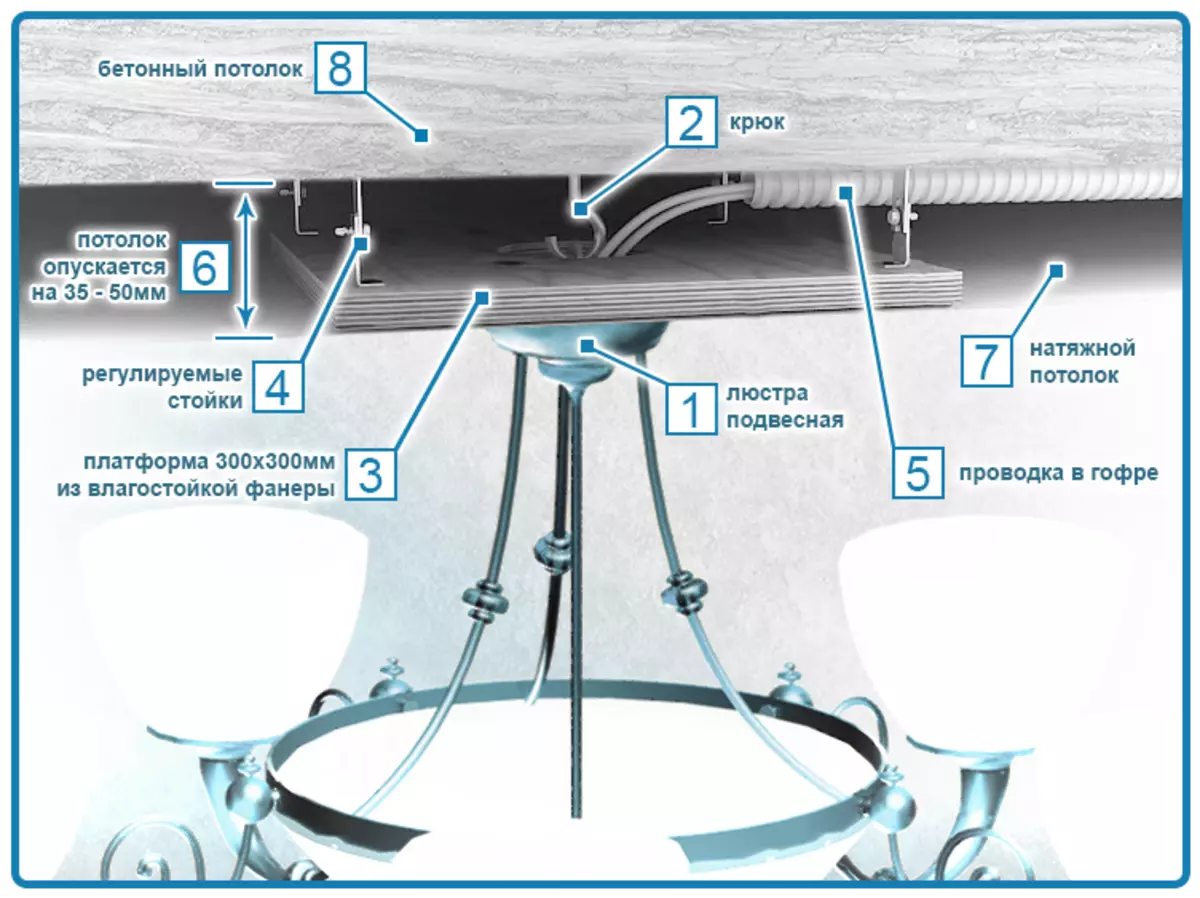
Wall lamps are used, table lamps for illumination of a certain zone. LED tapes received wide distribution to provide additional backlight. Depending on which types of lighting devices will be applied, the wiring scheme is selected.
On video: Principles of lighting design in the apartment.
Wiring electrical wiring with your own hands: from the scheme before installation
The implementation of the gasket of electricity in the house is quite responsible. Without experience and certain skills, do not do. The main thing is to know the correct aspects of the wiring, read and create schemes, have electrical engine skills. But all this can be mastered and make a gasket yourself. To do this, submit recommendations for all aspects.Fundamental rules
All rules that must be observed when wiring wiring, as with other types of construction work, are covered in low-speed and GOST. Reliable wiring needs to refer to the "Rules of the electrical installation device (Pue)". Getting Started by Wiring, this section is necessarily studied.
We will provide the main list of editing rules in the apartment:
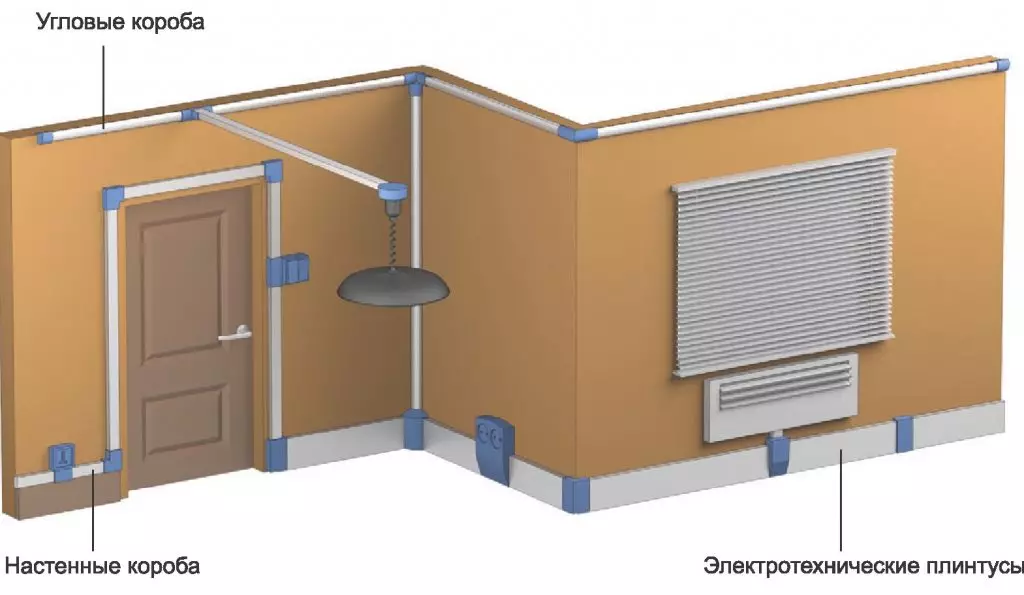
- Place the main components, such as the counter, sockets, switches, machine guns, etc., you need in easily accessible places.
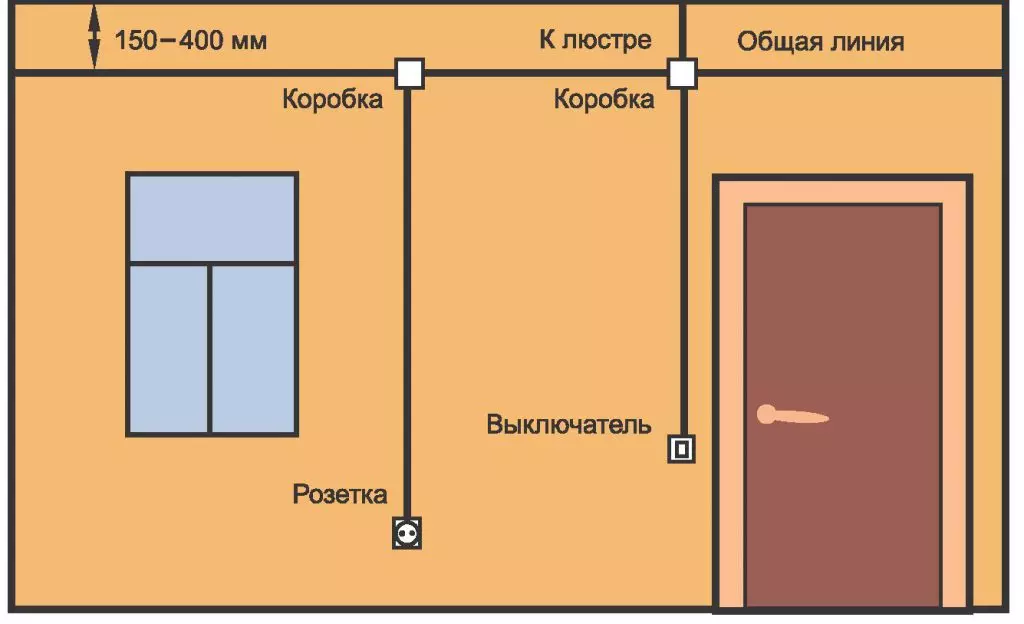
- The switching parameters of the switch varies from 0.6 to 1.5 m from the floor level. The location should be in an easily accessible place at the door at the entrance to the room. Wires must be laid, starting on top.
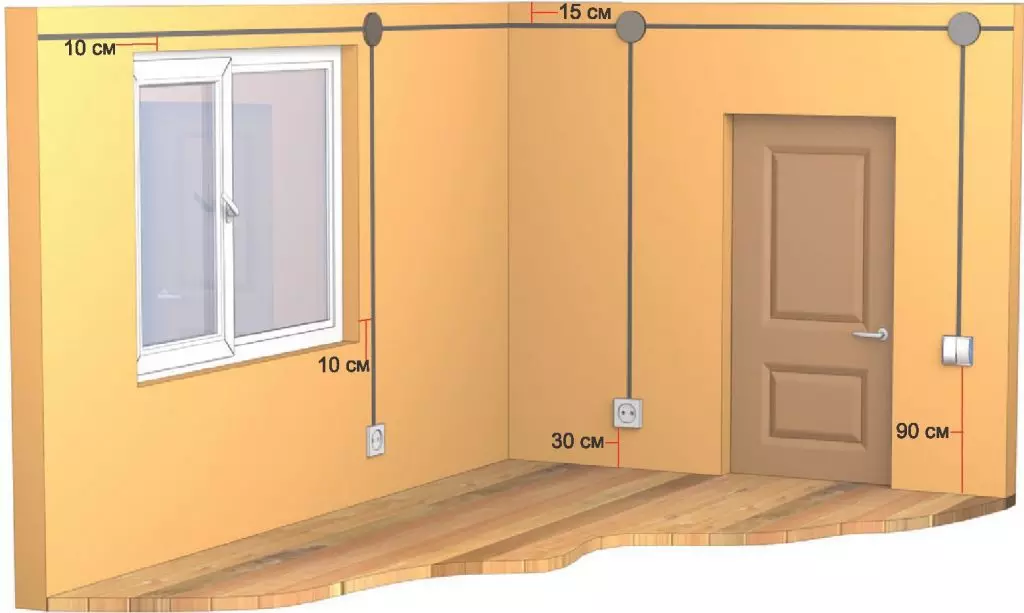
- Settings Settings are 0.5-0.8 m from floor level. It is due to the prevention of closure when flooding an apartment. It is impossible to place outlets near the gas and electric stove, as well as next to grounded items. The distance from them should be at least 0.5 m.
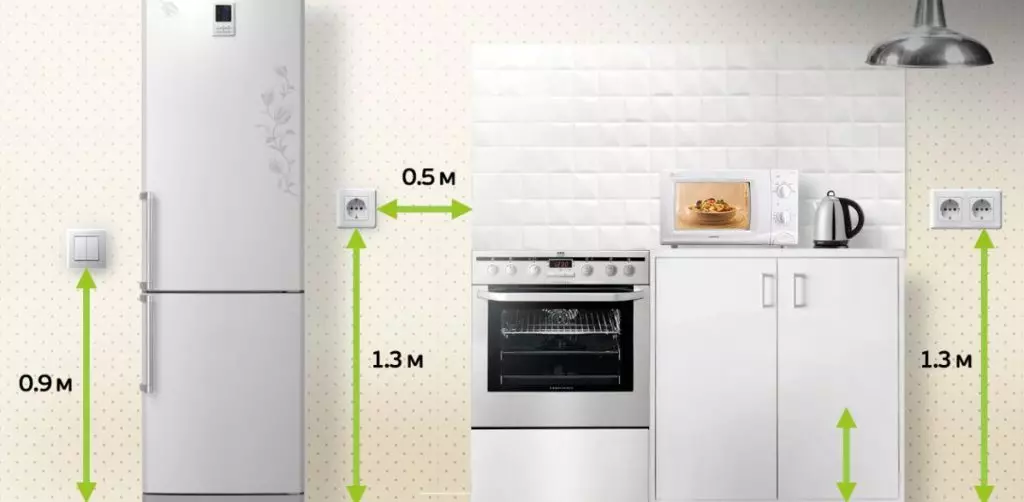
- According to the standard, the number of outlets is planned according to 1 piece by 6 m2. More than their quantity is allowed in the kitchen, as they are necessary for connecting electrical appliances. In the bathroom, the sockets are not installed, and the bathroom is better to provide a separate transformer.
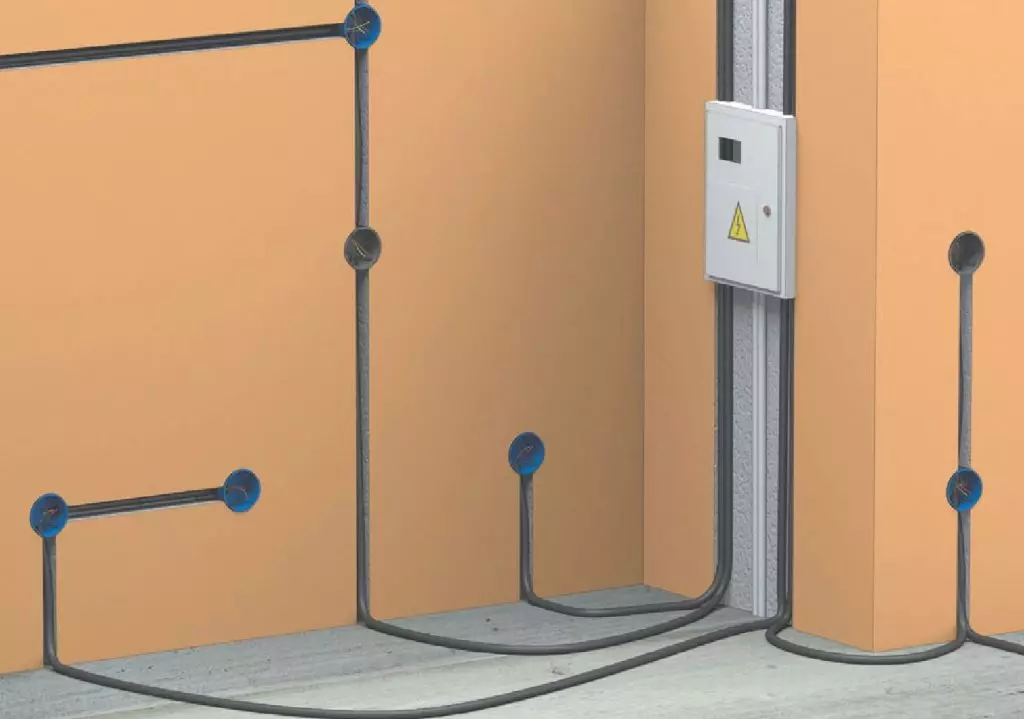
- Putting the wires only on the horizontal and vertical line, which are necessarily noted on the plan.
- When laying, it is necessary to take into account the location of pipes, overlaps and other obstacles. In the case of horizontal conduct of wires, the distance should be about 10 cm, and vertical - 15 cm.
- Must be monitored to ensure that the wires do not come into contact with metal objects.
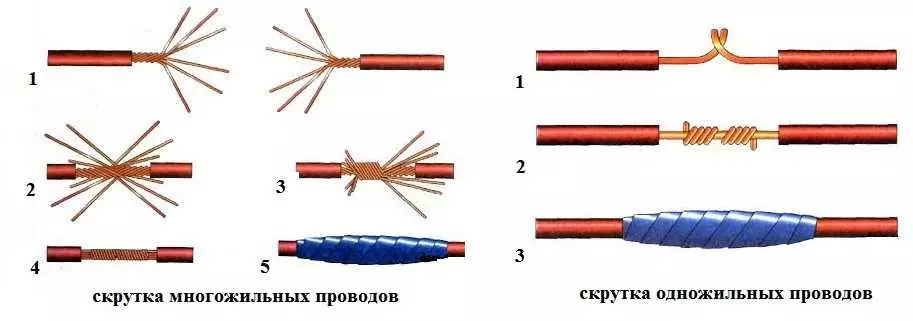
- When laying multiple wires, the distance between them is not less than 3 mm. It is also desirable to isolate wiring in a special corrugation.
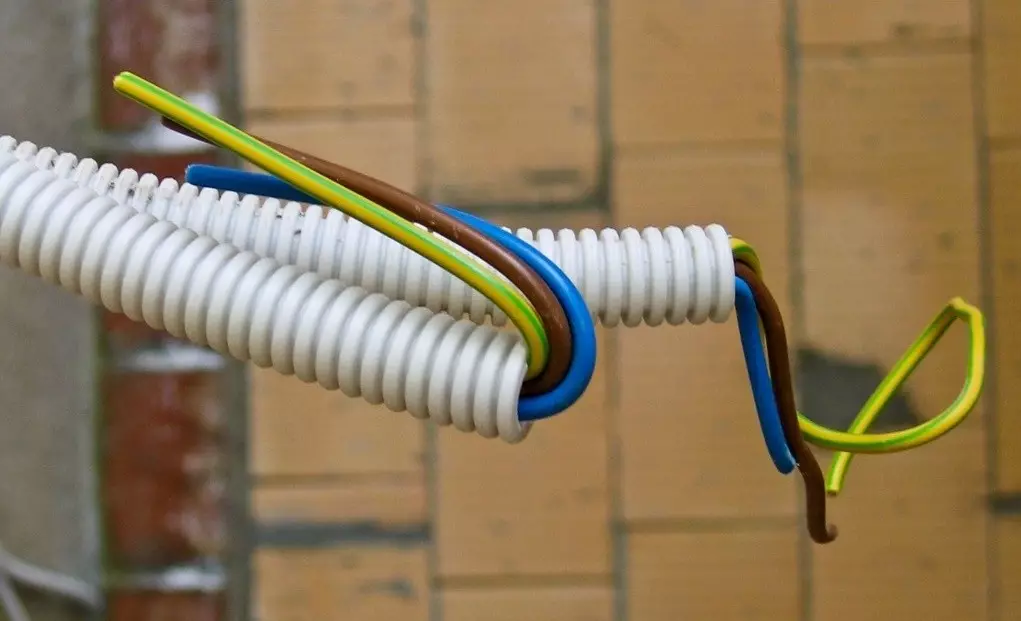
- Special boxes should be used for wiring. Connections are carefully isolated. Experts categorically prohibit the connection of aluminum and copper wires.
Project and wiring scheme
Like any work, the laying of electrical wiring begins with the design and drafting of circuits. For their creation, specialists are involved, which in Moscow are quite a lot. After all, safety in the apartment depends on them, and in the whole house. This service is worth certain money, but safety and calm is above all.
If it was decided to make work independently, and there are initial knowledge in the field of electricity, then all the above described rules should be followed. To ensure that all light loads are calculated correctly.
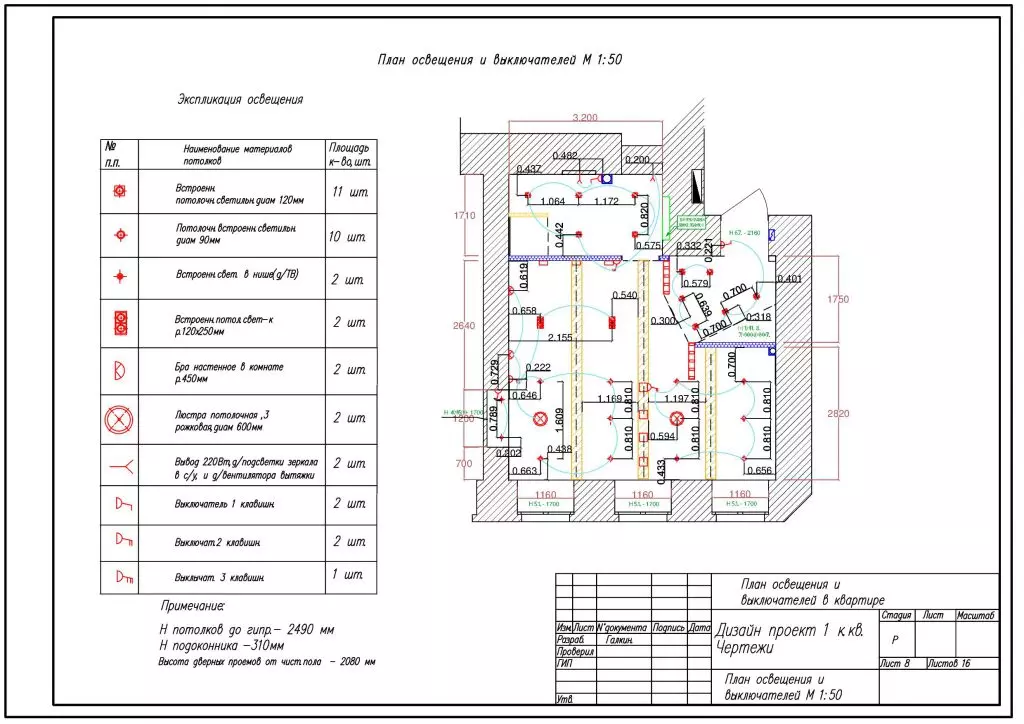
To draw up a project and schemes, it is necessary to start with the development of the symbols. The decoding of them is shown in the photo.

The project begins with the creation of an apartment plan, which marks all lighting points, the location of switches and sockets. Next, given all the rules, the lines of the pads of conductors are drawn. In order for the wiring scheme to be practical, the location of the instruments is thought out in advance.
Article on the topic: Types of lighting ceiling and designer ideas for different rooms | +80 photo
At the next stage of the compilation of the circuit, a liner is thought out to the connection point. This moment requires more detailed consideration. Conducted by different types of connection: parallel, sequential or mixed. The last method is the most economical in terms of using materials and performance.
To facilitate the connection point process, broken into groups:
- Lighting layout on the kitchen, corridor and residential rooms;
- ensuring the illumination of the bathroom and the bathroom;
- device sockets in the residential area;
- Power supply for the kitchen;
- Device sockets for electric stove.
This is one of the examples of the grouping for the wiring scheme. The essence lies in the fact that the more carefully the groups are thought out, the more economical will be the costs of materials, and it is easier to draw a scheme. Mask and dimensions of the apartment. In one-room design is carried out in one way, and in a room with a large area - with the addition of elements.
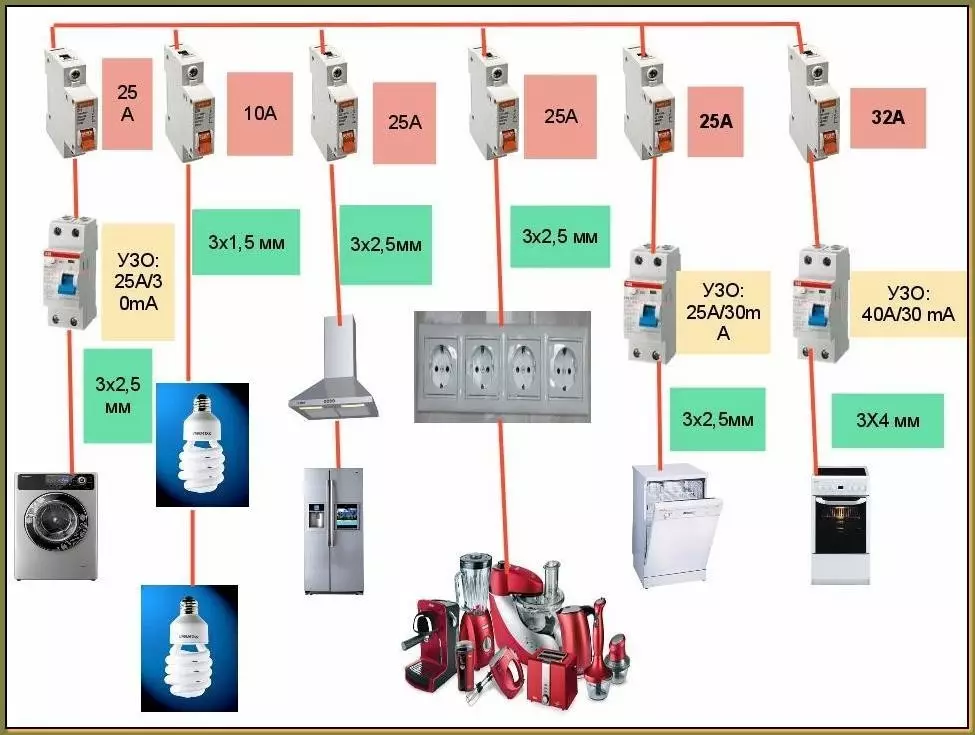
The next important point is the calculation of the load. It is necessarily indicated in the project. Calculations are made according to the formula I = P / U. It uses the values of P - the sum of the capacity of all devices that are planned to be used, U is the voltage indicator on the network.
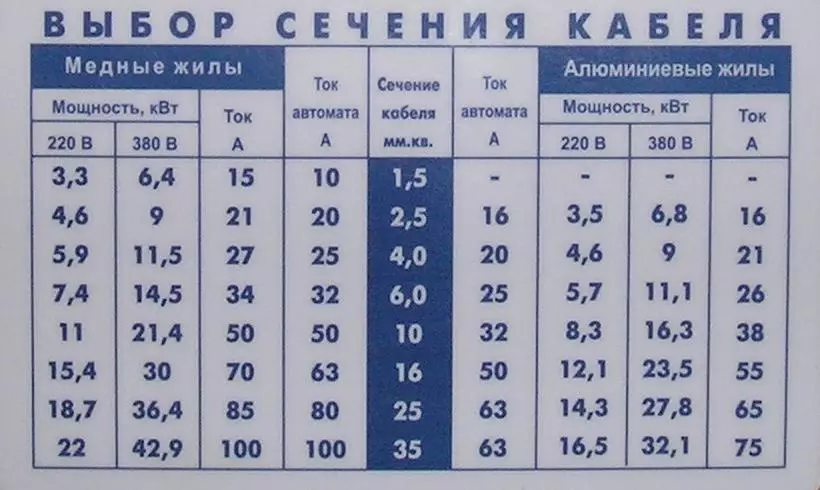
An example of a voltage calculation: electric kettle - 2.2 kW, lighting with 10 light bulbs with a capacity of 100 W, refrigerator power and microwaves in the amount of 1.4 W. In apartments, the power of the current is traditionally 220 volts. After calculations, it is obtained: (2200 + 1000 + 1400): 220 = 20.1 A.
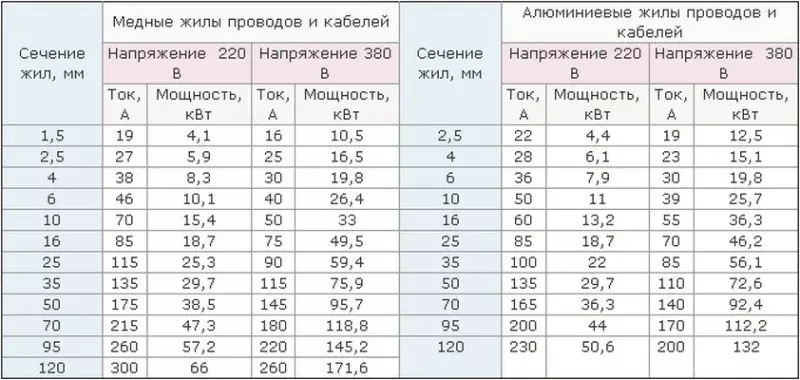
There are minor assumptions. You can add a bit to the desired load. But, according to the standard, it is necessary to prevent exceeding 25 A. Having calculated the load, begin to buy the necessary materials based on the result. To facilitate the selection, the table below shows the basic wire and cable parameters.
Installation of wiring
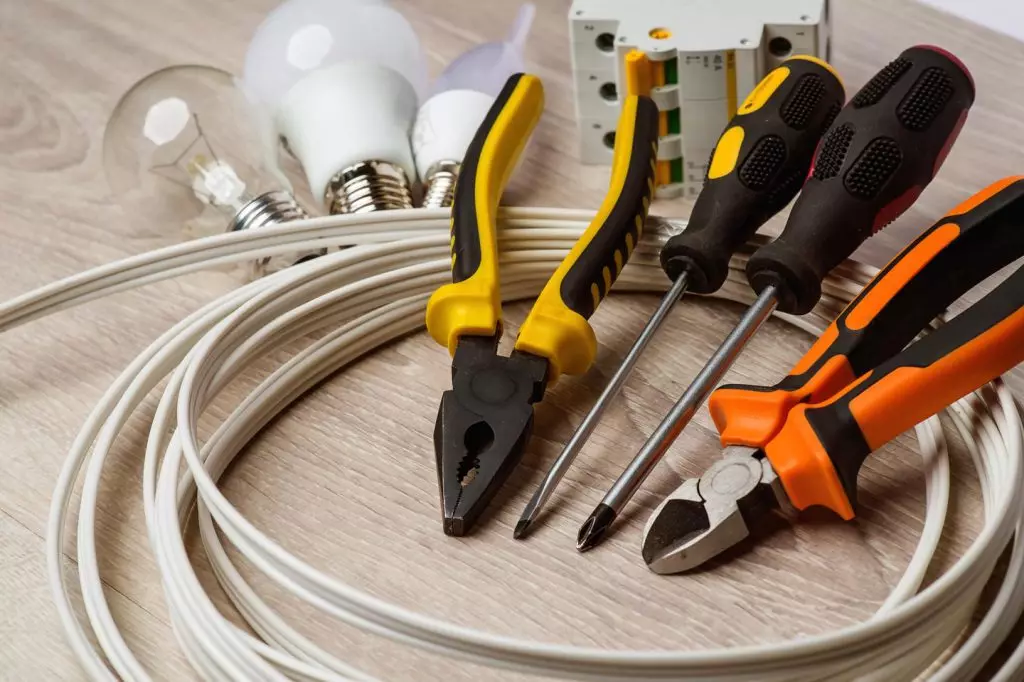
Mounting work is not so difficult, as it seems. Here in the first place is safety. Before starting, the following tools are prepared:
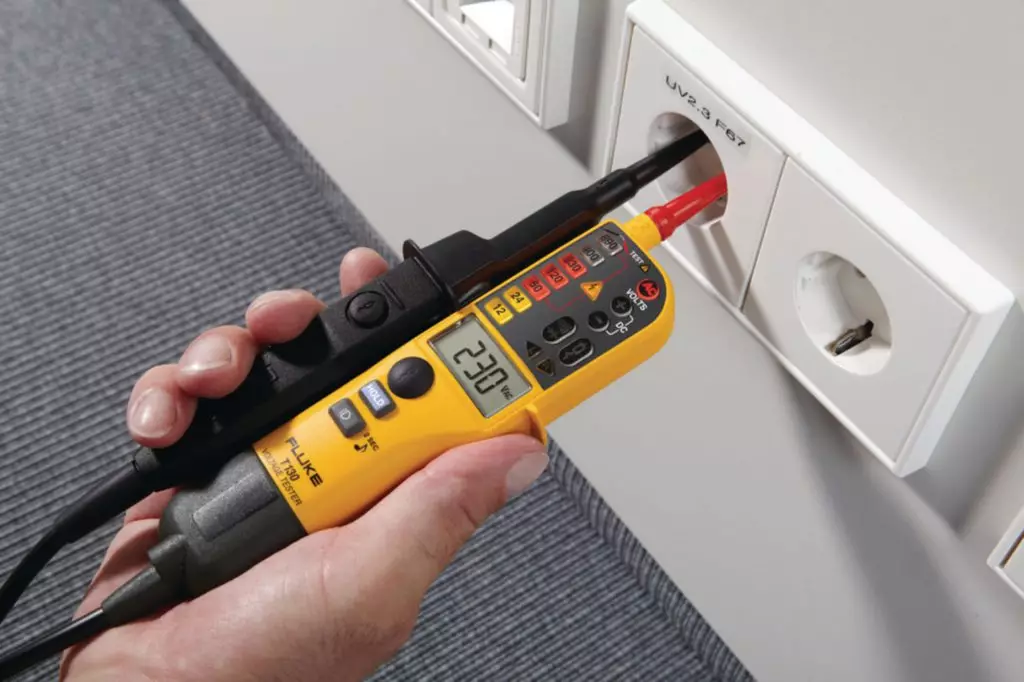
- instrument for testing;
- turbine or drill with a perforator;
- screwdriver;
- pliers.
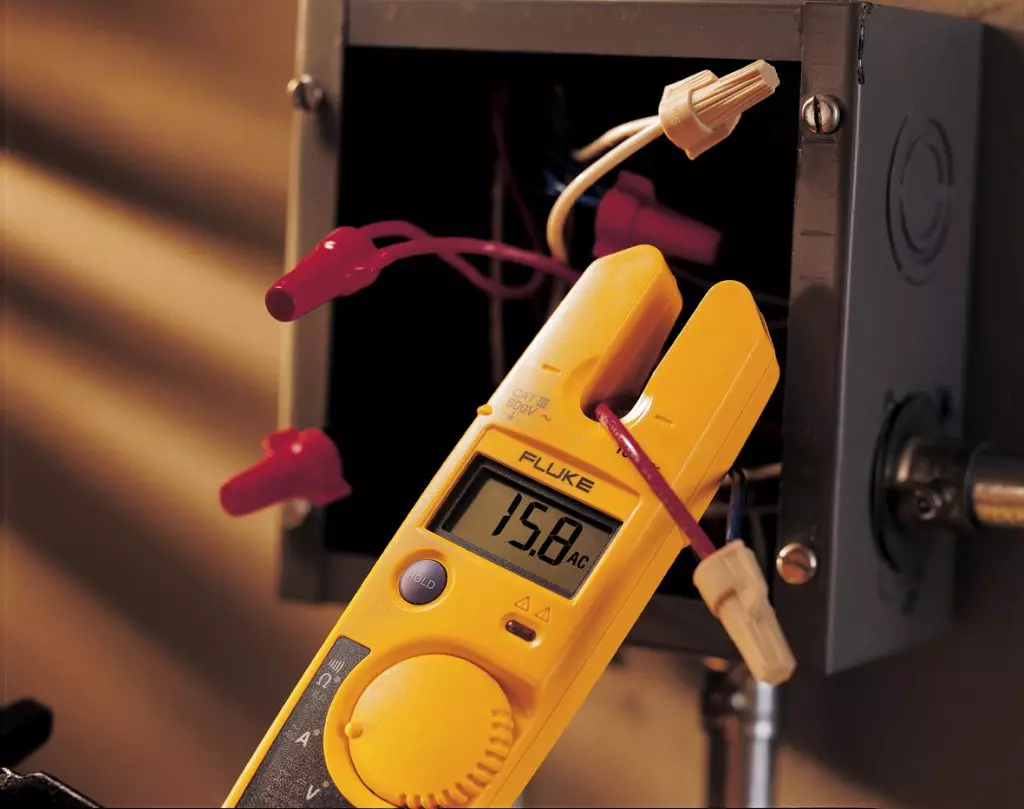
Important! By installing new wiring, initially dismantle the old. In this case, you need to use the device for checking the voltage.
Drawing diagrams and preparation of channels
All work begin with the transfer of the drawing directly to the walls. Prepare the surface according to the following algorithm:
1. Accordingly, the plan notes the marker the necessary posts of passing. Then mark the installation sites of the elements: sockets, shields, automatic and so on. Everything is placed in accordance with the plan.
2. Drill with a crown nozzle in places location of sockets and switches made holes for boxes for them.
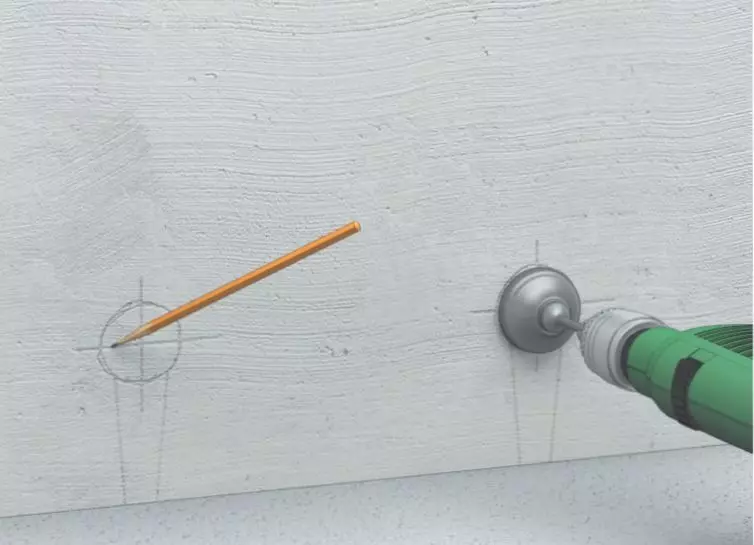
3. Using the perforator, shoes are done. For this you can use the turbine. Strob must be defined sizes so that the wire in it is easily placed.
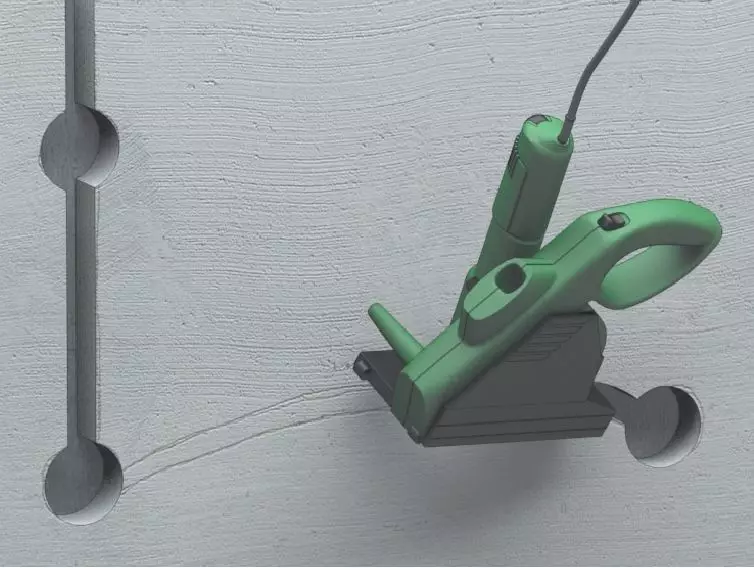
After the surface is ready, the wires are hardened inside the space from the corner side. To do this, you need to do a hole in the wall. It is best if it is located in the corner of the room.
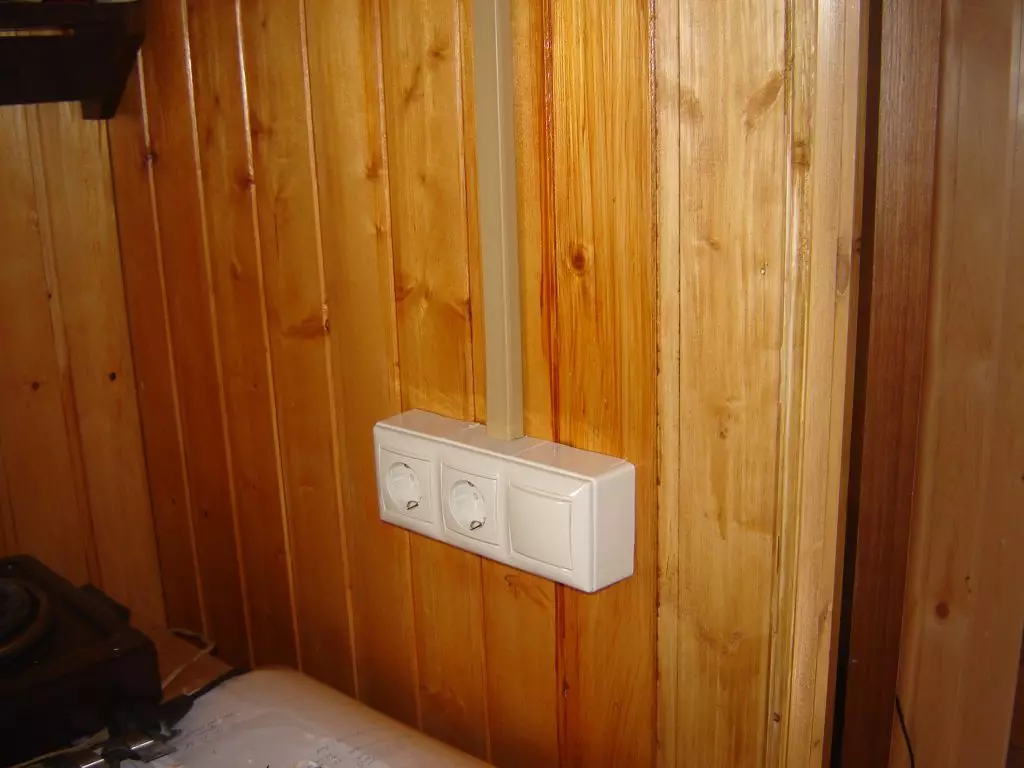
Mounting open-type wiring
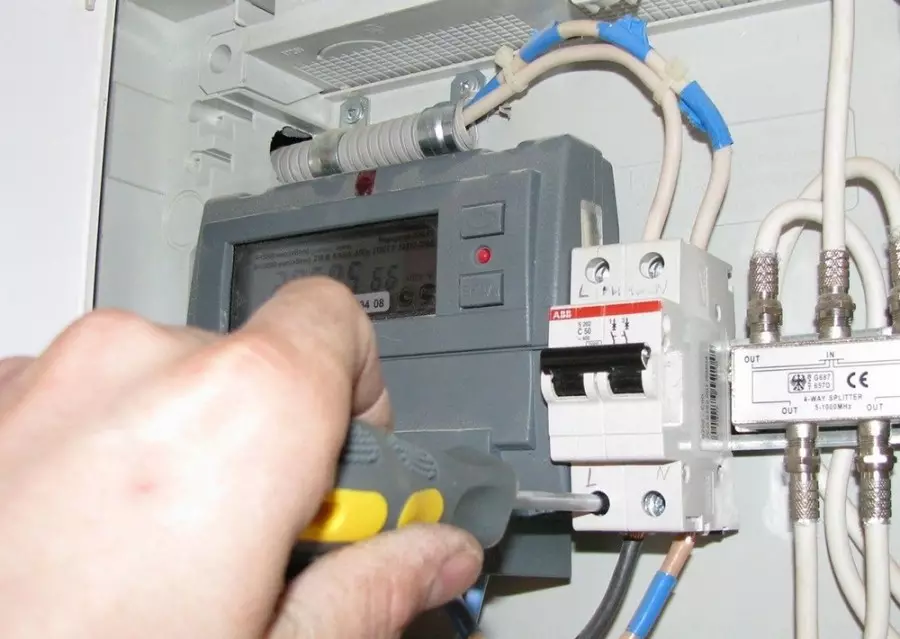
At the initial stage, a shield is installed at a certain height. Directly into the shield is the Uzo. By quantity, they are determined according to the lighting groups. By its structure, the shield is as follows: upstairs are placed terminals for zero wires, downstairs for grounding. There are automata between them.
The connection in the shield device is carried out in the following way: blue lived to zero-terminal, white to the Uzo in its upper part, yellow wires to ground terminals. Automatic connections are made in parallel.
For an open type of installation, first fasten on the placed box lines. The mount is carried out by means of a dowel with self-draws. The extreme is shutd up at a distance of about 5-7 cm, and then hold a step 0.5 m.
Important! When mounting open-type wiring, there is no need to prepare holes for outlets and switches. It uses products that are hung on the wall plane.
All wires on the marked lines are placed in the box and are conducted for distribution boxes. Directly in them are connected. You can do this by tight twist, after which the wires need to be carefullyroidered.
Article on the topic: Features of lighting in the kitchen: What happens and how to organize? (current ideas)
Mounting wiring hidden type
Hidden wiring is mounted a little easier by the volume of work. According to the principle of the compound, differs from an open type only by the fact that it is placed inside the walls, in the pre-stroke prepared. Before placing the wires in the stroke, mount the boxes for switches and sockets. They are fixed using Alebaster. When the material was frozen, the electric pipe is breeding in them and according to the plan in the stroke, it is carried out towards distribution boxes.
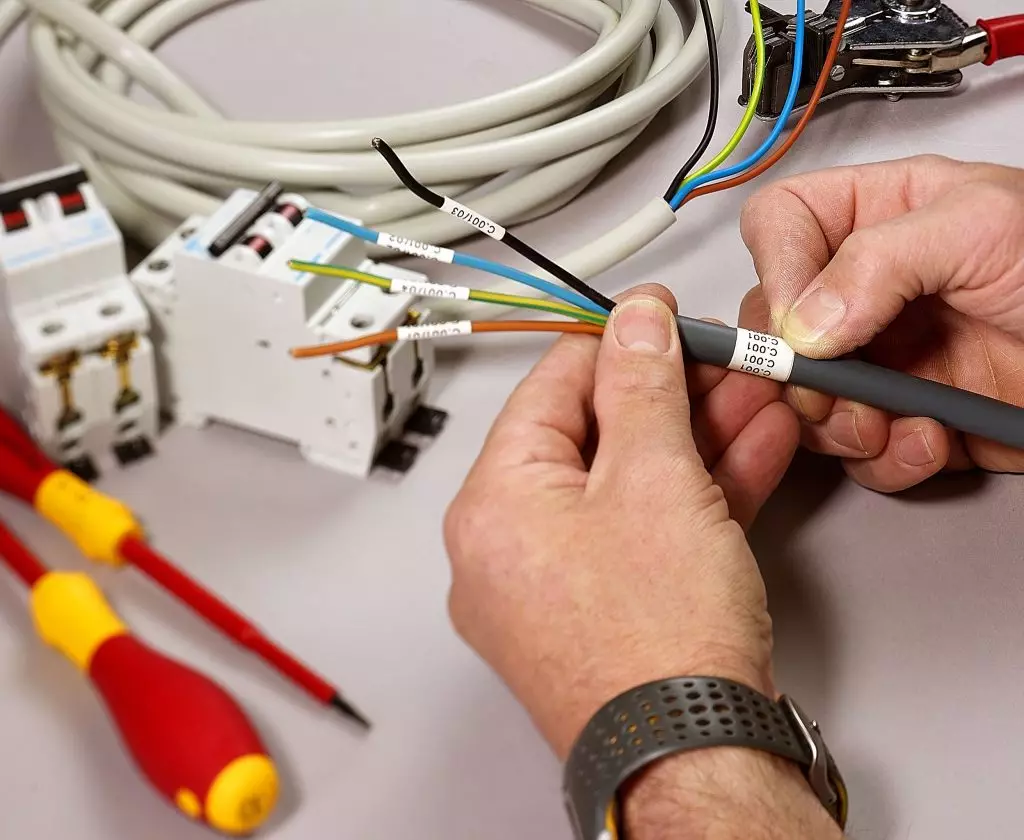
After all sockets and switches are installed, the lighting devices are connected, wire connections are made in boxes, it is necessary to check the connection correctly. To prevent an error, "nicknamed" compounds with a special electrical instrument.
On video: Top 10 wiring rules.
What wire to use
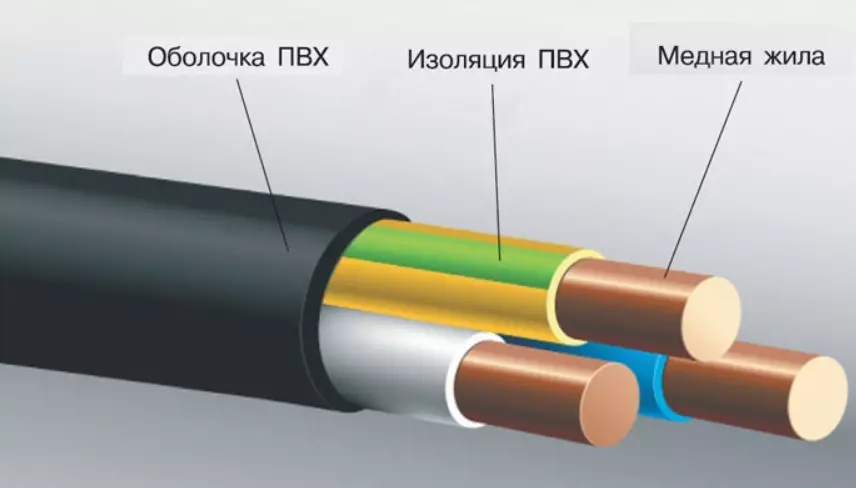
Cables to provide electricity in the apartment need to choose according to certain criteria. It is advisable not to change anything at your discretion, since the safe functioning of the system depends on this.Material and construction
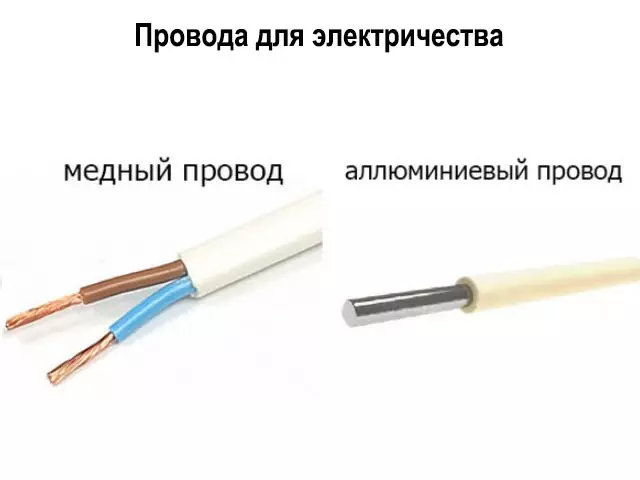
Materials used for the manufacture of wires exist two varieties: aluminum and copper. Aluminum inexpensive, but copper is much more reliable and able to provide high-quality functioning.
In terms of its structure, the wires are divided into single-core and several residentilios. In the first case, the material is closed with a shell of isolation. The characteristics of single conductors include: cheap, convenient for mounting, have a high degree of rigidity. The latter property leads to frequent fractures of the conductor.
Masters prefer to work with multiple wires. They have good resistance to twist, bending. If the scheme assumes a steep turn, then you can be sure that the conductor will not break.
Cable cross-section for wiring in the apartment
The cable cross section is one of the important characteristics. From its indicator directly depends on whether the conductor will withstand the supply voltage. Measured in square millimeters. Thus, in aluminum conductor, the cross section of the vein 1 mm2 withstands the voltage 8 A. Kappa and 1 mm2 copper products can skip 10 A.
The selection of the sections of the conductors must be loaded. It is not allowed to use the wires whose cross section is less than the intended load.
The thickness of the base isolation
Any conductor has isolation. Plastic materials are used to ensure it. The thickness of the residential insulating layer is determined by the articles of regulatory documents. For example, for a conductor, designed for a load of 660 V, with a cross section of 1.5-2.5 mm2, the insulation thickness is provided with 0.6 mm.Shell thickness
The next moment to pay attention to is the outer cable sheath. It is she who closes a few lived conductor. Similarly, plastic materials are used for external use, but its thickness is much larger. Basically is 1.4-1.8 mm. Considate the fact that there are permissible deviations.
Marking
On any cable there are signs that are called marking. It allows you to better read product characteristics information:
- The first letter denotes the material from which the outer shell of the product is made.
- The following letters can designate such properties as the degree of tightness, flammability of the insulating layer, the presence of steel tapes in isolation, plane or flexibility.
- The material from which the conductor is made is noted only on aluminum cables of the letter "A". On copper products, the letter of the material is not specified.
- Additionally, you can read the information about the manufacturer and the date of manufacture.
Coloring housing
Insulation core may have a monophonic color, and sometimes, to apply a strip with a thickness of 1 mm across the entire length of the product.
The color of the base isolation characterizes the purpose of the conductor:
- first - phase, it is red, brown and white isolation;
- Second - zero, blue;
- The third is grounding, green or green-yellow.

The lighting planning process in the house is rather responsible. But if the goal is achieved with all the correspondences with the rules, it will lead to a stunning result. The right light in the interior enhances the effect several times. Consumer impressions are rated from comments found on the Internet.
How to choose cables and apartments (1 video)
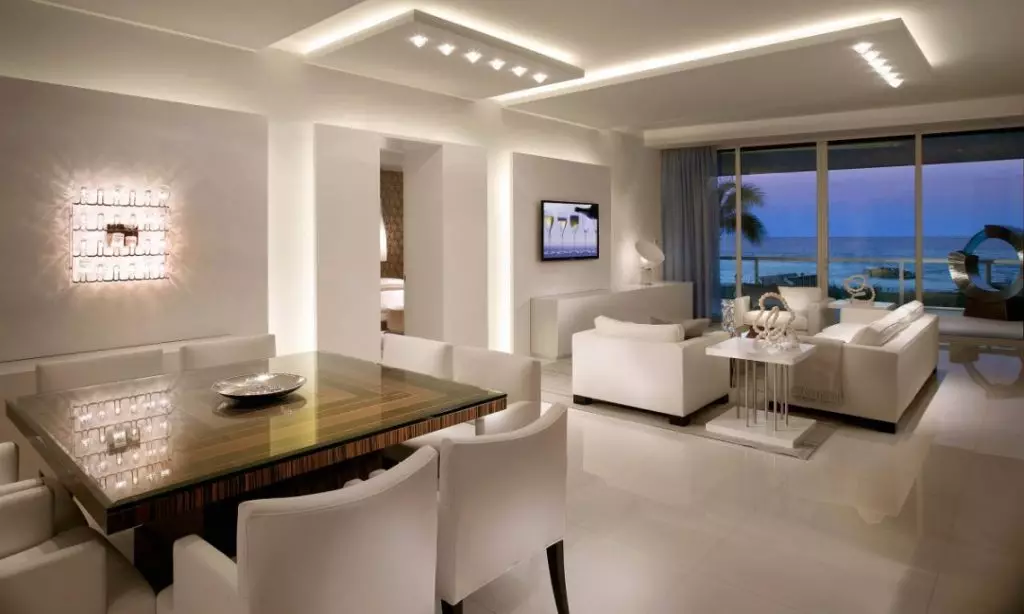
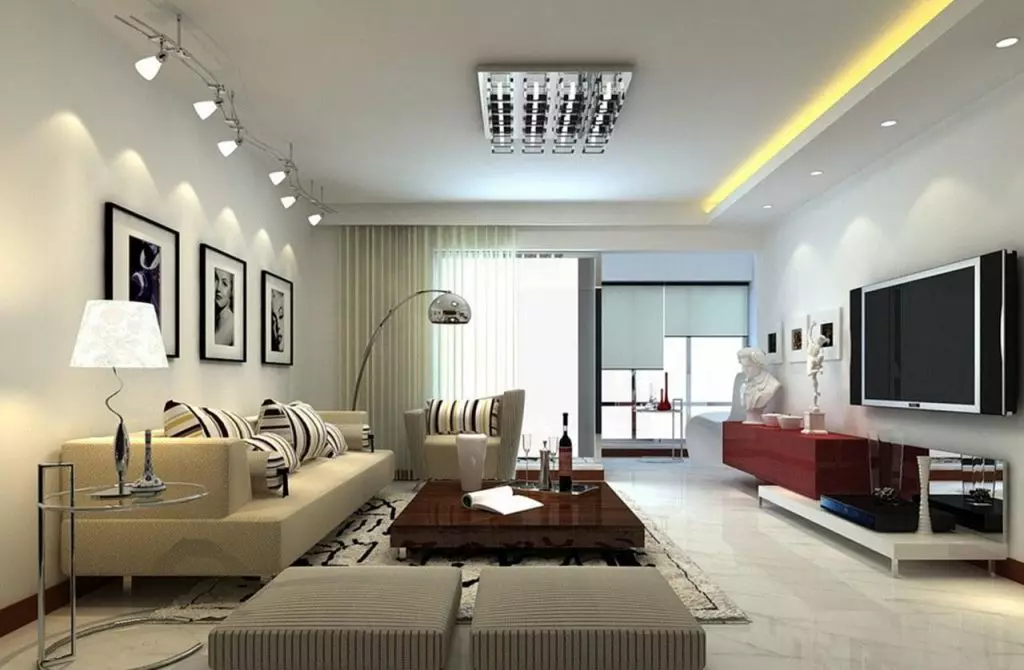
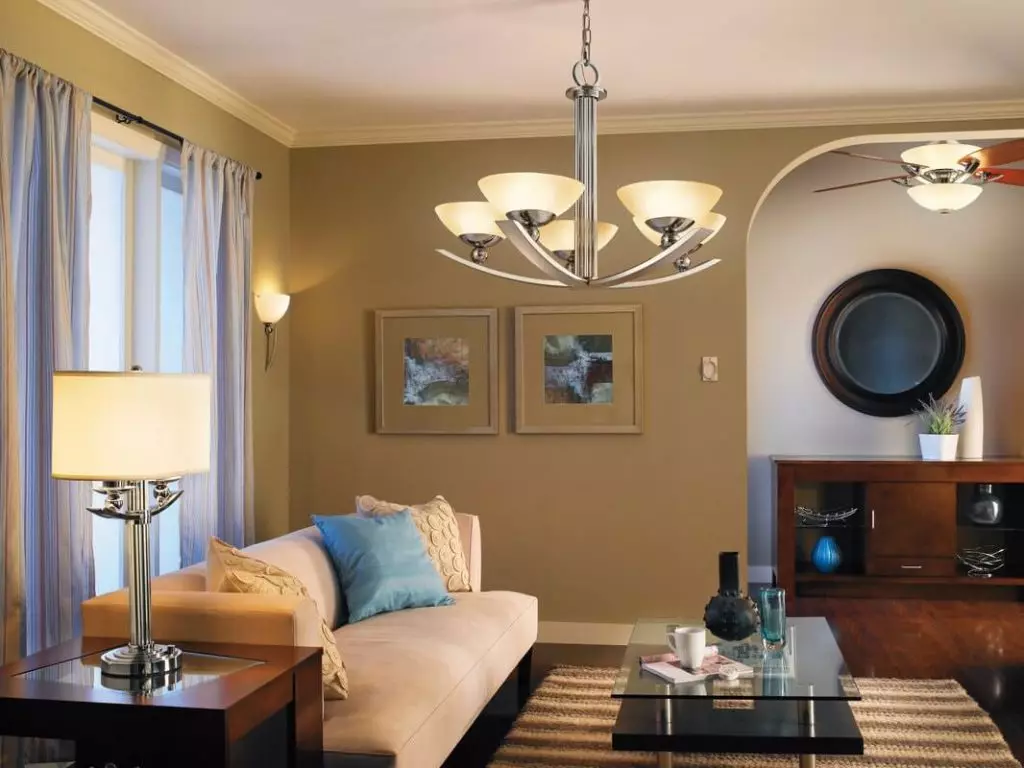
Different lighting schemes and examples of ready-made projects (55 photos)
")
")
")
")
")
")
")
")
")
")
")
")
")
")
")
")
")
")
")
")
")
")
")
")
")
")
")
")
")
")
")
")
")
")
")
")
")
")
")
")
")
")
")
")
")
")
")
")
")
")
")
")
")
")
")