
Racks at all times were of great interest. This is a fairly convenient thing that can be used for storing various things, books. You can also put on high racks and pots with low-spirited plants, which will look pretty beautiful.
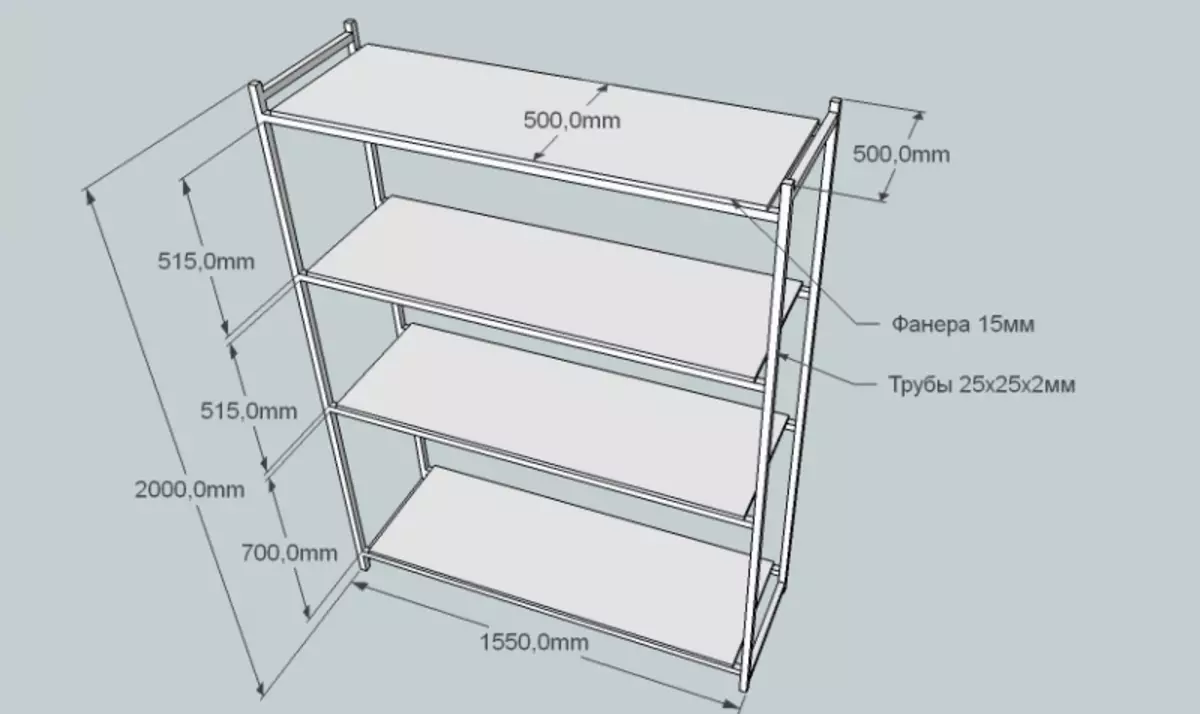
Figure 1. Wooden rack drawing.
Make a wooden rack with your own hands is not so difficult and for almost every person. You only need to prepare everything you need in advance. To date, there are many options for racks, different designs. But let us consider one of the easiest and most practical options.
Materials and tools for work
Before being taken for the process of manufacturing a wooden shelving with your own hands, you need to correctly pick up materials and tools.
It is advisable to choose boards from a natural tree as the main material. For such a goal, the oak, pine or red tree suitable. It is not recommended to use wood chips based boards, as they will not differ special durability and practicality. At the same time, make sure that the moisture of wood does not exceed 12%. Also before working, the tree is processed by antiseptics and special impregnations, after which it gives him a couple of days to lie down in the warm room. In addition to boards, you will need it for the rack:
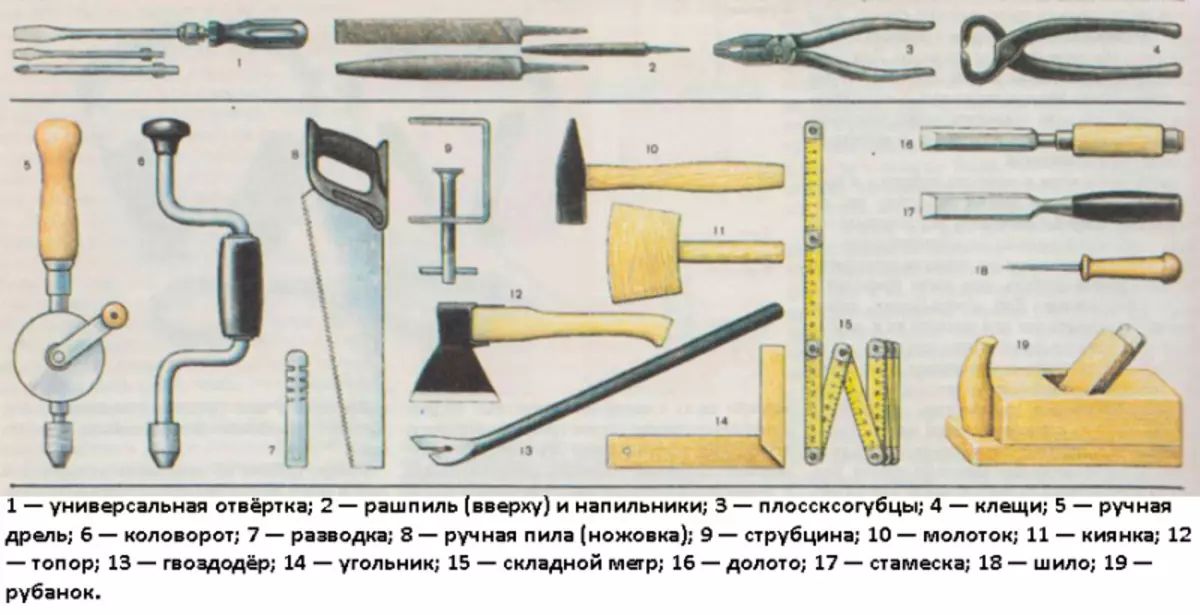
Tools for the manufacture of a wooden shelving.
- Roulette and labeling pencil;
- self-tapping screw;
- grinder machine;
- electric jigsaw;
- wood varnish;
- a hammer;
- carpentry glue;
- Metal corners;
- drill;
- plywood;
- Furniture legs on wheels;
- varnish and brush;
- Wooden bars for transverse locking shelves;
- Holders for the shelves.
Preparation of the base, walls and shelves
Work begin with the choice of lower base. As such, a thick board is taken (the thickness should be such that the self-supezheza in 3 cm long entered into it). At the same time, its length is equal to the maximum length of the rack, and the width is the maximum width that you choose yourself. At the same time, at the bottom of the base, it is desirable through each meter of the length of the shelving to navigate the transverse bars, the length of which is equal to the width of the base. They will provide an extra fortress.
Article on the topic: Installing plinths with cable channel: how to open and ed
Now go to work on the side boards. If you have limited material resources, then you can use thick plywood instead of natural wood for the sidewols. Immediately mark it so that the width is equal to the width of the base, and the height of the boards is selected independently. Next, cut out gently the sidewalls of the desired size. Immediately make on their inner side markup for the shelves. It should not be forgotten that the optimal numbers at the height of the shelves - 21 and 42 cm. These two heights can be combined. So you get the shelves at the same time and spacious, and quite neat.

Rack assembly scheme.
Now go to the cutting of the wood shelves. Their length is measured from the inside of the shelving so that they simultaneously and freely and tightly fit into the rack. The width is equal to the depth of the cabinet itself. The shelves thickness in the ideal version should not be less than 2.5 cm. But it is still better to fix them with transverse bars from below. Bruks can be peeling with ordinary small carnations.
Next is the time to do the rear wall. As a rule, if you are satisfied with the color and texture of the wall, to which the closet is adjacent, then the rear wall can not be mounted. But if necessary, the wall is cut out of the usual plywood, based on the size of the length and height of the rack.
Assembling rack with your own hands
So, all the necessary structural elements are prepared. Now the most responsible is to assemble the wood rack in a single design. At the same time, it is best to use several different types of fixtures: and self-tapping screws, and carbon black, and nails, and metal corners, if necessary.Options for fastening the shelves
First, the lowest shelf is taken for the base, to which the rear wall of the rack is mounted using self-samples. If such a wall is not provided by you, then immediately start working with the side walls. From the inside, you have previously been made for the shelves.
Article on the topic: Turquoise wallpapers: photo in the interior, for walls color, with brown pattern, room, white turquoise with flowers, curtains in bedroom, beige, video
So now on each of the marking parallel to each other, it is necessary to secure special metal or plastic (depending on the intended cargo for the shelves) holders for which wooden shelves can be put. Next, these sidewalls are mounted to the lower base using self-samples. At the same time, do not forget to observe the evenness of all angles. For reliability, it is even better to use metal corners as fixing elements.
But it was the first version of the shelves. There is also another - solid fastening. Here you already do not need to make holders. In this case, the shelves will directly connect with the sidewalls. To produce everything correctly, for starters, attach the side walls to the base with self-taps, after which one person should keep inside the shelving of the shelf, and the other - from the outside side of the sidewalls to fix it with self-draws. From under the bottom of the shelf, it is advisable to further fix all the same corners of the metal. But note that this method is a bit more complicated, since it requires perfect measurements of the length of the internal shelves, as well as more time and care for work. Any batch can spoil the rack. Therefore, immediately use the construction level.
Some additional advice
So, the bulk is ready. Now it remains on top to secure the cover of the shelving, which will give the shelving a finished look and protect the most upper shelf from dust from entering it. Fastening is carried out with the help of all the same screws.
The manufacture of the shelving (in particular, in the assembly process) will be more reliable if after drilling holes under the screws you wake them inside with joinery glue. This will provide additional reliability. It is best to use furniture legs on wheels as a rack legs. So it will be more convenient to move the design, if necessary, it will be able to withstand any loads, while not provoking the distortion.
Article on the topic: Gas column in the bathroom
Wooden rack is ready! It will look like its main part will be approximately as in Fig. 1. This simple and practical simultaneously design is suitable for any room: for kitchen, bedroom, hall. Now you can only cover the rack of a lacquer for a tree and let dry as it should.