
On the eve of the summer season, many needlewomen are trying to diversify their beach wardrobe by some new thing. We want to offer you a fairly interesting and simple master class, which will tell how to sew a beach tunic with your own hands. In this case, it will take a batter or chiffon for the main material, the drawing of which will be the highlight of this product.

For experienced craftsmen, this product can be sewn even without pattern, but for convenience we want to offer a pattern for it.
For any drawing, you must first remove the main dimensions. In this case, it is necessary to measure: the length of the shoulder and sleeves, the neck circumference, the depth of the armor, the length of the back to the waistline, the pancake from the waist line, as well as the girth of the hips. If you have dimensions, close to the fact that they can be shifted on the pattern. You can safely sew beach tunics from chiffon, patterns use those that are shown in the master class.
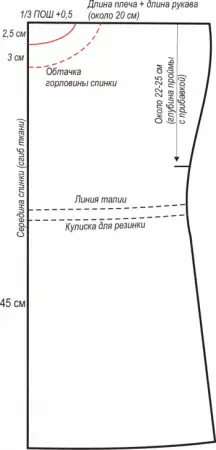
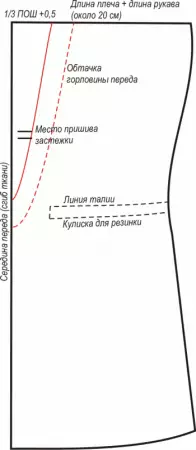
Now you can start building the drawing, for which it should be started from the upper left corner. From the point in this corner it is necessary to spend two lines: horizontal and vertical. By horizontal further postpone one third part of the semicircle of the neck plus half a centimeter for landing. In the same direction, we continue to postpone the length of the shoulder and the length of the sleeve.
The vertical line must first postpone two and a half centimeters, then the length of the back to the waistline, after which the length of the tunic from the waist line.
From the resulting endpoint, it should be cut to the right, on which we post one fourth hip girth and seven centimeters for free fickling.
Then, with the use of melts, the line of the side seam should be burned. (see Pattern).
We should not forget about the wrappers that are needed for the front and back of the tunic. Be sure to transfer them to paper.
Article on the topic: Tausa from Berestov with their own hands
The Kulisk will have a width of about four centimeters, which will give a strip in the finished form from two to two and a half centimeters.
This stem is seized from all sides and admonish with the inside using the previously applied markup. Do not forget to leave a place to make a gum. In this embodiment, a gum is used two centimeters wide, which in the front of the tunic is attached using two vertical lines.