
Preparation of a child for school is not only stress for the most future carpenter, but also for his parents, but first of all for their wallet. Pens, pencils, rules, notebooks, propisi - a considerable list is recruited, the result of which is the figure with three zeros. But on some trifles you can save, for example, make a cup for pencils with your own hands. This is a functional element that must be on the table of preschooler and schoolboy. He organizes a child and tends to order, to the fact that everything should be in their places. Most of the techniques for creating a cup for pencils are very simple, so you can master them together with the child, and you can fully entrust the creative process. A cup made with your own hands will be valued much above the shop.
Methods for creating cups for pencils quite a lot. They vary from the simplest, which are even a baby, to more complex, requiring certain skills and skills. This article provides examples of only some uncomplicated ways.
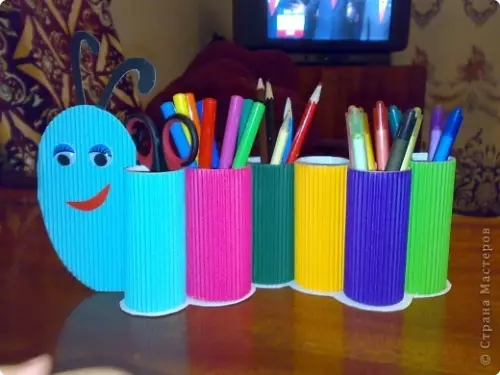
From the bushings for toilet paper
Such a cup is easier than simple. This lesson can be trusted even the younger preschooler. The process of it is very hobble, and a 100% guarantee of obtaining a good result will become impaired.
You will need:
- toilet paper bushing;
- corrugated paper;
- Color cardboard;
- Scissors and glue.

- From paper cut the rectangle. The height of the rectangle is equal to the width of the sleeve, and its width is equal to the length of the circle of the sleeve. This is not necessary to carry out complex mathematical calculations. It is enough to simply wrap a sheet of corrugated paper sleeve and make notches in the plus places.
- With the help of glue, the sleeve is covered with corrugated paper and retracts on drying.
- From the cardboard you need to cut the colors of arbitrary shape and quantity.
- At the last stage, cardboard flowers are attached to corrugated paper with glue.
Article on the topic: The ideas of the New Year trees do it yourself
This can also be stopped and getting a very pretty cup or go further. You can add an additional decor from undergraduate materials, such as tapes or clips. And adding a little fantasy, from several such cups it is quite realistic to get a cheerful caterpillar.
From tin can
Not every household waste should be left immediately. Some of them can purchase the second, completely uncharacteristic for them, life. For example, from the used can be made an original cup for pencils.
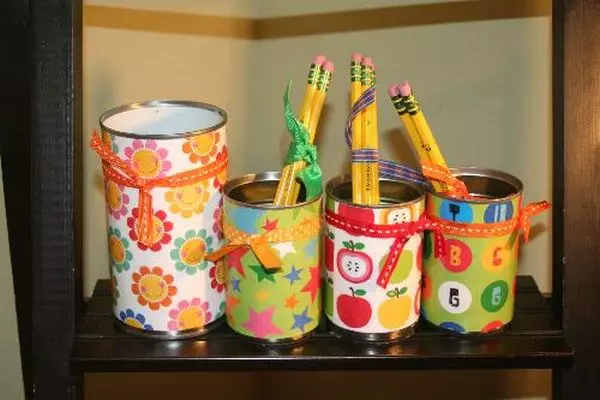
You will need:
- empty cans;
- a piece of linen or canvas fabric;
- transparent PVA glue;
- decorative tape;
- Element of decor (flower, accessories, etc.).
- Rinse the cans and remove the paper label if it is.
- With the help of a file, pass the sharp edges in the opening place of the jar.
- Take a piece of linen fabric or decorative canvas tape and enclose it to a jar on transparent PVA glue.
- On the top of the jar on top of the basic tissue, glue the decorative tape.
- In the center of the front of the bank, glue the flower.
This is only an approximate algorithm of work. Using various materials, you can create absolutely unique cups.
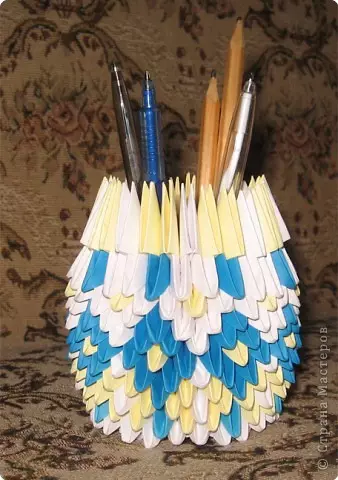
In Origami technique
There is a way at which only paper will be required to create a cup for pencils. This method is called modular origami. Technique is simple, but requires perfection and patience.
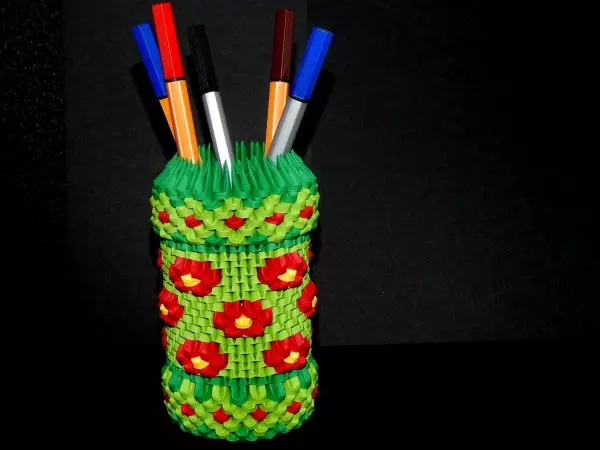
You will need:
- sheets of paper;
- scissors;
- Cardboard sheets;
- PVA glue;
- Simple pencil.
- It is necessary to cut 176 rectangles from paper.
- Fold them in this way as shown in the figure.
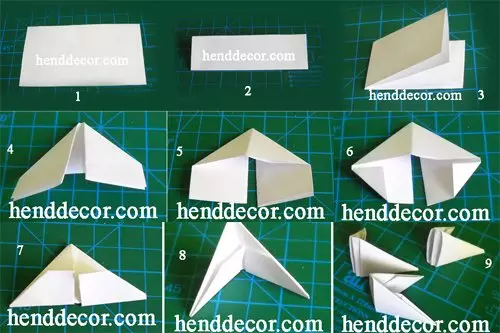
- To build a first level, you will need 24 modules. They need to be added in this way: 2 modules are inserted with sharp edges in the third, which will be between them.
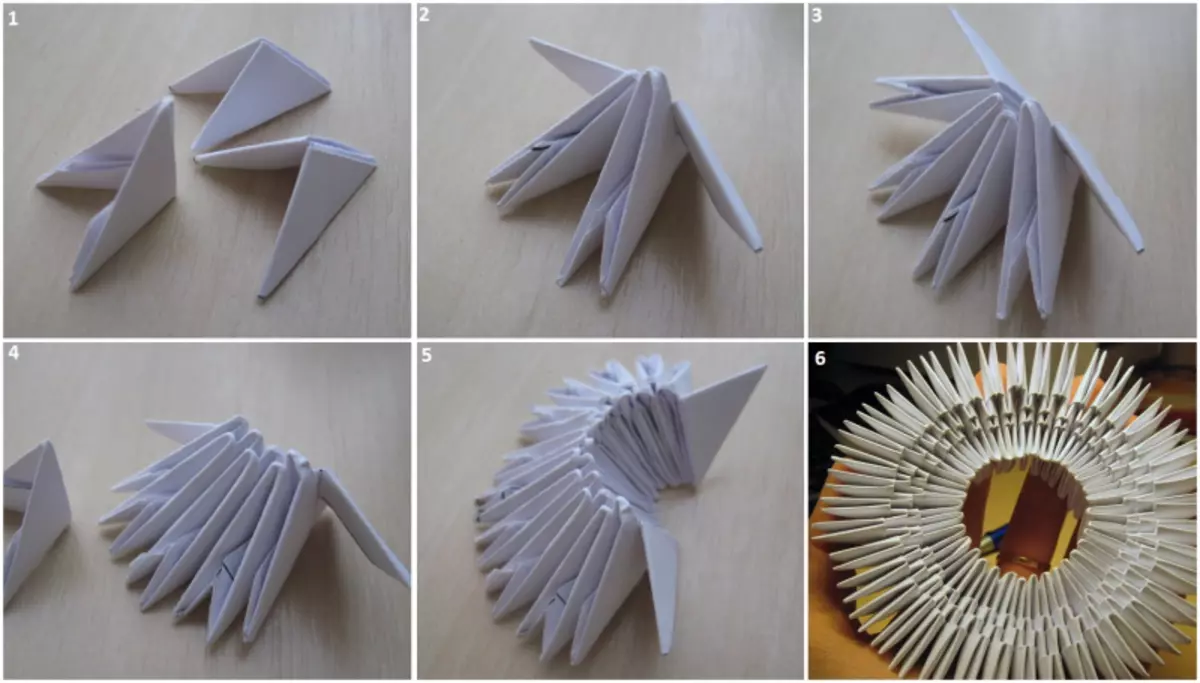
- By the same principle, 8 levels are connected up.
- Next we compact the bottom of the product. To do this, it needs to be turned over to the bottom and strengthen the first row by another number of modules.
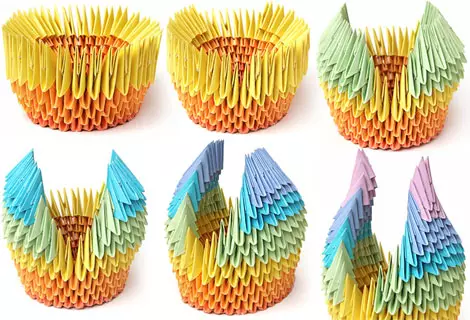
- A circle is cut from the cardboard in diameter equal to the diameter of the cup, and is glued below. It will be the bottom of the cup.
Article on the topic: Rosets from egg trays
Glass in Origami technique is ready.
If you wish and acquire a certain level of skill, you can create cups from several colors, as well as output colored patterns from paper modules.
If we seize such a technique you are unable to simplify the task. To do this, it is enough to glue with each other paper modules. In this case, they will no longer fall apart, and it will be much easier to work with the product. Having made the first few cups, you will find the hardness of the hand and can in the future you can work without glue, create not only cups, but also more sophisticated products.
Video on the topic
See video on the topic here: