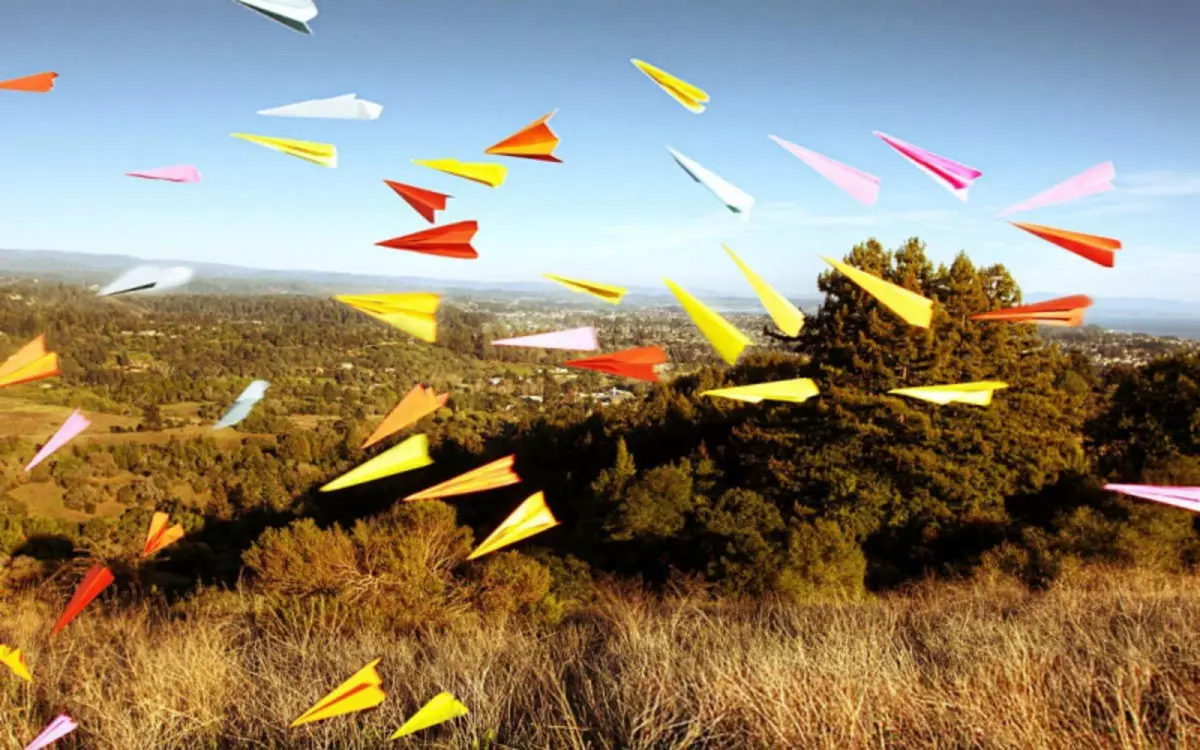
All are familiar with paper airplane, who did not master him in childhood? Children loved to play with ships, airplanes and toads made of paper. Origami does not require any special costs, develops motility, imagination and hand dexterity. This is the safest hobby for kids. You can run paper toys at home and even in the yard, without fear of unpleasant consequences. And you can immediately make such toys. Especially the kids like to run airplanes from the window on the high floor, and then watch their lavaling and flight.
Secrets of mastery
Consider several different ways, how to make a paper airplane with children. It is important to know that several factors will affect the range of flights of your paper design:
The most important participant of the flight is the tail. So that the aircraft flew far, it should be folded in all the rules.
Strict symmetry should be observed.
Paper should be easy, so the cardboard is not suitable here.
Wings must be bent.
As the airplane flies
Working with paper is pleasant and convenient, it is easily deformed and takes almost any shape. Independent folding of origami can benefit and pleasure:
Many will be able to remember childhood and posstalgate, while taking their children to fold simple models of airplanes or ships.
This lesson trains concentration and attention, helps learn to think creatively and developing imagination.
You can arrange various contests on children's holidays, who will quickly make paper figures.
So you can train your fingers and coordination.
Hand training
Standard model
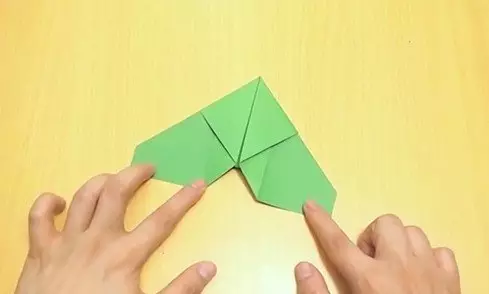
It is better to start with the simplest, this is familiar to the whole basic model of an airplane from childhood. We need only a sheet A4 (you can use a notebook or newspaper sheet if you wish), the supply of patience and skill. To understand how to create a paper airplane, you need to start with Azov. Teach your kids to start cope with simple layouts, and then gradually go to more complex. Let's proceed:
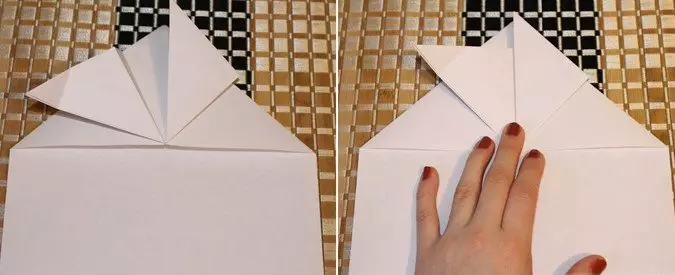
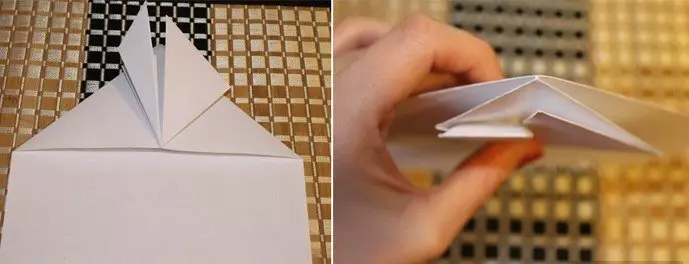
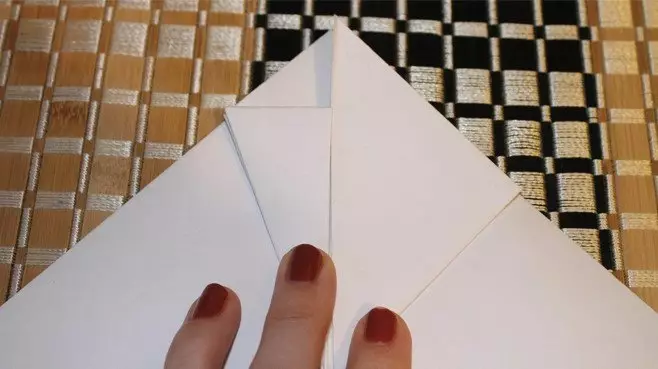
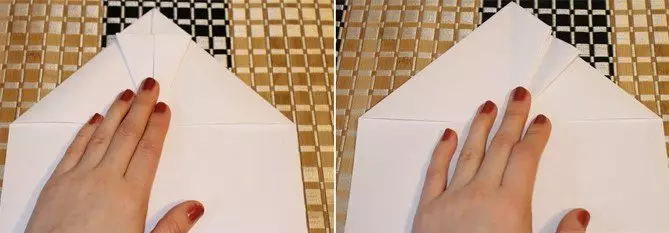
We fold a sheet strictly in half, carefully spend on the bend line and recall again. The middle line should be clearly visible and be perfectly smooth.
Top corners on both sides bend down to the midline. There should be triangles with equal parties.
Again, bend triangular corners in the direction to the midline.
The layout fold in half and deploy to the opposite direction.
We make wings on both sides, and the plane can be launched!
Mastery truckers
Such a layout has the ability to fly, as if boomerang.
To form a central line, you need to fold the sheet in half and spend your finger along the line in the middle to fix it. Then re-break.
The upper corners are folded to the midline so that two equal triangles are. The form must resemble a house with a roof.
We fold the layout across the top line of two triangles.
Again, bend both upper corners, leaving below a small tongue.
The tongue raise up and gently stroke the line for fixation.
We fold the model in half, make wings and way! Now you know how to make a paper trucker.
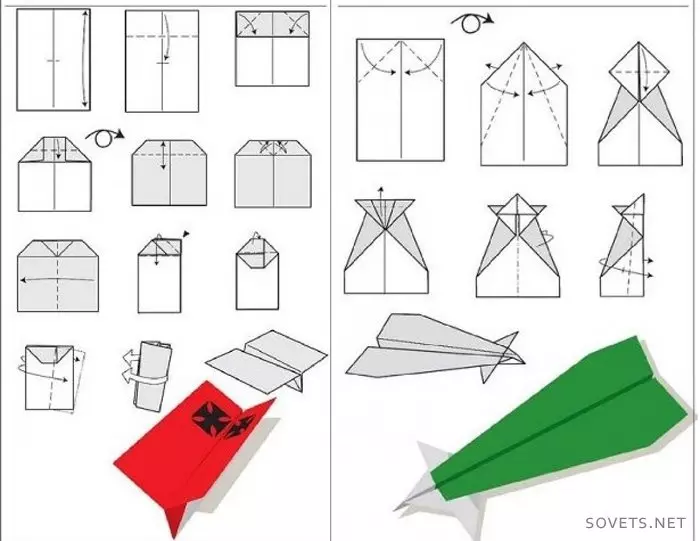
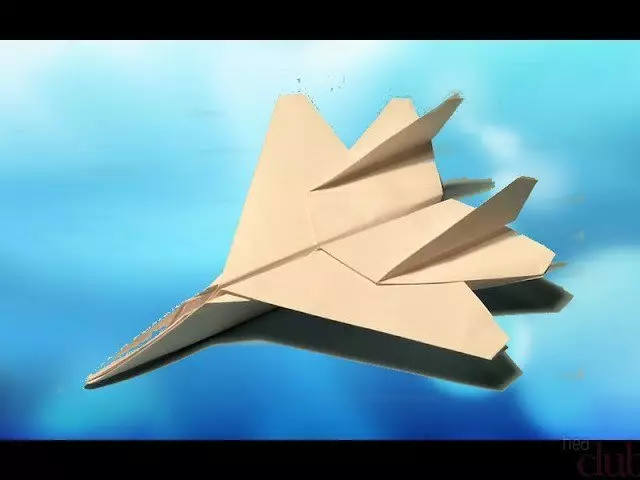
Jet fighter
The boys will love to make military combat aircraft, similar form for real. You can use colored paper, as well as depicting it markers or pencils of models.
The mockup of the red color is perfectly maneuver and gains high speed due to weighting in the nose, the tail is facilitated. In this case, the aircraft even the wind will not be an obstacle.
But the layout of the green color is designed for long flights. Such a model is capable of slow and smooth decrease, the planting is soft.
These are real F15 and F16 fighters. They are capable of complex maneuvers, pass a dead loop, various peak and blown. Certain with such devices is capable only there is only a fearless pilot.
Airplane design tips:
It all depends on your imagination. You can use color pencils, handles, markers, markers and paints. Break already ready-made designs.
Do crafts from colored paper, choose bright shades so that the plane immediately stand out on a general background.
If you want to arrange competitions whose model is faster or longer, make your planes from one color. So it will be easier to distinguish your layout from the opponent layout. To understand the process of creating an airplane from paper, clearly follow the instructions in the pictures and video.
Device with propeller
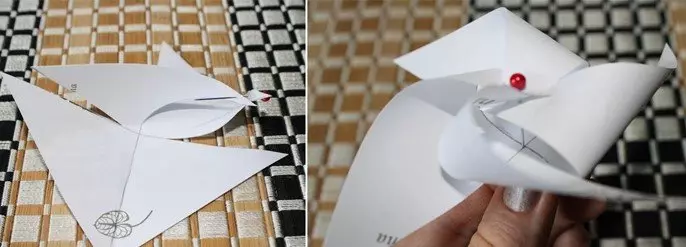
We will need a sheet of paper A4, sharp scissors or a stationery knife, a needle with a bead and a simple pencil. Consider the entire process of step by step:
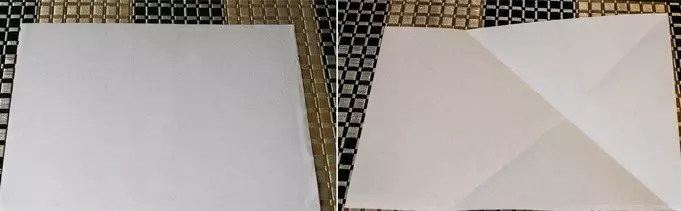
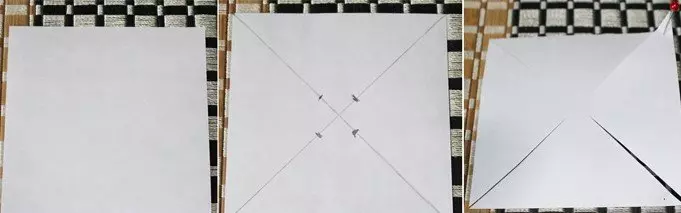
Paper sheet bend in such a way that two diagonals are turned out, as shown in the photo.
I turn over the sheet face down, bending so that the central line is in the middle of the diagonal. Then bend the paper on both sides, as shown in the picture.
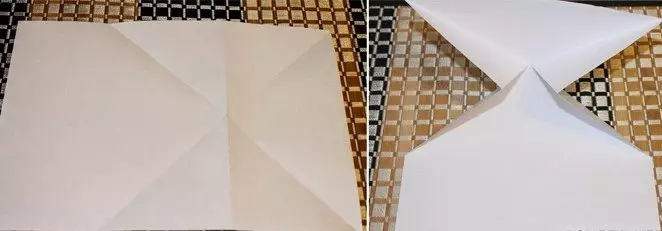
We turn the left edge to the right and bend up. Then we unfold back and do the same with the right edge.
It is necessary to bend the left edge again by starting the corner per layout.
We deploy the right side, bend to the midline.
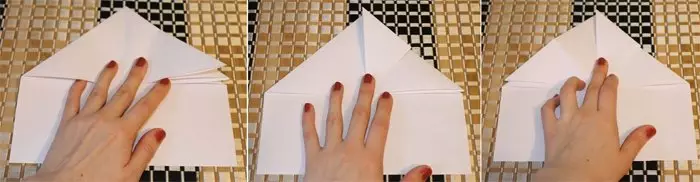
We make another fold and wrap the upper corner inward.
Right corner bend to the midline and extend back. The left part turn on the opposite direction, the edge from the bottom you need to insert into the hole on the right.
Bend the layout and make the wings, as shown in the photo.
To make a propeller, we need a piece of about 8 * 8 centimeters, dismissed in two diagonals. On each line we make notches at a distance of 5 mm from the central point.
To understand how to make a paper plane that far flies and easily done, you need to properly learn to make a propeller. We cut the sheet along the lines exactly to sites. We fasten the design, as shown in the photo, fixing in the middle of the needle. The needle should pass through exactly the central line at the intersection of diagonals.
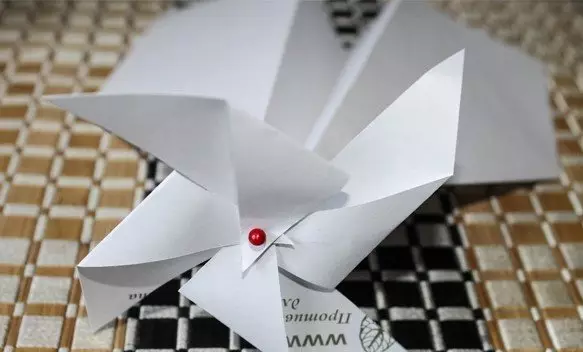
Fix the propeller on the tail of our aircraft, can be fixed with glue or scotch. Model is ready!
Origami manufacturing tips:
Always well and gently stroke all lines on bends. To do this, you can use solid items, such as a ruler or pencil.
Work only with a smooth not referring paper so that the layout looks beautiful and was collected by the rules.
For a newcomer, they advise to start with simple models, get used to paper and technicians. When the material will obey you, and you will develop a motor skill, you can move to more complex crafts. Mastering new methods is never late.
The curved, crumpled, deformed and curved sheets are not suitable for origami. We will have to purchase new ones.
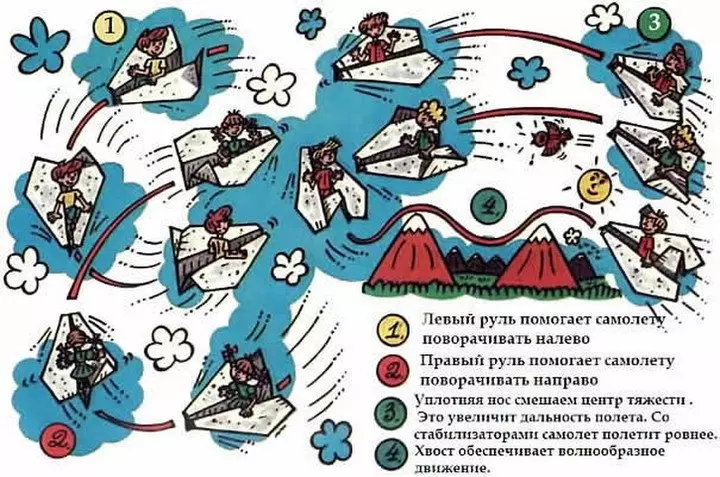
Make sure that symmetry is observed in the designs relative to the central axis. Otherwise, the product will not correctly maneuver and fly for a long time. Airplanes can also fall on the side or even fly not in the direction in which it is necessary.
When you figure it out with the creation of a paper airplane that flies well, you can organize a home airline with your baby. This is an interesting and exciting occupation not only for children, but also for adults.
Fast aircraft
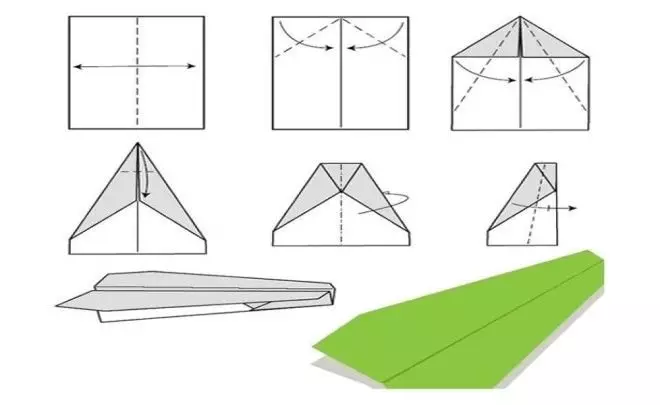
Clearly follow the instructions, you can make a product that is capable of flying quickly and well. Let's start:
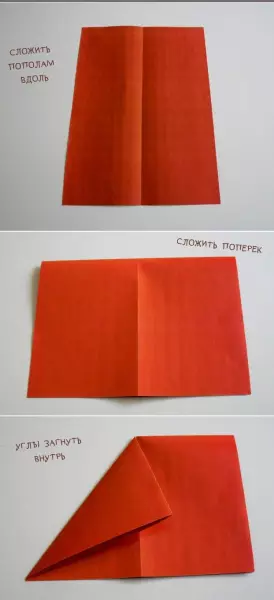
Bend a paper sheet along to get a smooth and clear line in the middle, carefully stroke your fingers or ruler. Then the sheet is repeated again, returning to its original position.
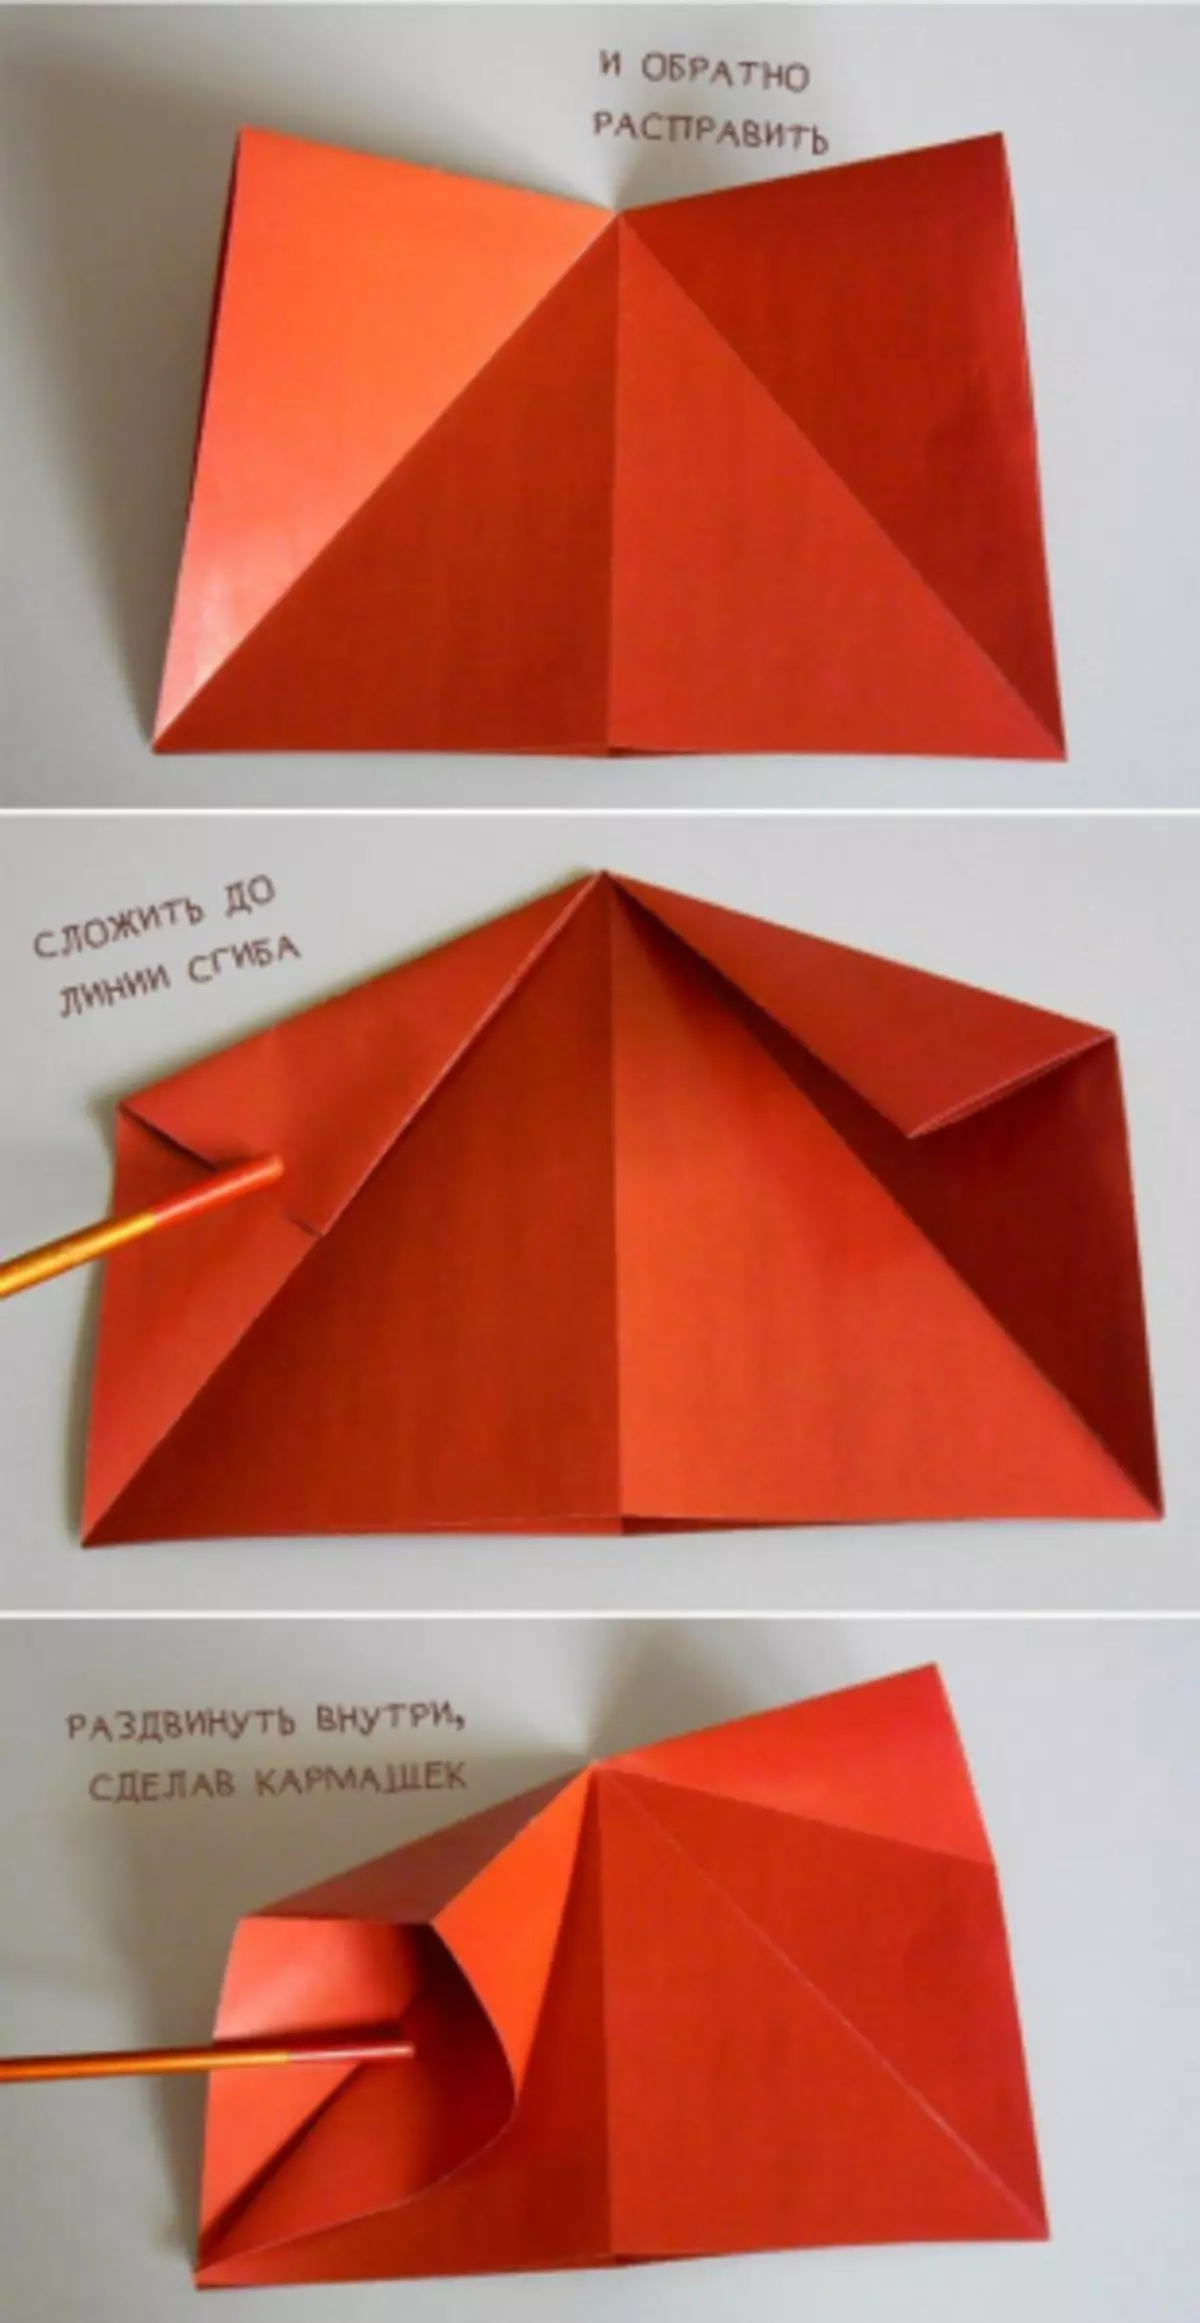
We fold the paper in half to form a smooth transverse bending. From the midline, fill down the two edges. Then weagle half of what was hurt.
The sides are deployed and fold both overheads inside. It must be done first with the internal and then with external challenges.
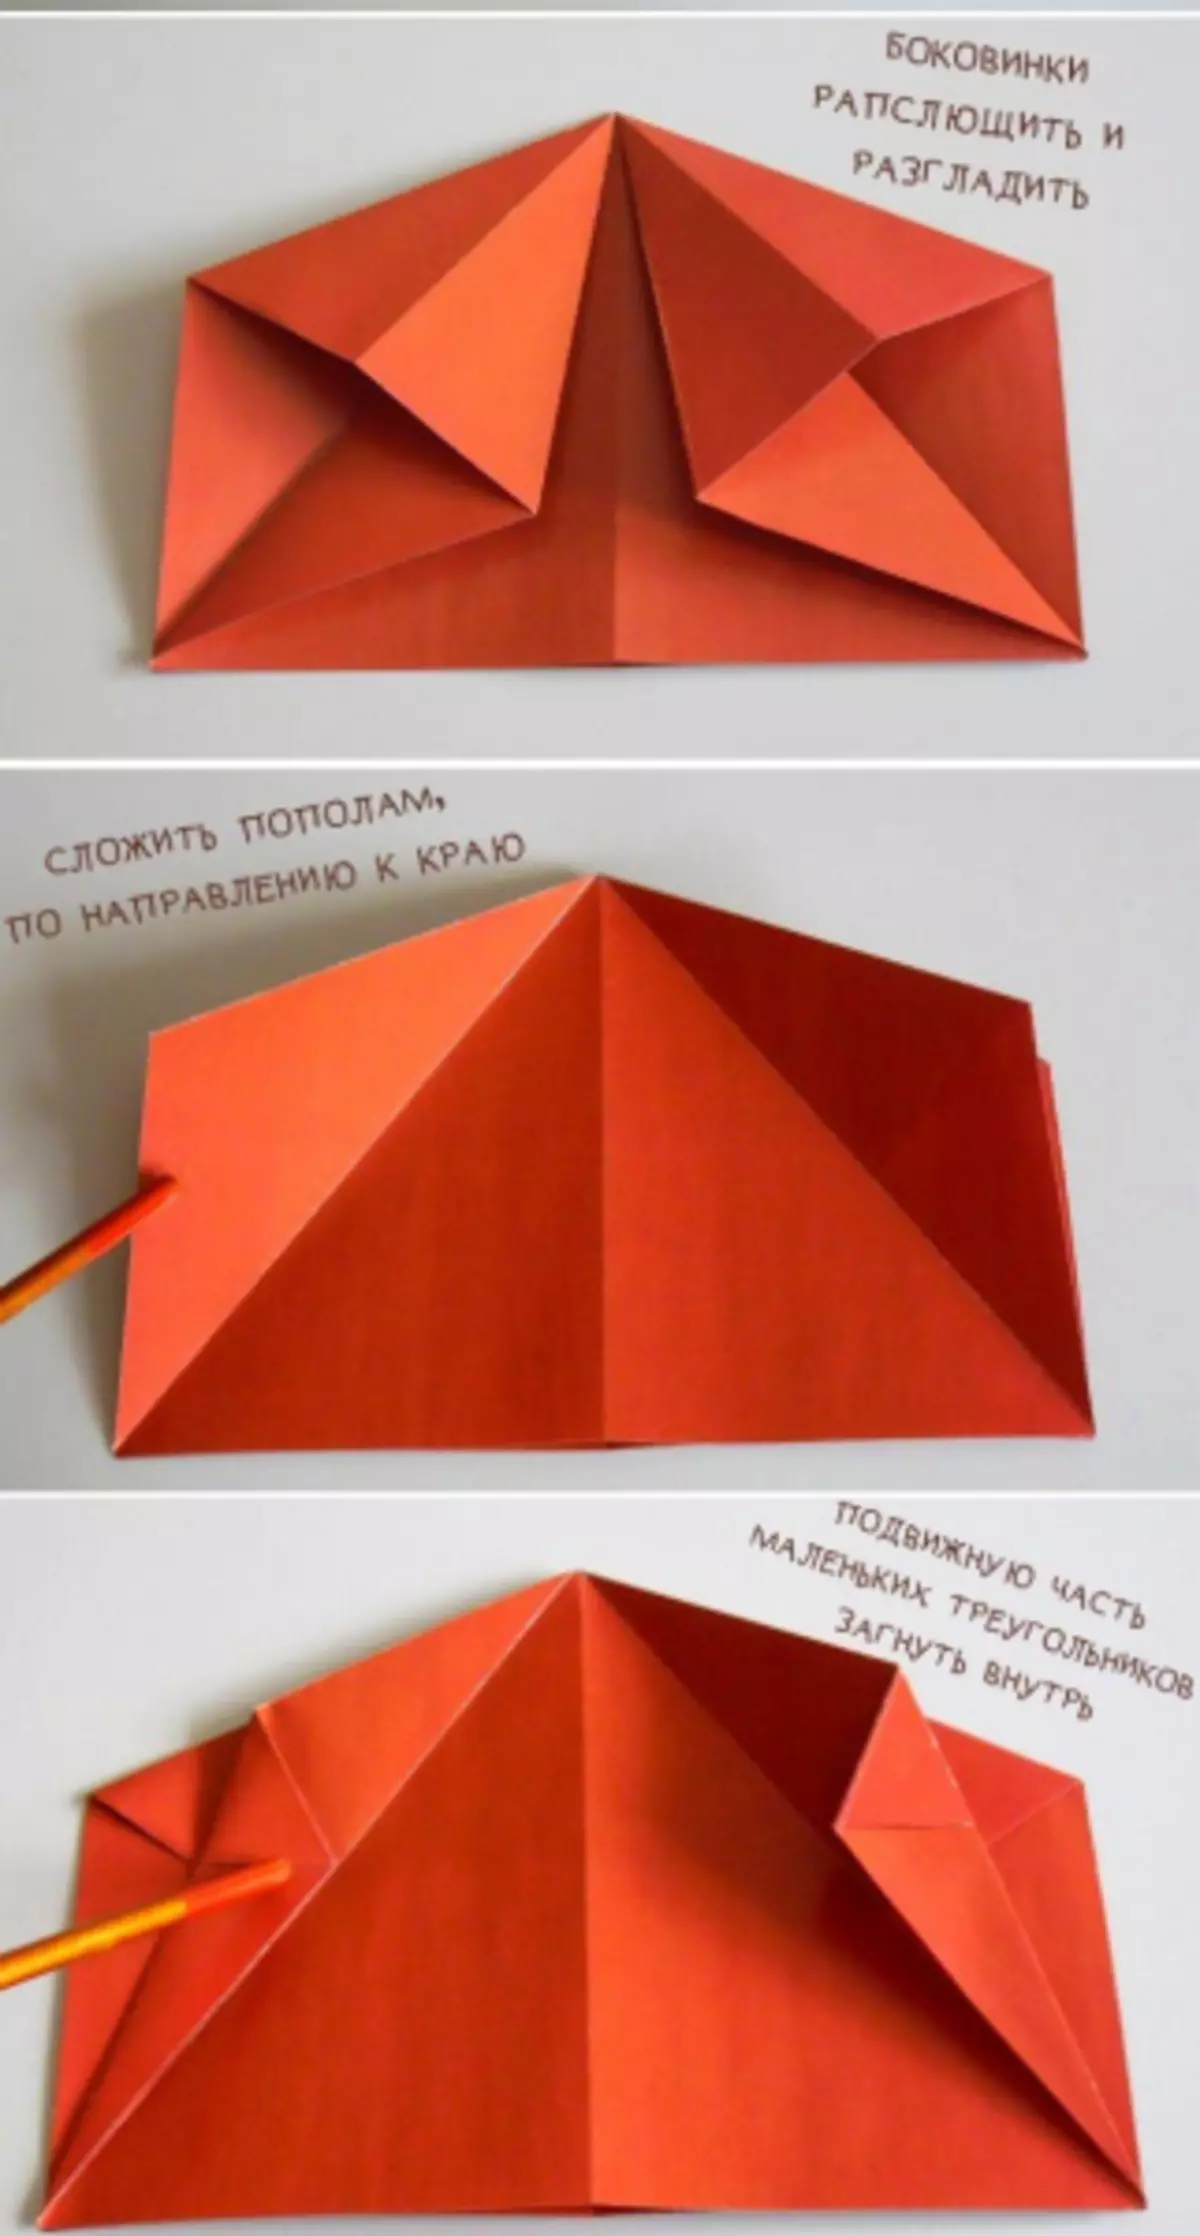
Part of the wing with one and on the other hand bend back, flexing the wings from the bottom.
Stroke the line of bending and extending the wings.
Flaps made strictly parallel to bend on wings.
Fast aircraft ready for flight!
There are secrets, knowing which, you can make your product fly longer than usual. Here are some of them:
Excess weight always interferes with flight, so the length of the wings should be minimal, but sufficient for maneuverability.
For good planning, the layout must be perfectly symmetrical. Below we will tell you how to make a paper airplane with step-by-step instructions and photos.
Throw the plane is always a bit up, and not just forward.
You can add a small thickening (weighing) on the nose. For this, the tip is just gently bend or attached a small clutch.
If your product is crighted in one direction, and does not fly exactly in a straight line, the bending of the wing will help. Determine the side where your plane rolls, and then it is exactly that the wing is slightly lowered.
Well think about the design of the tail part, it is it that is responsible for the directness and duration of the flight.
If you make the hand sharp, remember that it will increase the flight speed, but will reduce the duration.
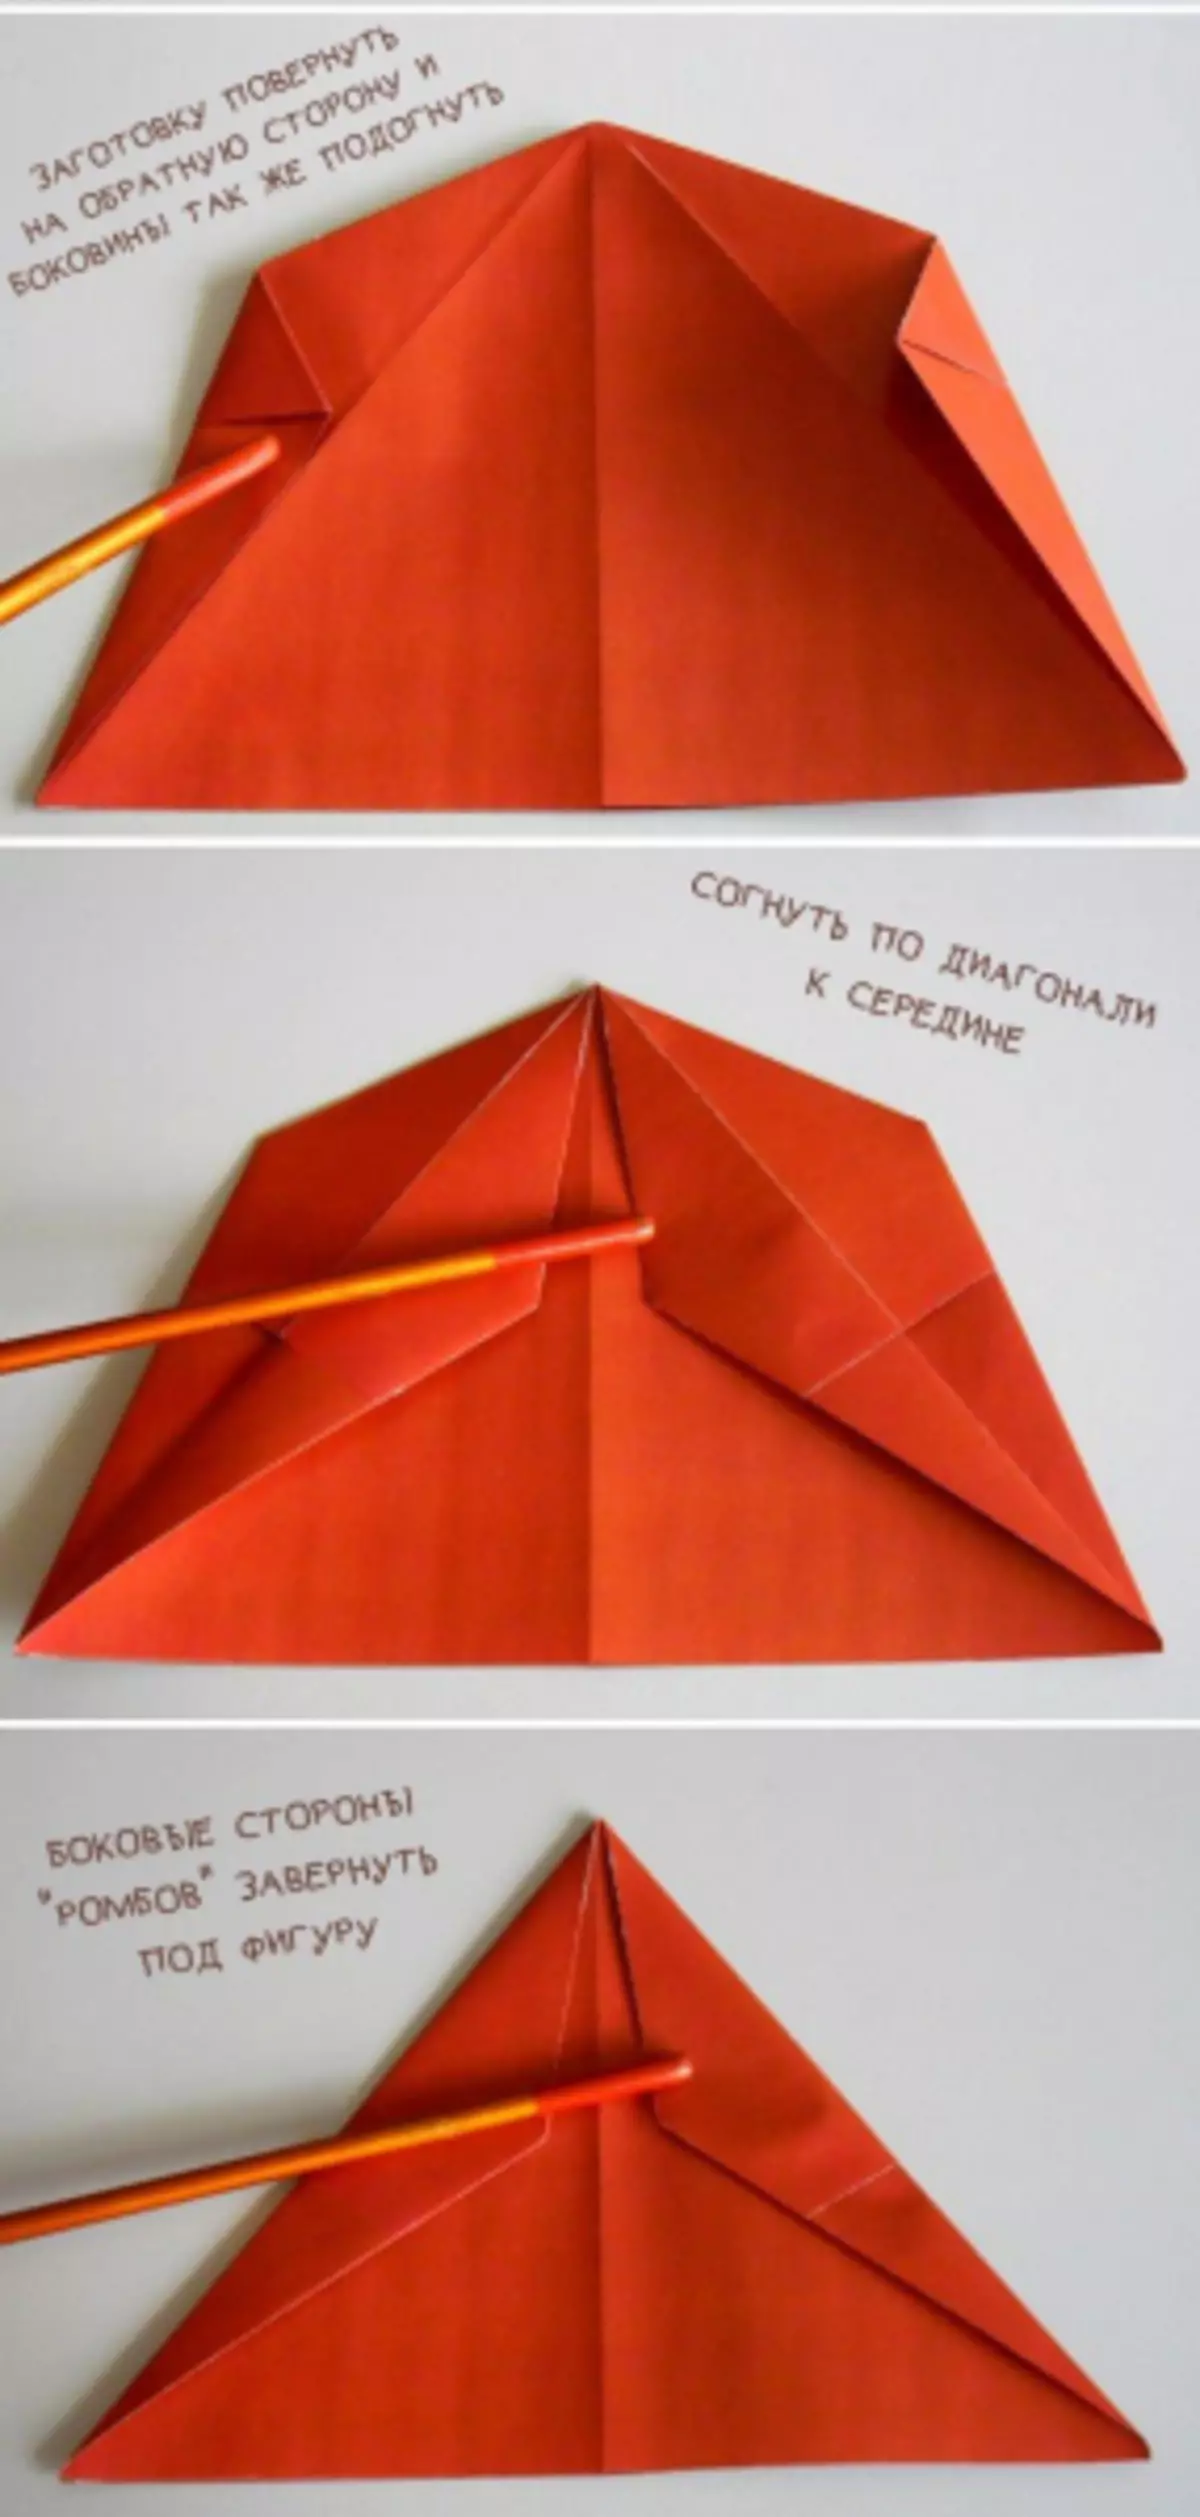
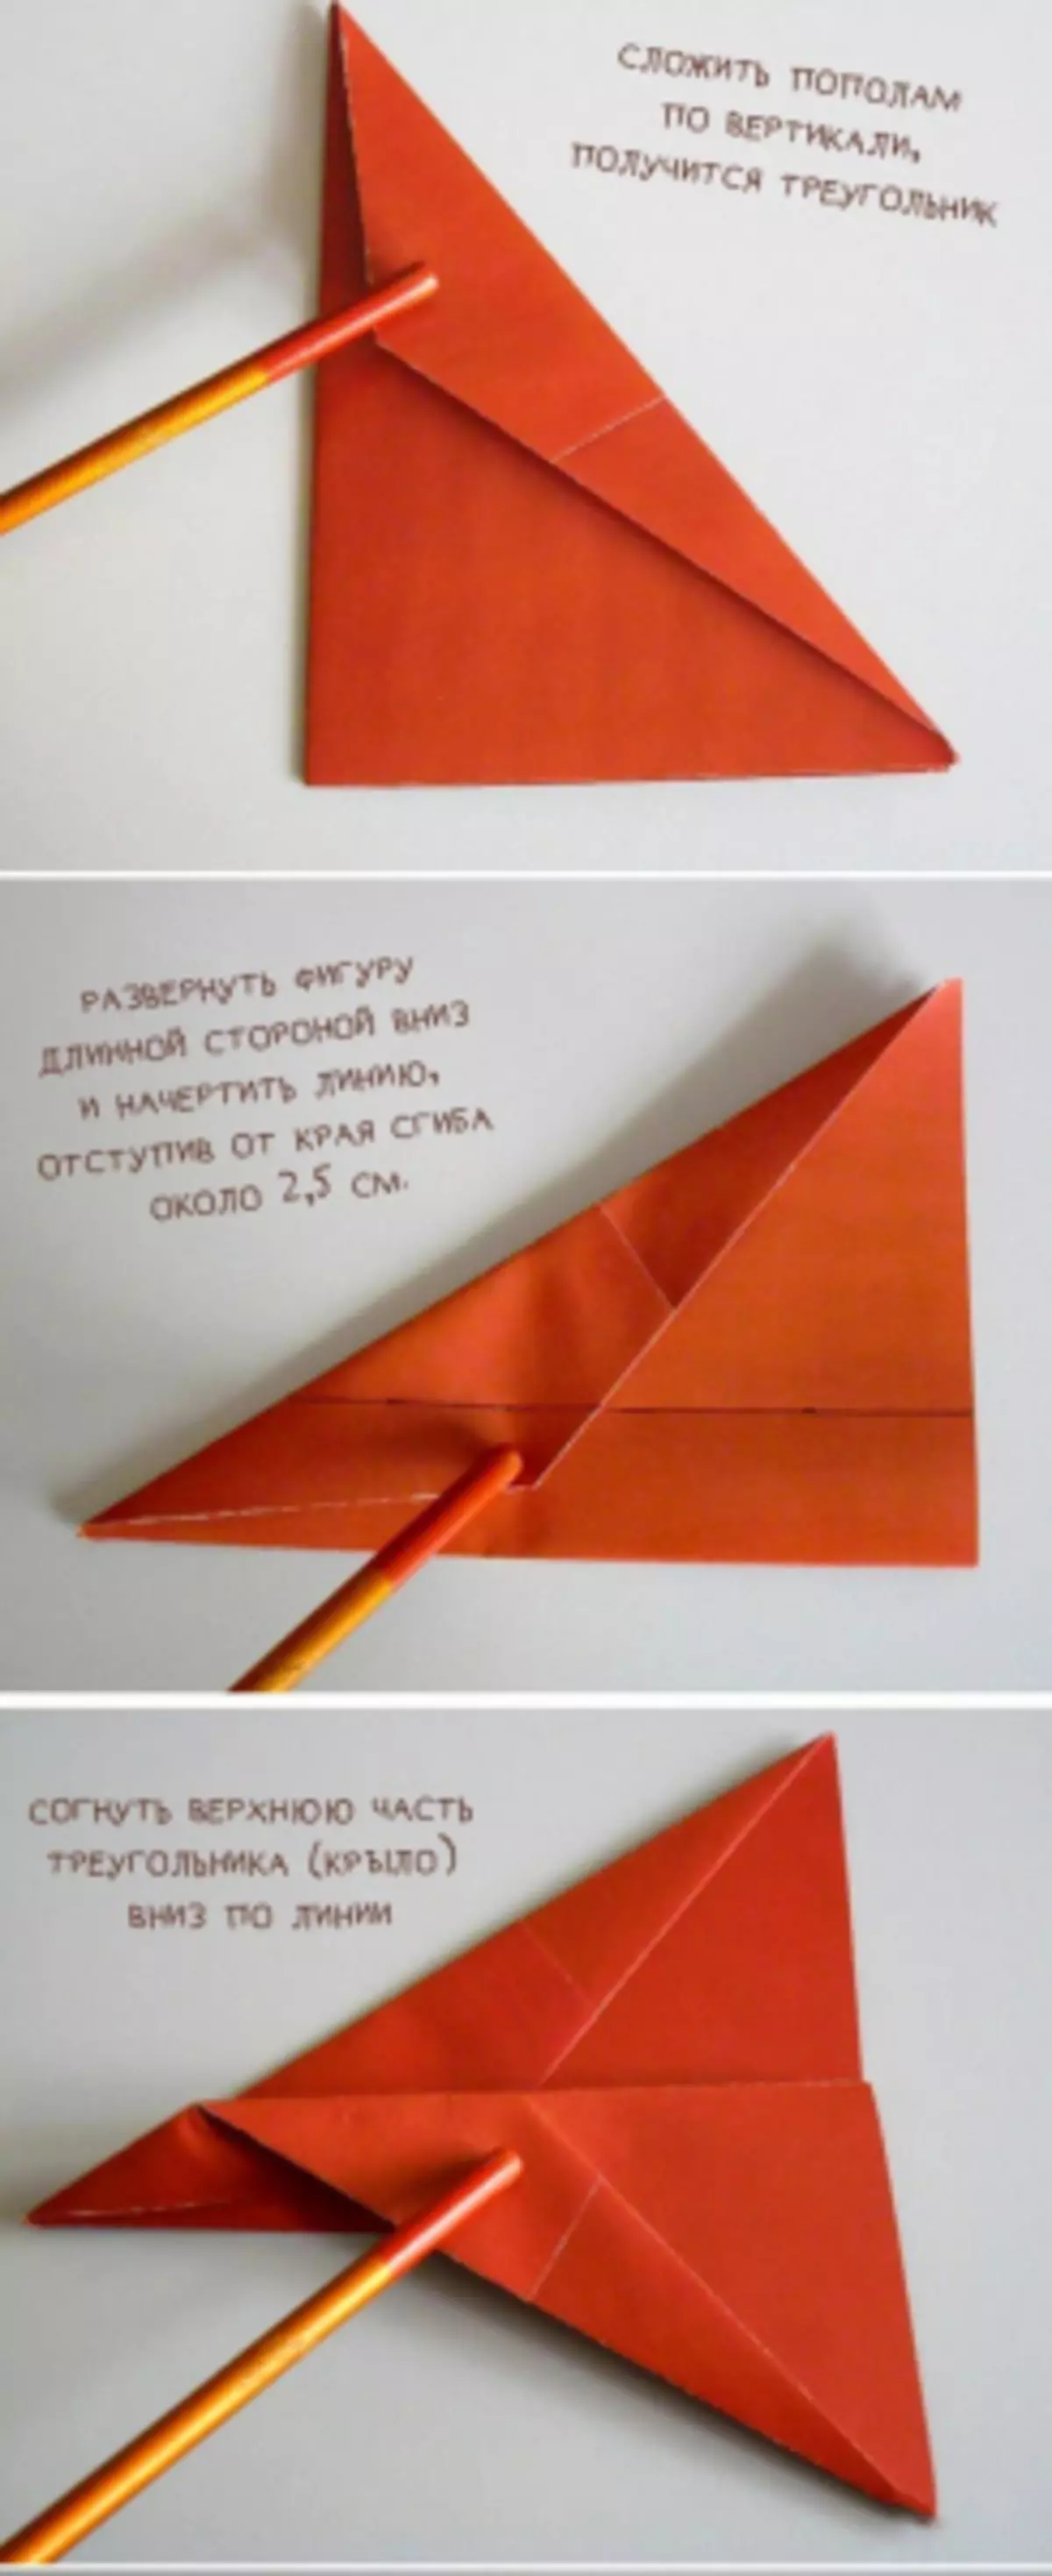
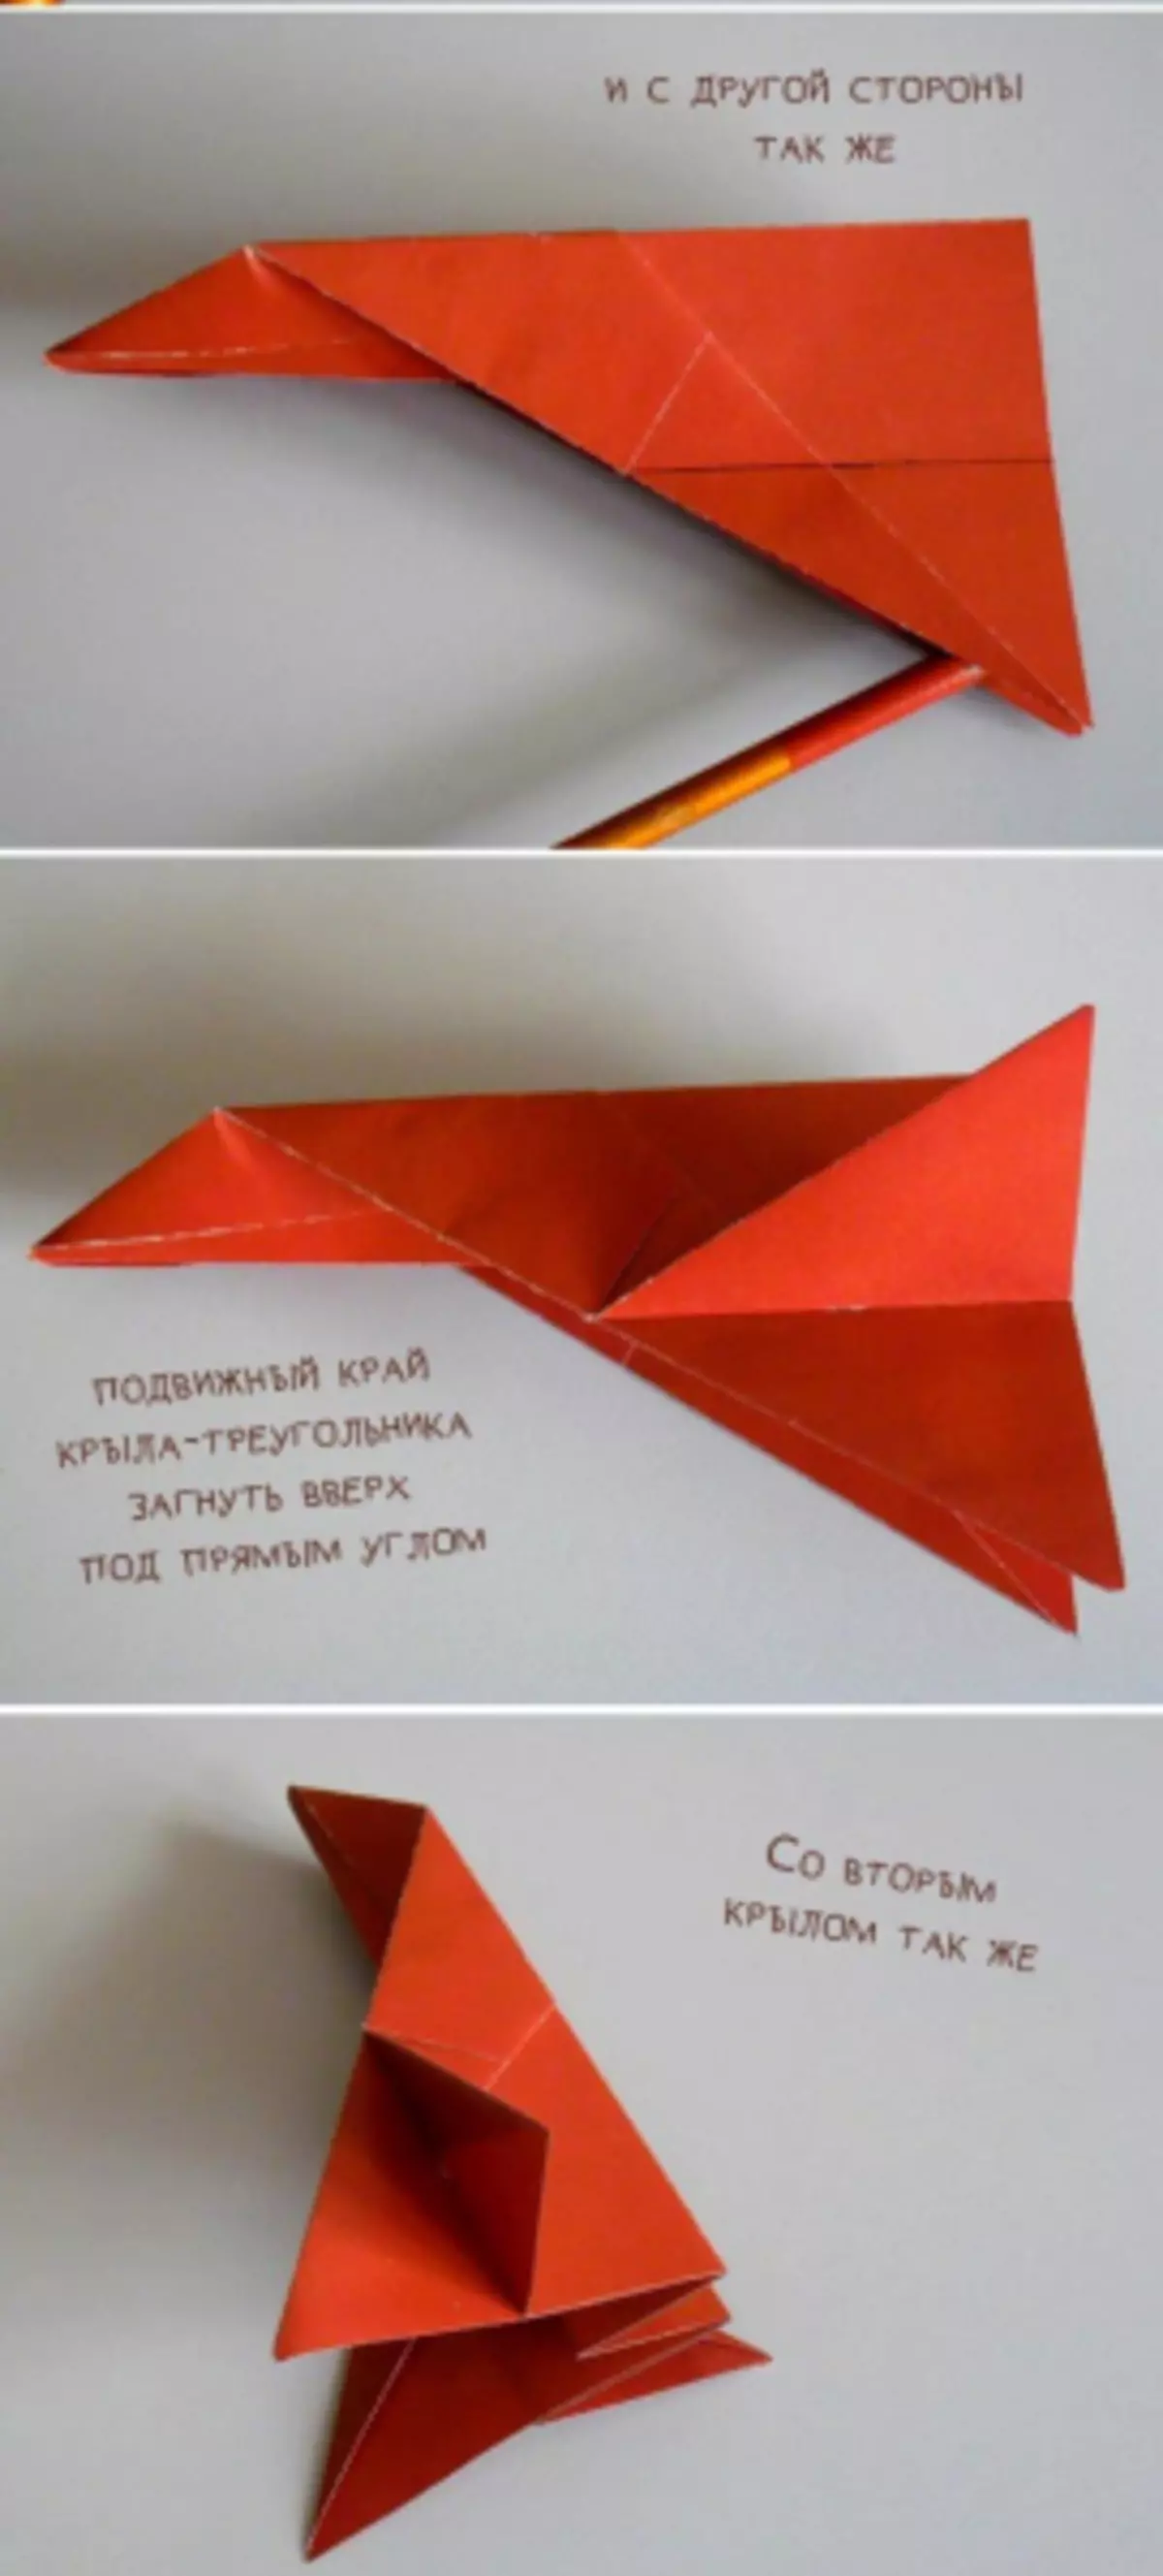
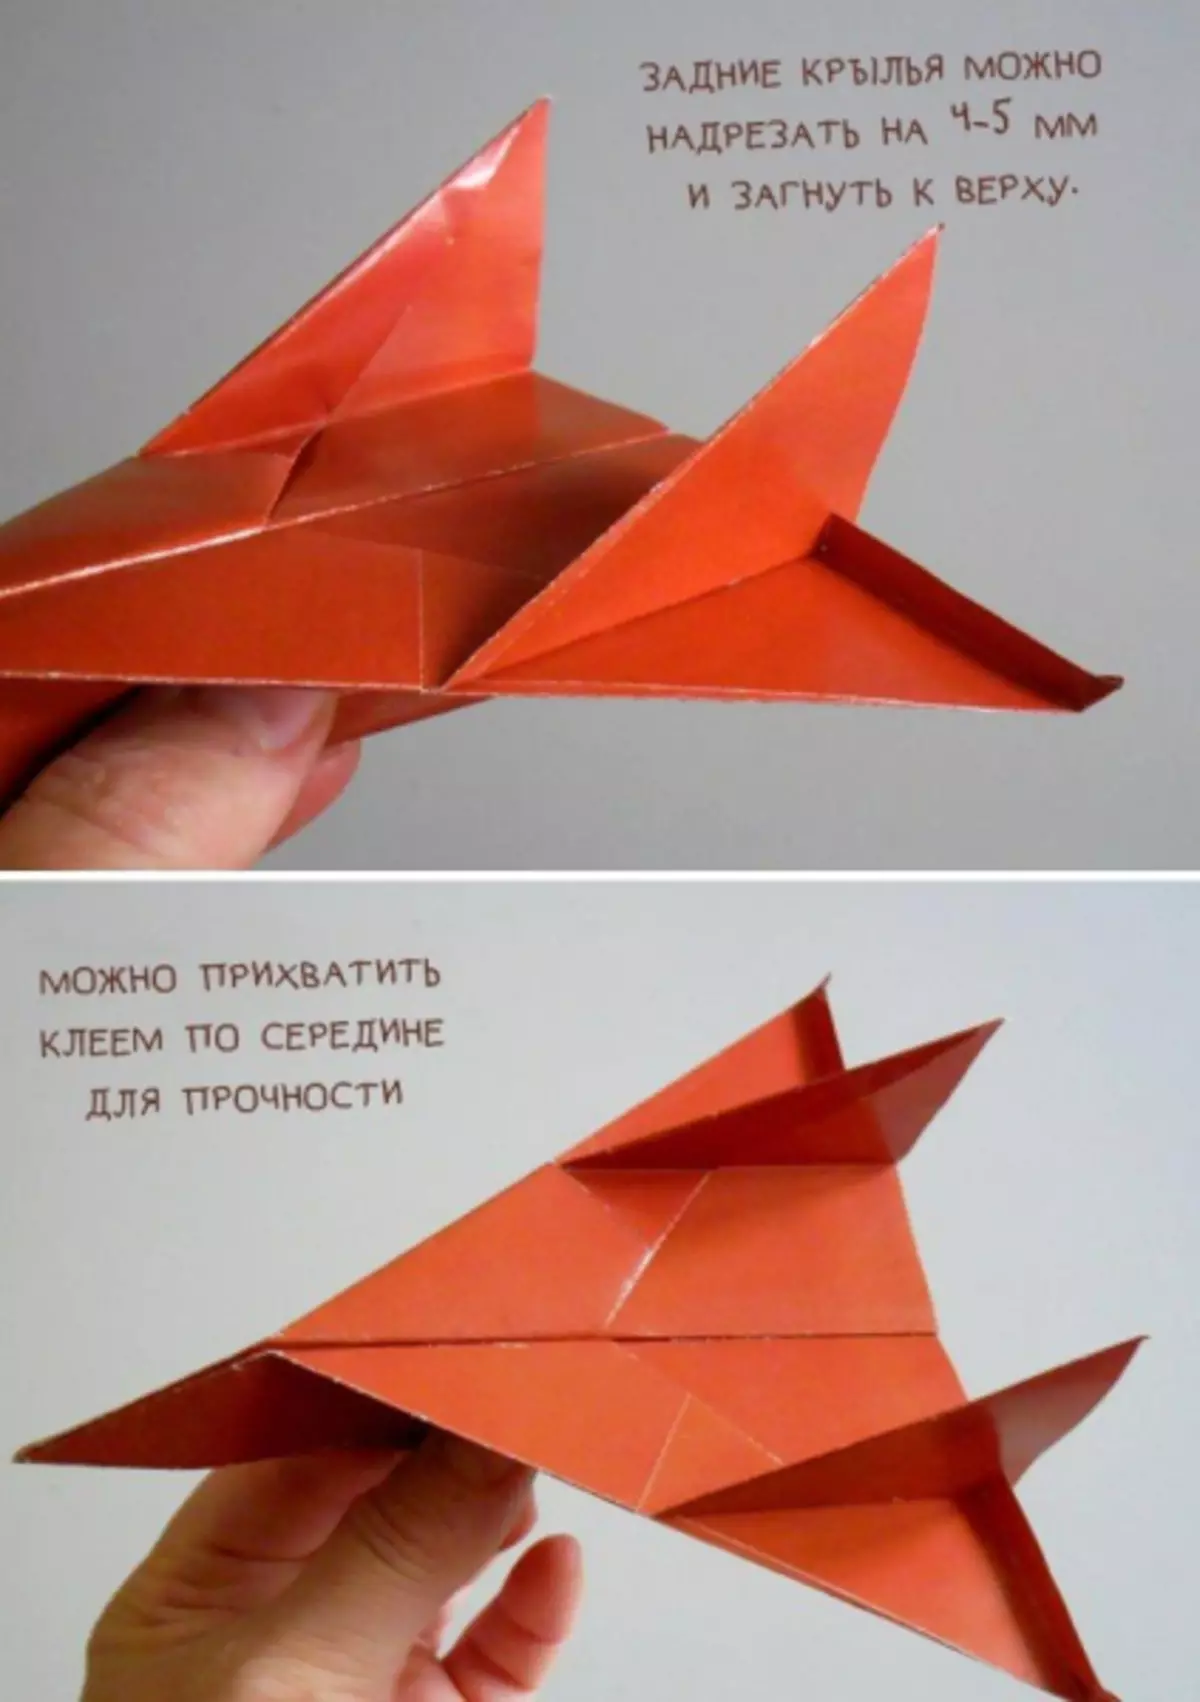
Super-model of the fighter
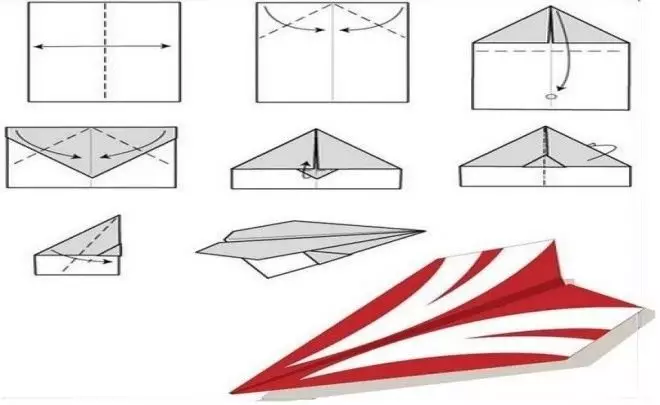
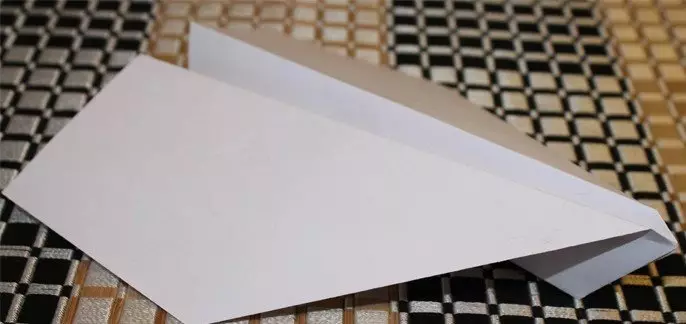
Why is this a super product? It is believed that it is capable of flying up to 100 meters. However, from official sources it is known that the maximum range of such a paper product amounted to 69 meters. This model has good aerodynamics and looks spectacular. To create a handsome fighter, we need a smooth sheet A4, color paper is also suitable. Following our step-by-step instructions on photographs, you will have a real fast aircraft! Work carefully and carefully, especially in the formation of the wings and the tail.
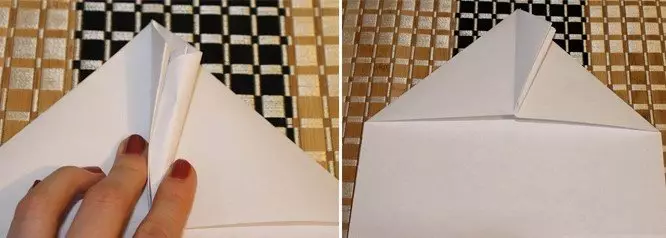
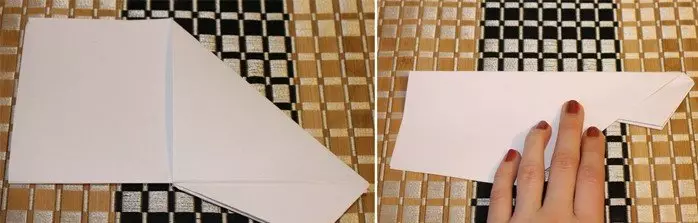
Stage 1
2 stage
3 stages
4 stages
5 stage
6 stage
7 stage
How to make a paper airplane, shown on video.
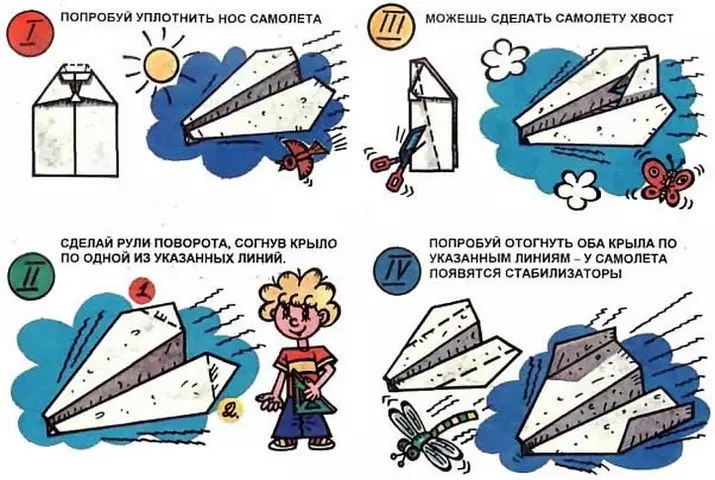
A few more secrets from specialists in the aircraft industry:
If your product constantly hills up, ignoring the direct flight trajectory, after which it makes a dead loop and flies to the ground, it is necessary to revise the design of the nose. You can increase weight or complicate the nose. For this, it is enough just to get a little bit inside.
If your paraglider rolls to the side, you will need to make the steering wheel. You just need to heat the edge of one wing.
If your product always strives to fall on the side of the flight, you need good stabilizers. To do this, bend the wings on the edges.
Paraglan
Parabeda has very large and wide wings, which allows it to make beautiful and high flights. We will proceed to the manufacture of paper paraglider:
Bend the workpiece on the center line, well stroke and extend.
¼ The tops fold to the center line, the corners bend inside.
Paraglan
I turn over the leaf on the opposite direction and bend half the already bent part.
Small corners sweep, fold the layout in half strictly in the center.
Deploy the nose and make the wings of paraglider, as in the scheme. The product is ready for flight! At the same time it should turn out long flying and beautiful. How to make a good paper airplane, similar to paraglider, is shown on video below.
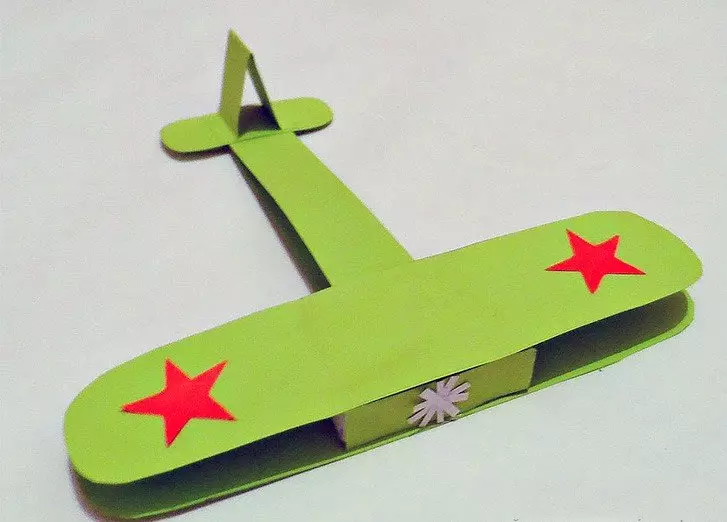
Original corn
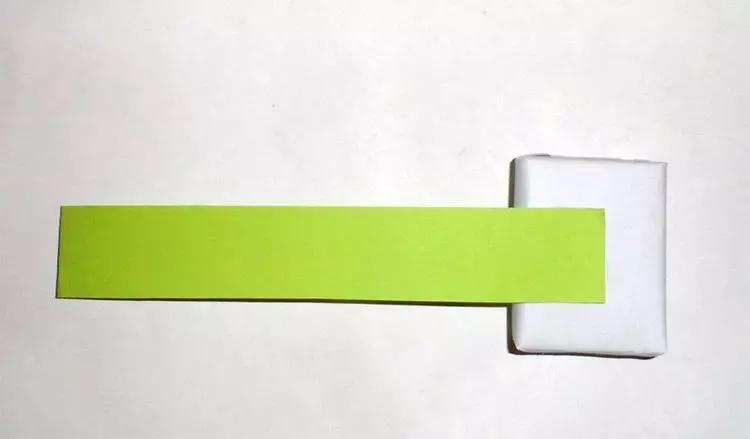
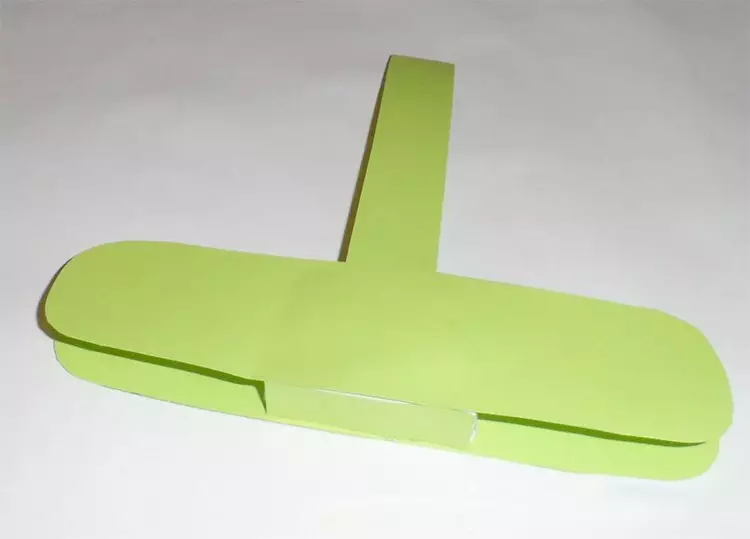
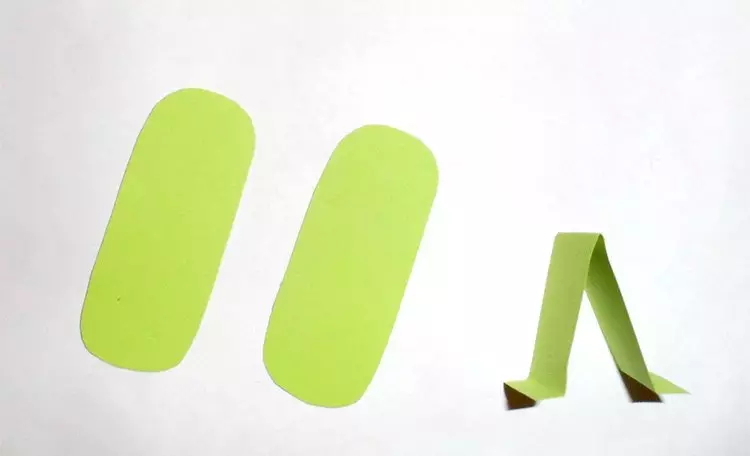
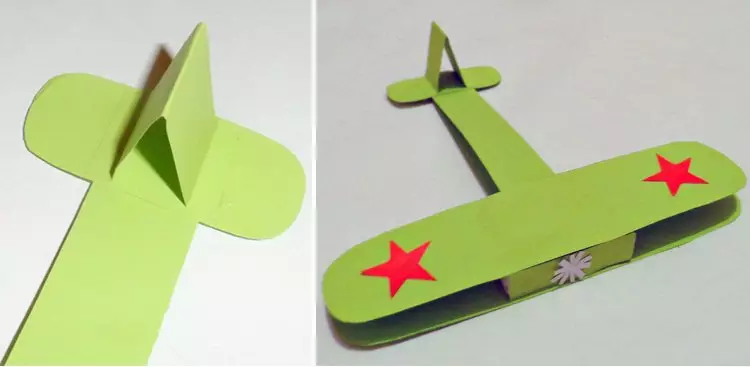
Such a model will surely like your child, especially if you have a boy. This handicraft resembles a real corn. It is necessary to purchase red colored paper, green double-sided cardboard, empty boxes from matches, sharp scissors, pencil, glue.
We proceed to the creation:
Matchboxes glue with a paper sheet, cut the cardboard strip of a 3 centimeter width. Exactly half of this length will be the case of your corn. Bend strip in half and glit to the box.
From the cardboard, we cut both wings in the form of two strips, a little rounded around the edges. We glue them to the box parallel to each other on top and bottom. Cut out a rectangle from green cardboard and put the side of the box, disguising it completely.
Now cut out parts of the tail, they also need to be rounded. Then cut the strip and fold as shown in the photo.
All parts are glued to the tail part, and you can proceed to the decor. On the wings on both sides, we glue two red sprockets cut out of colored paper. In front, you can draw or also glue a small propeller imitation. The video below shows how to make such a paper airplane with your own hands.
Your child will be delighted with such an aircraft! It can be a great idea for a gift or participation in the contest of crafts.
Original models
Paper crafts are available even to children, but they require adherence, patience and concentration. Here are some interesting models that will surely get involved in your child in this useful lesson:
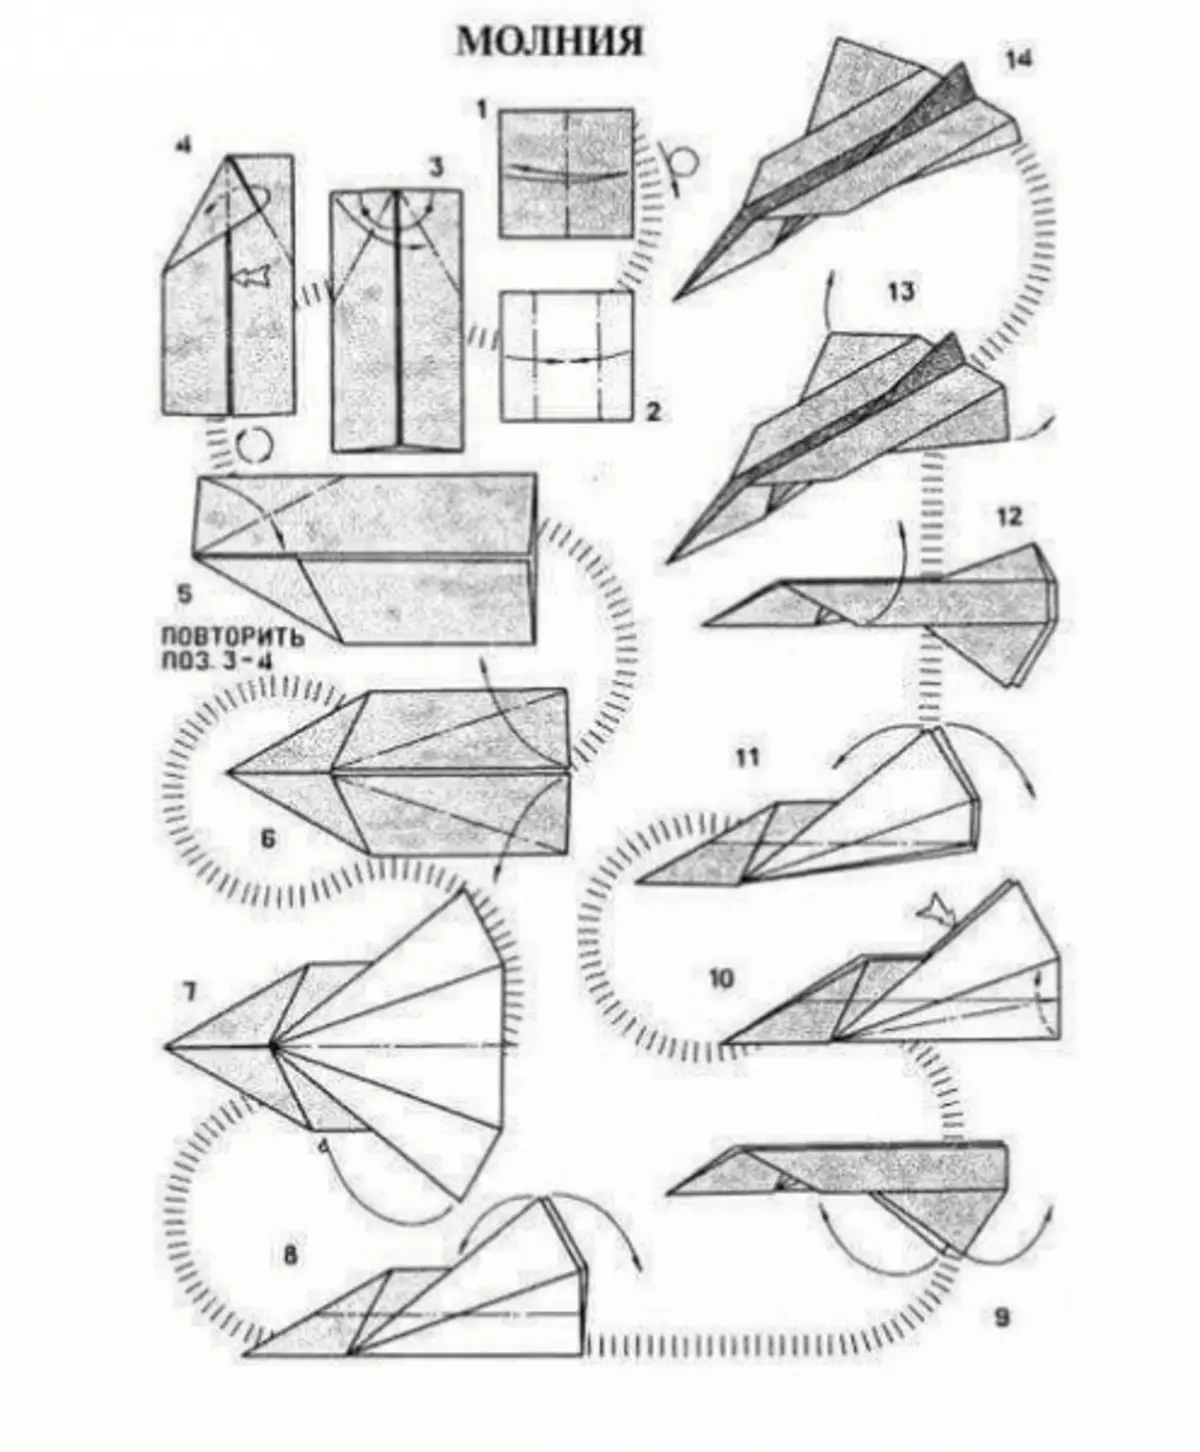
Paper lightning.
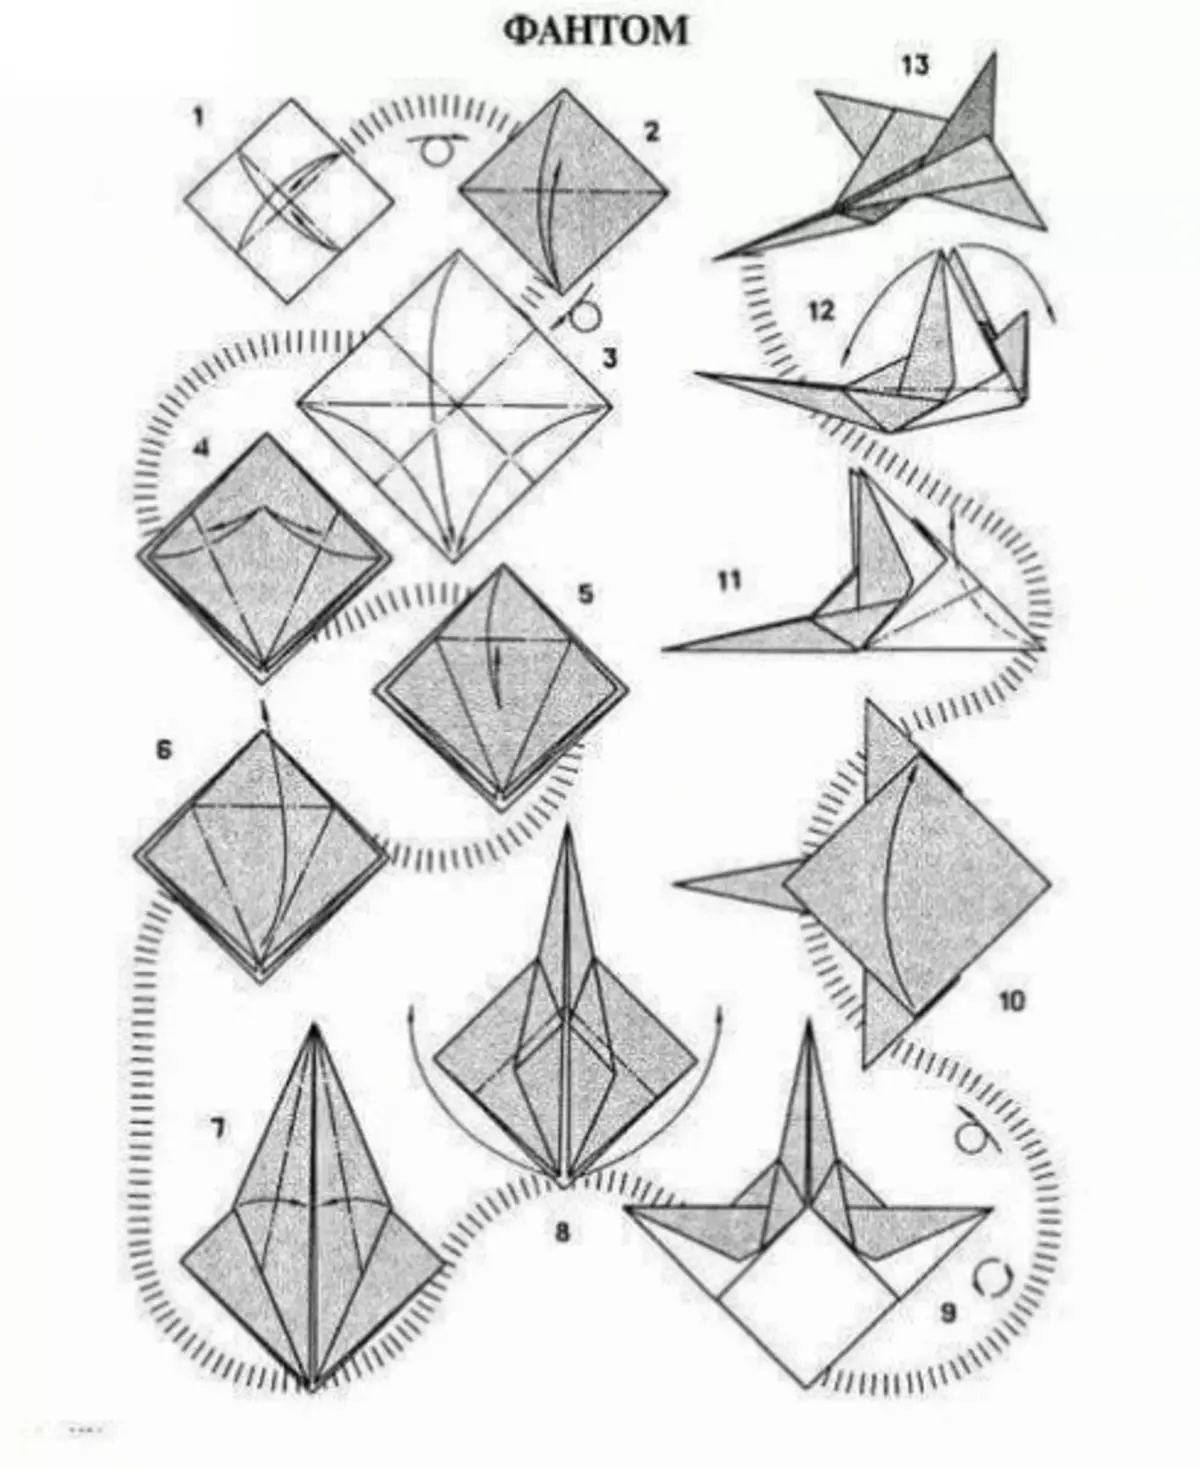
Unusual phantom.
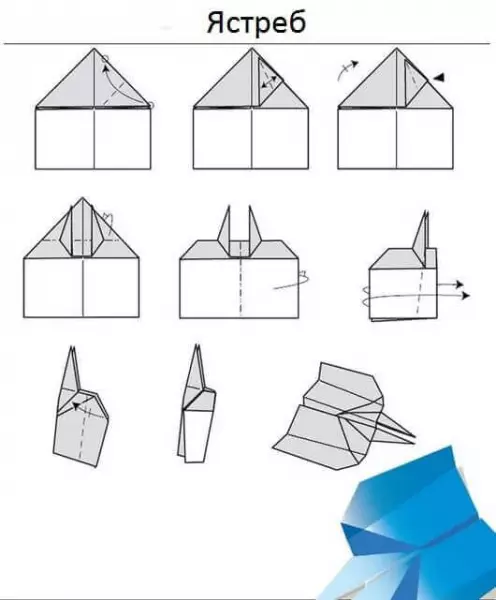
Swift hawk.
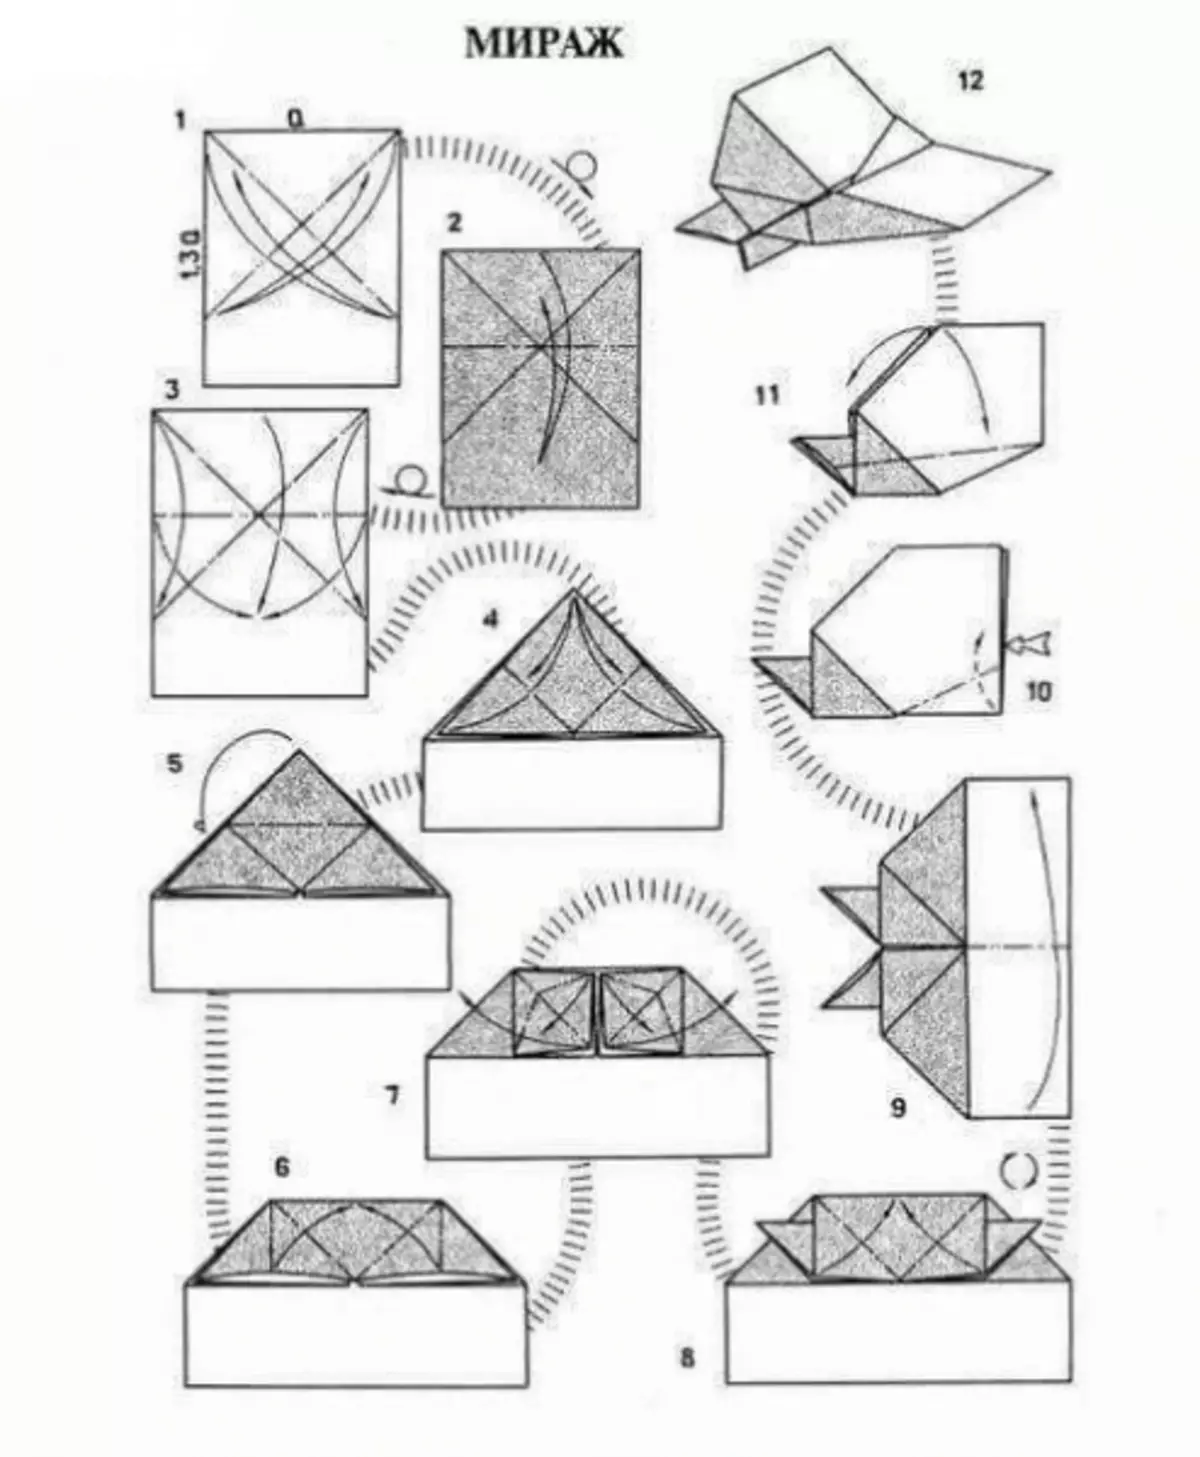
Sudden Mirage.
Fast arrow.
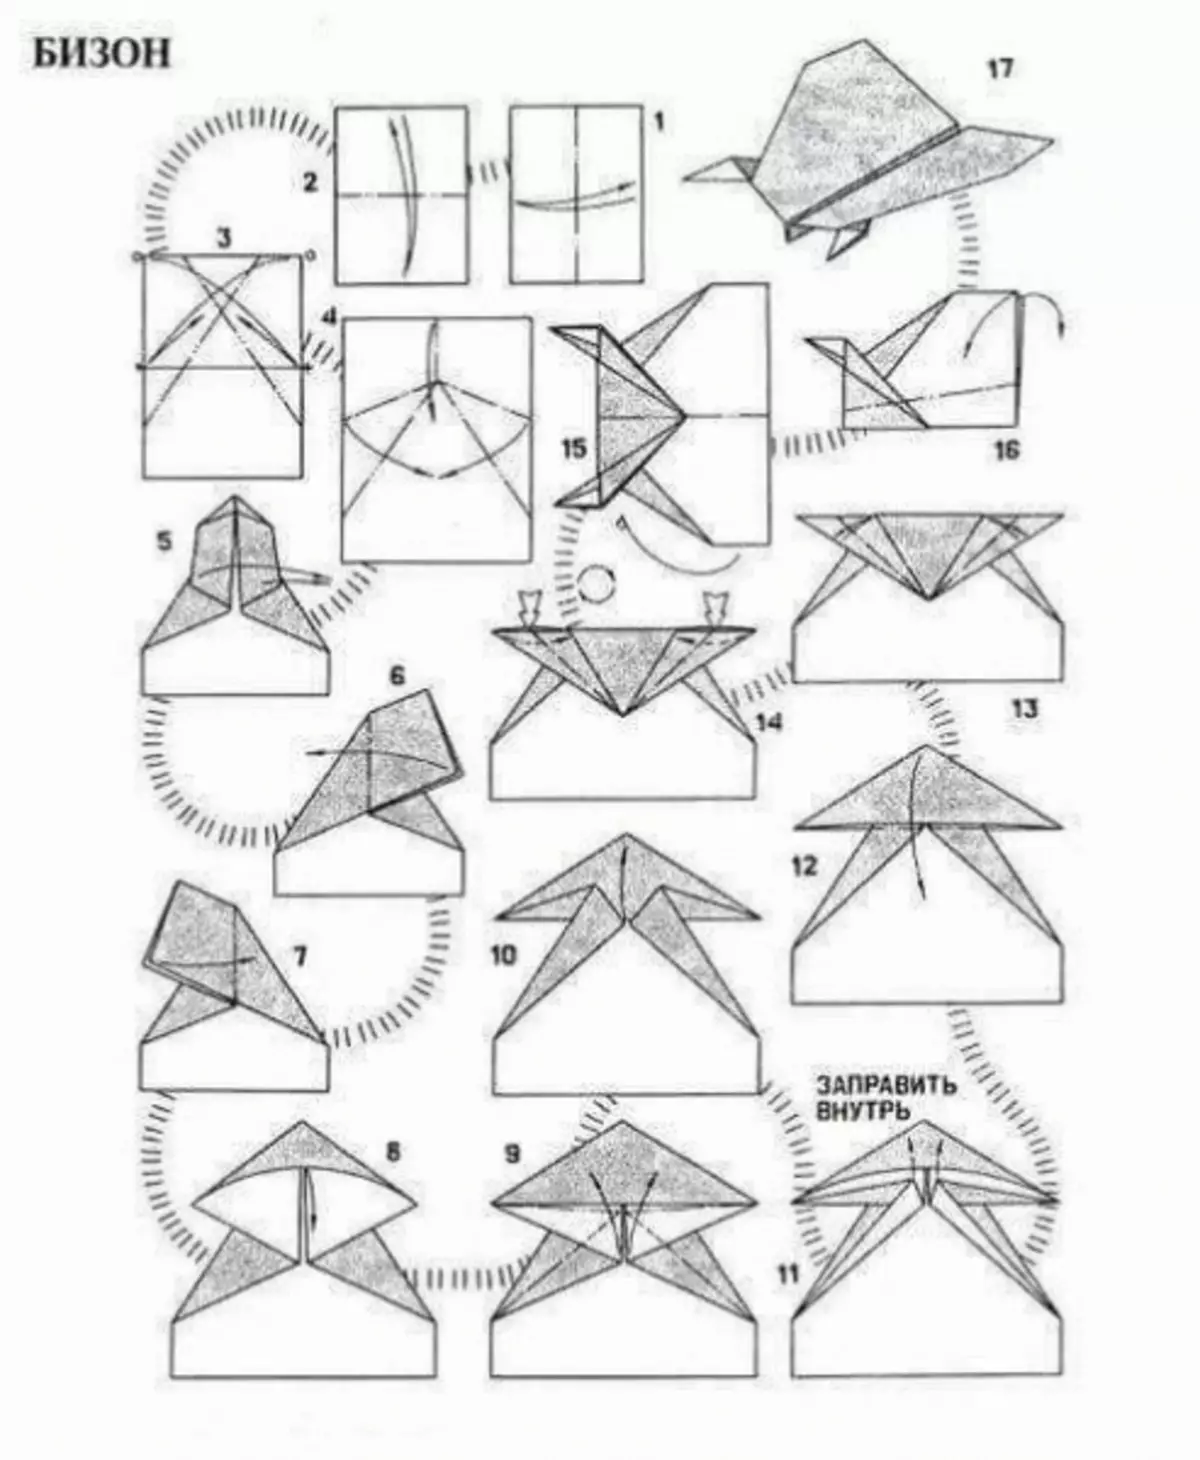
Model Bison. A rather time-consuming process of creating, but the result is worth it.
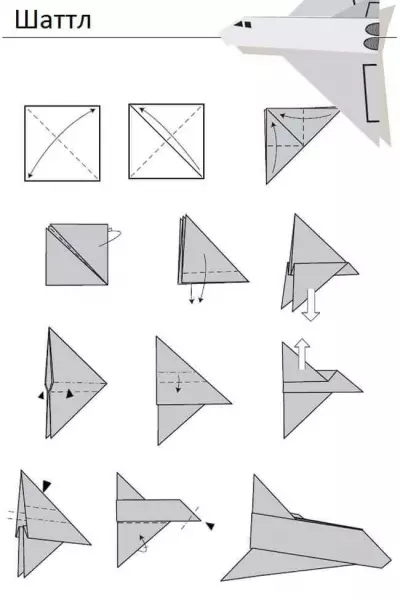
Present shuttle.
Ostropy heron.
Origami classes are undoubtedly very useful, so do not be afraid to spend pastime. So you can develop the dexterity of the hands, perfection and concentration of attention. At the same time, the sections of the brain responsible for spatial thinking and fantasy are also involved.
Take the basis of our schemes, photo insertion and video master classes and do not be afraid to experiment. Now you know how to make an airplane from a sheet of paper, and you can please your children with fresh and original ideas.
Article on the topic: Floor stencil - Moroccan pattern